Starting newer fridge smoker

  • Some of the links on this forum allow SMF, at no cost to you, to earn a small commission when you click through and make a purchase. Let me know if you have any questions about this.
SMF is reader-supported. When you buy through links on our site, we may earn an affiliate commission.

sgebbie

Newbie
Original poster
Feb 20, 2014
15
10
Hello!

So I'm new to the site and was drawn here by reading about converting a small fridge to an indoor smoker. I love smoked meats but honestly haven't done anything besides ribs on my outdoor smoker. I'd like to get into this pretty heavy but need a good indoor smoker to start with.

Here's the thread of the one I read about and would like to try and for the most part mirror. It was created by dcarch about half way down the page on the thread.

http://www.smokingmeatforums.com/t/123302/cold-smoker-with-working-mini-refrigerator

dcarch if you could chime in with any answers to questions that would be awesome.  This might start out kind of slow since I'm pretty newb to a lot of things related to smoking and don't actually have any of the parts for this on hand yet. Hopefully some computer / very minor electrical background will help some with this project.

I'll be starting literally at the very beginning and am going to be buying a 4.6 or 3.2 cu ft. fridge. Leaning towards the smaller since my space and budget for this is somewhat limited. Besides I can always upgrade to bigger and build another right? ha

So first question.. Would there really be much difference in going slightly smaller aside from space for meat limitations?

Short of searching the forums (will do that also), does anyone have any additional good resources to help with some things like:

Smoke generators

Small blowers - (where to get? - like the ones shown in the pictures in above thread)

Power this stuff would require and if possible tie to fridge power?

Understanding PID controllers and if one is necessary for proper functionality and where to start with making one?

What tools needed to cut into the actual fridge for making inlet / outlet

Some good reading about this kind of stuff will be super helpful while I wait for things to arrive.
 
Hi, Sgebbie,

The unique feature of my smoker is that it is an operating refrigerator also, which with a heater and a PID controller, I can hot smoke, cold smoke in any weather, and because it is indoors, i can smoke when it is 36" of snow outside.

A refrigerator is very well insulated, my heating element is just a 300 watt halogen light bulb, ($2.00).

For a smoke generator, with a variable air intake and a variable motorized blower to draw the smoke, the quality and quantity of smoke is totally controllable. I got my DC motor blower and a speed controller on ebay for about $15.00. The smoke generator burns pellets and wood chips, and takes seconds to light, and the burn never seem to go out because the air intake is constant. I have done 24 hour smokes regularly, the the flame did not need tending at all. Also it is very economical in pellet use. One cup is generally I use for even long smokes.

The long brass accordion connecting tube is able to condense and trap most of the creosol, therefore the smoke is very clean when it gets on the food.

Be very very careful cutting into the refrigerator walls. Some refrigerant coils may be buried inside the walls. I used a circular hole saw to cut the holes.

Good luck.

dcarch
Hey dcarch thanks for the reply!

What are your thoughts on the 3.2 vs. the 4.6? I know that using a smaller one the location of the coils might change a bit. I did read what you had said before about letting it run for a while to get a decent idea of what areas to avoid when cutting.

I am going to order the fridge this weekend. I'm also liking that Igloo offers a fridge with a dry erase door. You can write on the whole door which would be perfect for this. I'm sure someone else has done that already or maybe that would be a good idea that someone else could incorporate into a custom build since I know a lot of people are building these out of different types of things. Seems like a nice convenient way to keep track of what's going on in there.

Since you said this is still an operating refrigerator, I can potentially still keep some beers or sodas in there when I'm not smoking? That would be awesome!

So I know literally nothing about smoke generators aside from the concept which is pretty obvious.  Would you mind taking a semi close picture of yours so I have an idea of what it is and how it hooks up to things?  I was looking at the blowers on ebay already and will probably get a couple from there just not sure yet what sizes would be best.

Does the larger blower in your setup that purges the smoke out of the fridge force it through the outlet in the top of the fridge? That's the way it looked from the pictures but I couldn't tell for sure. Pretty sure the smaller one is kind of a reverse where it pulls the smoke from the generator and sends it into the fridge. Then you turn the valve to adjust the quality of smoke (more or less)  or turn it fully to block the path back up to the generator for when the larger manual blower is purging smoke out? Am I getting this or not even close? lol

What kind of sealing compound if you did use any to connect all of the piping or are the connections just tight enough to not have to mess with that? Also did you seal the pipe into the fridge?

Where did you get the creosol bottle? I could see myself spending too much time trying to find something like that lol

Thanks for the help! Hope I can eventually contribute some unique ideas after getting into this stuff a bit and learning a bit more.

Thanks for the help!
 
What are your thoughts on the 3.2 vs. the 4.6? I know that using a smaller one the location of the coils might change a bit. I did read what you had said before about letting it run for a while to get a decent idea of what areas to avoid when cutting.

4.6 cu ft is not very big. Big enough to be useful.

Since you said this is still an operating refrigerator, I can potentially still keep some beers or sodas in there when I'm not smoking? That would be awesome!

I also have a small muffin fan to keep smoke and temperature uniform inside.

So I know literally nothing about smoke generators aside from the concept which is pretty obvious.  Would you mind taking a semi close picture of yours so I have an idea of what it is and how it hooks up to things?  I was looking at the blowers on ebay already and will probably get a couple from there just not sure yet what sizes would be best.

Does the larger blower in your setup that purges the smoke out of the fridge force it through the outlet in the top of the fridge? That's the way it looked from the pictures but I couldn't tell for sure. Pretty sure the smaller one is kind of a reverse where it pulls the smoke from the generator and sends it into the fridge. Then you turn the valve to adjust the quality of smoke (more or less)  or turn it fully to block the path back up to the generator for when the larger manual blower is purging smoke out? Am I getting this or not even close? lol

The concept is simple for the smoke genrator. Have an adjustable size air intake for burning, and have an adjustable speed blower to pull smoke out to blow into the smoker. The exhaust fan cuts in by the cheap plastic valve you see which cuts out the smoke blower, when you want to purge smoke to outside thru the tube on the top.

What kind of sealing compound if you did use any to connect all of the piping or are the connections just tight enough to not have to mess with that? Also did you seal the pipe into the fridge?

Interestingly, the system is mostly negatively pressurized, so there is no need to seal. Many of the connections are just friction fit, they are very tight but can be taken apart without tools.

Where did you get the creosol bottle? I could see myself spending too much time trying to find something like that lol

I keep a lot of junk. It is from my junk pile.

Thanks for the help! Hope I can eventually contribute some unique ideas after getting into this stuff a bit and learning a bit more.

Thanks for the help!

dcarch

To Tjohnson, the AMNPs is a well designed smoke generator, which works for many smokers, but it will not work in the strange smoker I have constructed. The smoker I have configured is completely sealed with no air intake. 0 air for combustion.
 
Forgot to mention a couple of things:

1. If you are going to use a PID temperature controller to make this into a cold/hot smoker, you will need to bypass the refrigerator's thermostat, and let the PID controller to take over temperature control.

2. You must do the cutting outdoors, in case you cut a refrigerant tube by mistake.

BTW, you can also use this smoker for dry aging beef, proofing bread on the hottest summer day, etc.

dcarch
 
Last edited:
 
Forgot to mention a couple of things:

1. If you are going to use a PID temperature controller to make this into a cold/hot smoker, you will need to bypass the refrigerator's thermostat, and let the PID controller to take over temperature control.

2. You must do the cutting outdoors, in case you cut a refrigerant tube by mistake.

BTW, you can also use this smoker for dry aging beef, proofing bread on the hottest summer day, etc.

dcarch
Well I haven't looked into the PID temperature controller just yet but I would like to eventually figure out how all that works. On a scale of 1-10 for newbie difficulty where would you place creating and implementing one of those?

Also while I wait on the fridge I've been doing some research on smoke generators. I was curious before you replied about the one above that TJohnson posted about. Honestly that one looked pretty sweet to for a different application (thinking more outdoor smoking maybe)  but I think I am needing something more enclosed for this correct? I could always maybe try and enclose that one somehow.

I've been looking at some examples of using a venturi effect on an enclosed container with some copper or brass fittings. I'm not certain how I'm going to join stuff together yet since I know nothing about soldering copper pipe together or on to something else but at least the idea is making sense. YouTube, Google and searching this forum has been helpful so far. I read something about a different type of copper pipe connector called sharkbite. Looks much easier to join tubing but only downside is smallest I can get is 1/2" reduced to 3/8". Would that work or you think that size would be too big?

How hot does your smoke generator container get on the outside? Hot enough to worry about it catching something else on fire or not even close? Positioning the generator would be one of my main concerns for fire safety if it will potentially be running a decent amount of time unattended in the house.

I'm going to try something interesting that I haven't seen done yet for an enclosure. I'm not sure it will be large enough but it's a good start for an idea I suppose but my plan is to try using a ceramic beer stein to burn dust / chips in. The ceramic should hold up to the repeated heating literally forever I would think without ever compromising the structure of the container. Should hopefully  be able to drill it using a masonry drill bit carefully.

I should also be able to take advantage of the metal lid and modify it with a hole in the center for the T pipe. Lids on those things usually have a decent seal.  Attaching the T pipe to the lid should be fun since I don't know what the hell I'm doing LOL. If I can accomplish that maybe I can figure out the rest of the venturi setup with the copper pipe and reducer and whatnot.

I bought a nice stein on ebay today to do the experimenting with for like 8 dollars shipped so not a bad deal at all. Won't be out that much if this doesn't work out.

When I eventually get this thing completed the right way I think I'll have a lot to learn about what all it can be used for! Thank you for the additional ideas!

I will cut the fridge in the driveway in front of my garage and I'll probably go incredibly slow and pray that I don't get one of those lines. Would be frustrating to come up with money for another fridge!
 
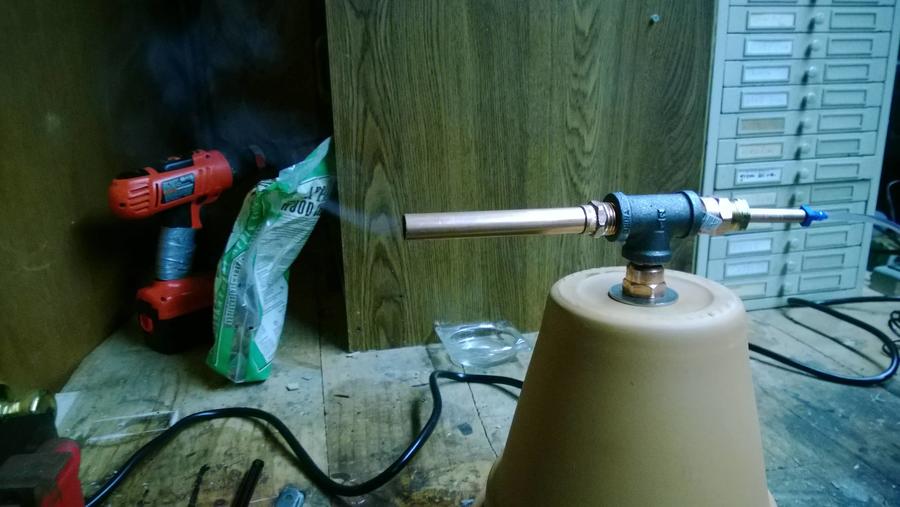
So I guess things are getting serious now lol. I've completed my smoke generator.. well 90% completed it. My original plan was to use a ceramic stein but I realized the pewter lid may contain lead and I found a nice large round tin in the meantime to play around with.

This can be done a lot cheaper using all copper if you are ready to do some soldering. I really didn't want to mess with soldering copper pipes together so I used a combination of brass (little more expensive) and copper parts.

So as it turns out, even supposedly Lead-free brass can still supposedly contain lead! I know galvanized is bad after everything I read but just kind of right now finding out that I might need to rethink the two brass pieces I used. Oh well... live and learn with this stuff I guess.

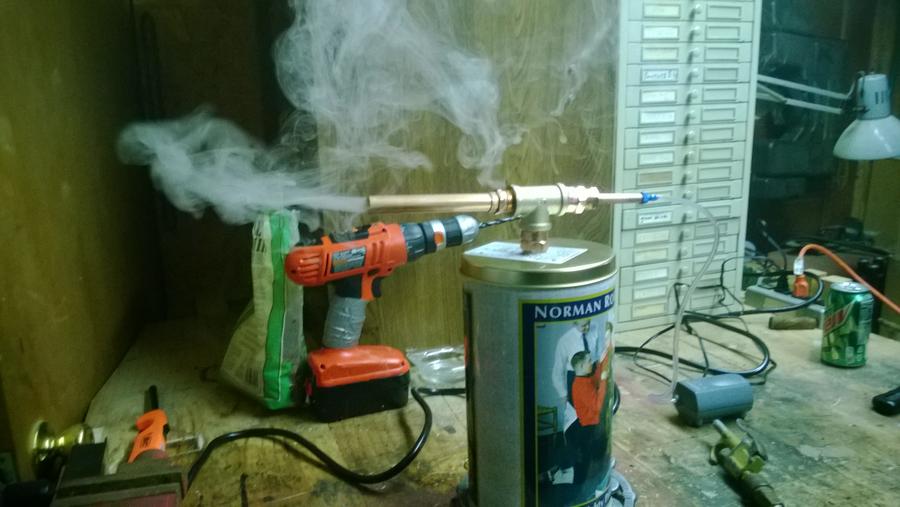
Here's a picture of it in action. Looks like I'll need to learn how to solder copper tube after all. Goodie. At least the concept of what I had set up worked good.

Couple questions for anyone who can help answer? Metals.. What metals are really safe? Only copper? Stainless steel? Black Steel? Iron? Still assuming lead-free brass and pewter are probably out.

My canister in the picture below works well but seeps smoke pretty good from the small I put in the bottom of the can. Holes too big? I know this probably won't be perfect with no smoke or smoldering or anything. Probably will always be a very small smoke seep?

This thing also was incredibly hard to light through the holes in the side. Once it got lit it seemed to go really well but got pretty hot and chips were actually catching on fire a little bit. What's the best way to keep them smoking good but avoid the flames?

What size pump does everyone else use with theirs and do you prefer chips or dust?

With a larger sized container how high up should it be filled with chips or dust? Seemed too many chips was kind of smothering it and not enough chips it was burning too hot but working better

.

 
good luck with this unit ......
i built a similar but larger model. wanted to get a longer burn. i used a variable speed aquarium pump and that really controlled the smoke perfectly. what i found was that the venturi system would creosote quite badly and i needed to burn it out with a torch every other use.

i ended up going to the mailbox mod with an AMNPS and never looked back.
 
 
So I guess things are getting serious now lol. I've completed my smoke generator.. well 90% completed it. My original plan was to use a ceramic stein but I realized the pewter lid may contain lead and I found a nice large round tin in the meantime to play around with.

This can be done a lot cheaper using all copper if you are ready to do some soldering. I really didn't want to mess with soldering copper pipes together so I used a combination of brass (little more expensive) and copper parts.

So as it turns out, even supposedly Lead-free brass can still supposedly contain lead! I know galvanized is bad after everything I read but just kind of right now finding out that I might need to rethink the two brass pieces I used. Oh well... live and learn with this stuff I guess.

Here's a picture of it in action. Looks like I'll need to learn how to solder copper tube after all. Goodie. At least the concept of what I had set up worked good.

Couple questions for anyone who can help answer? Metals.. What metals are really safe? Only copper? Stainless steel? Black Steel? Iron? Still assuming lead-free brass and pewter are probably out.

My canister in the picture below works well but seeps smoke pretty good from the small I put in the bottom of the can. Holes too big? I know this probably won't be perfect with no smoke or smoldering or anything. Probably will always be a very small smoke seep?

This thing also was incredibly hard to light through the holes in the side. Once it got lit it seemed to go really well but got pretty hot and chips were actually catching on fire a little bit. What's the best way to keep them smoking good but avoid the flames?

What size pump does everyone else use with theirs and do you prefer chips or dust?

With a larger sized container how high up should it be filled with chips or dust? Seemed too many chips was kind of smothering it and not enough chips it was burning too hot but working better

.

1. Aluminum is good, stainless steel very good (you can solder S. S. Good for cleaning also).

2. A variable speed blower to extract smoke and adjustable air intake will give you very good control of quality and quantity of smoke.

3. I have found bottom extraction of smoke is better. When you draw smoke from the top with bottom burn, creosol will condense on all the pellets above and gums up the pellets, then the built-up creosol gets burned and coats your food.

dcarch
I think I have my contraption figured out by replacing the brass T with a black steel one and replacing the bushing with a stainless steel. That should eliminate my lead-free 0.25% leaded brass heh. Don't think I can get the T in stainless unfortunately. Will black steel be ok? I had read somewhere that black steel should be safe.

Would you mind posting a picture of your smoke generator and the bottom extraction method rather than out the top? I would guess that you really need the blower to extract the smoke along with the variable speed pump to keep the smoke going where you want it as it naturally wants to rise?

Is the bottom extraction method you have going still a venturi type setup or is it different?

Do you get any excess smoke from your generator? Seeping out seals or cracks or hole or anything like that? I really don't mind if it seeps a little. It doesn't have to be airtight or anything just don't want to smoke up the house or set off smoke alarms.
 
So is anyone game for diving head first into a PID controller conversation? I see this being my hang up on this project. I'm pretty confident at this point I can finish out the actual smoke generator and the fridge the way I want it to be and to work properly but the PID controller is a whole different story. This may just end up being a flat out cold smoker rather than a hot / cold smoker with use of the PID like dcarch's design.

I've read a bit about the PID controllers and this sounds fairly complex and potentially dangerous if you mess up badly. I'm as good as anybody at following directions but really haven't worked a ton with electrical wiring. I understand the concept of what the PID controller is supposed to do, but how to make one or make it work with my fridge is going over my head so far.

Anyone ever made one that was as green as I am? Anyone really good with this kind of stuff that can explain it in terms a newbie would understand? What would a rough cost estimate be for making one of these from scratch?
 
OK so no takers on the PID LOL  OK back to the smoke generator again then, I can electrocute myself on video later on.

Originally I had done up a smoke generator above with an old popcorn tin and some pipe and stuff from the hardware store. This sort of half worked. It looked like crap and was flimsy and just didn't feel very durable at all. I was going to start over using a ceramic beer stein but that went south with possible pewter lid (contains lead) that I was going to cut a portion off the top. Also probably a tad small.

Here's smoke generator project number 2 and I'm super happy with how this turned out. I was able to use all but the container from the first one I made and only had to get one or two other parts. This is killer sturdy, safe for fire & keeps heat down, doesn't leak smoke really at all even with holes in the bottom and is just the right size.

I may need to slightly tweak the ventilation holes to increase air flow and smoke output a little  but I also need something better to light my fuel with (wood chips) or better fuel in general. Overall I thought this is pretty much exactly what I wanted to do and although my smoke kind of died out after about 15 min, this isn't bad for being nearly negative temperatures, no pre-drying of wood chips, no other fuel, only two small air holes in the bottom plate and only about a 1/8" clearance on the bottom where the cork feet are and a pretty cheap $6   Wal-Mart air pump with no variable speed.

Two video links here also. 


Last edited:
There is not much you need to do. Wire the power, the SSR relay (make sure the polarity is correct to the SSR) and heater, wire the type K sensor (be careful with correct polarity).

The diagram shows you how and where to connect.

TBSTBS
 
 
So is anyone game for diving head first into a PID controller conversation? I see this being my hang up on this project. I'm pretty confident at this point I can finish out the actual smoke generator and the fridge the way I want it to be and to work properly but the PID controller is a whole different story. This may just end up being a flat out cold smoker rather than a hot / cold smoker with use of the PID like dcarch's design.

I've read a bit about the PID controllers and this sounds fairly complex and potentially dangerous if you mess up badly. I'm as good as anybody at following directions but really haven't worked a ton with electrical wiring. I understand the concept of what the PID controller is supposed to do, but how to make one or make it work with my fridge is going over my head so far.

Anyone ever made one that was as green as I am? Anyone really good with this kind of stuff that can explain it in terms a newbie would understand? What would a rough cost estimate be for making one of these from scratch?
well if there are no takers on the PID query ill jump in.

http://www.auberins.com/index.php?main_page=product_info&cPath=14_28&products_id=381  

order one of these and decide how you want to mount it. I researched enough PID and pricing options and set ups that this is the way I think a guy should go. The most options and flexibility when it comes to controlling the whole smoking and cooking process. The same options this offers is well over $300. plus you have to  build it.

I called several companies looking for a PID that would let me connect 2 temp probes, ! for the house temp and the other for the food internal temp. None available, anywhere I could find. You need 2 separate PID controllers for that. And to get the internal food temp PID to control the ramping functions, or shut off the house temp control PID when a set internal temp is reached is damn near impossible to directions to do. I could find any help in doing so.

The Auberin's plug n play does all that and more.

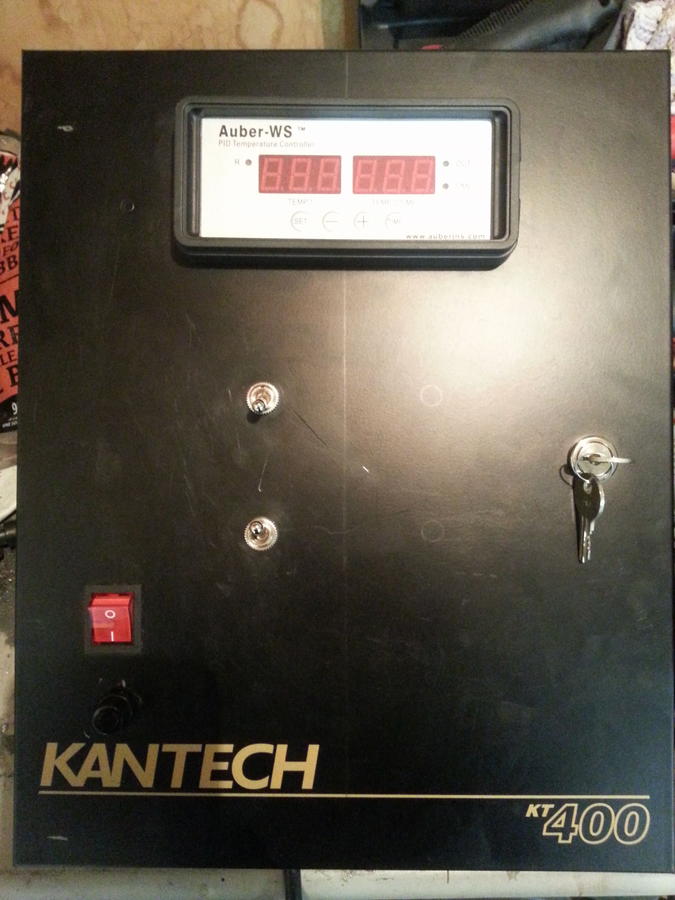
I am mounting my controller in a cheap control panel I found at a surplus store. Allows me to also add controls for convection fan, exhaust fan, the air pump for my smoker generator (like yours) and what ever else I want to add. wiring will be run through the cabinet outside the insulation to hide everything.

 
Last edited:
did you think about flipping the design of the smoker generator you built?

I found that if I didn't have a baffle inside with a mesh bottom the wood chips went out.

The baffle will allow them to slid down as they burn and the screen bottom allows ash to build up below the embers.

I used a 12" black chimney pipe with 2 end caps, wire mesh and a lid from a 100oz can of tomatoes. add pics when I have a chance. it works pretty good and stays going for hours now that i've tweeked it.
 
SmokingMeatForums.com is reader supported and as an Amazon Associate, we may earn commissions from qualifying purchases.

Latest posts

Hot Threads

Clicky