question regarding a double barrel wood smoker

  • Some of the links on this forum allow SMF, at no cost to you, to earn a small commission when you click through and make a purchase. Let me know if you have any questions about this.
SMF is reader-supported. When you buy through links on our site, we may earn an affiliate commission.
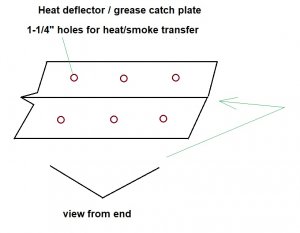
Looking Good.. where the main stack comes up into the CC , i would put a rack in rite there to hold a water pan, it can in turn catch any grease.. then for the sides, you can drill a hole in each big rib one on each side and put a drip pin and a aluminum can to catch grease from the sides...

alot of folks take some type of cooking oil or grease like Bacon grease and rub it all over the CC walls n grates etc. it helps keep it seasoned like a cast iron skillet... basically, it fights rust from forming..

if you can find some used fire brick for the FB and line the bottom where the main fire will be, that will help extend the life of the barrel 10 fold.. i use a old wood stove to fire my smoker with.. it has fire brick in it.. it helps alot
 
Update:

I had planned to do an initial burn-in yesterday, but it turns out that the new upper barrel is smaller at one end. My nice and square upper rack frame would not fit. I will be re-working that today.

Meanwhile, here is what it will look like after I can finally assemble everything.

The "V" shaped metal heat deflector plate will also serve as the grease catch. It is slopped towards the left side and exists that end of the upper barrel.
While you can't quite see it, there is enough space above the "V" area for the grease to drip out and into a container.

Regarding the heat deflector plate.... it's quite large and wide, and only offers heat/smoke transfer at each side of it.
I'm thinking about making six 1-1/4" holes in this (equal distance from V to edge) for better heat and smoke transfer.
Any thoughts on that?????


I built a second removable meat rack. Not sure if this is necessary.

I left some space between the fire bricks and the bottom of the grate. I like having some ash build up in that area...... I think that it will be just fine.

If all goes well today, I'll be building a burn-in fire later tonight.

inside views.jpg


Attachments

  • heat deflector grease catch plate.jpg
    heat deflector grease catch plate.jpg
    59 KB · Views: 1
Last edited:
Looks good, how are your temps across the top running ? Now, tell me a 55 gal drum smoker aint fun to build? easy to maintain and clean as the ends come off and you have all that room to work in...nice job
 
You fired it up yet?
Yes, one initial burn in fire as shown in post #24..... and a few more to come later this week!

Looks good, how are your temps across the top running ?
I varied the fire and both thermometers read close to the same temperature.
I'll be doing more burn in and further testing temps.


Now, tell me a 55 gal drum smoker aint fun to build?
Yes, it was fun to build!

easy to maintain and clean as the ends come off and you have all that room to work in...nice job
 
Update: I've now done two initial burn ins, and believe that she is just about ready for a test run. As suspected, a build up of ashes (under the metal grate and on top of the fire bricks) has made it easier to control and keep the wood burning.
I'm going to pick up some inexpensive carne asada (thin Mexican beef slices) for my first test run.

Meanwhile, I was given the remainder of a downed Cherry tree.
I spent a few hours cutting it up into short rounds and a few thin rounds from areas where I could not get into the longer ones.
The wood is still pretty green, however. It's is tough to split the larger rounds by hand, so my next move is to use my friends hydraulic wood splitter.

Here's a little trick that I taught myself years ago:
I use my chain saw for making wood shavings for smoking.
When cutting with the grain, the chain pulls out nice long shavings that work well on top of briquets and for the little electric smokers.
I drain out the regular chain oil. Then I put vegetable oil in my oil tank as to not contaminate the wood. It does not lubricate as well, so if you try this, plan on a little bit of bar and chain wear.

cherry wood.jpg


I'm able to hold around 200* if I keep the fire supplied and keep an eye on the air intake. I'm sure that after I do this several times, I'll get it dialed in!

I also found a miniature bucket for the grease catch.

second burn in.jpg


Last edited:
I'll be building a Hillbilly style file cabinet smoker next week.
Any thoughts re; how to proceed?

image0.jpeg


It's hard to imagine that anyone would build one of these!


.
 
This is what she looks like as of yesterday.

View attachment 407383


I ended up going with pneumatic tires on the one end of my platform, and just blocks at the other end. (hard caster wheels will not roll as smoothly as these will) I will probably make some type of handles for the blocked end. Basically, it would be moved similar to moving a wheel barrow.


I have yet to do and/or install:

.... a diverter plate just above the center flue. I plan to cut 1" spaced holes in it to allow the smoke to more evenly enter the smoke chamber.

.... grease catch system.

..... meat rack. I may do a second rack just above the main rack.

.... burn-in or smoke seasoning the interior.... perhaps 2 to 4 hours with wood fire. (all interior components have been sand-blasted clean of any paint)

Any other suggestions will be welcomed!

Rick E.
....
Hi this looks great!! How did you make out with cooking/smoking? What temperature ranges are you able to achieve with one flue going to the cooking chamber?

I'm picking up a few barrels today and want to start on my first build.

Thanks.
 
SmokingMeatForums.com is reader supported and as an Amazon Associate, we may earn commissions from qualifying purchases.

Hot Threads

Clicky