Question about heat element placement.

  • Some of the links on this forum allow SMF, at no cost to you, to earn a small commission when you click through and make a purchase. Let me know if you have any questions about this.
SmokingMeatForums.com is reader supported and as an Amazon Associate, we may earn commissions from qualifying purchases.
Thanks Jim.
I put the insulation in the roof today but it’s to cold to be out for a Texan.
I hope to do a test on the heating element soon.
 
The plan is to drill a hole through a 2x2 and run the cord through it to hold it over the middle of the firebrick.
I did plug in the element and it doesn’t get hot from the “plug” on the element to the stainless mounting clip.
I will wrap the “ plug” and cord with the 2000 degree insulation and hold together with high temp tape. All will be ran through the 2x2.
I will have to cut off the actual plug and reinstall after hiding the cord in the walls.
As always, I’m open to suggestions.
 

Attachments

  • EC786731-7CD4-4A1F-A707-78166CCCEC31.jpeg
    EC786731-7CD4-4A1F-A707-78166CCCEC31.jpeg
    86.1 KB · Views: 47
Got a little done today.
Didn’t like scabbing under the hinges but had to.
Insulated the fire box too.
 

Attachments

  • 3E13226B-3AE1-4E3C-AA96-F692FCC6A59C.jpeg
    3E13226B-3AE1-4E3C-AA96-F692FCC6A59C.jpeg
    106.3 KB · Views: 49
  • 02951BAE-79BB-46AC-B501-88D237B69CD3.jpeg
    02951BAE-79BB-46AC-B501-88D237B69CD3.jpeg
    127.7 KB · Views: 48
  • 627C772A-66A2-47E1-B766-1621076BDB2B.jpeg
    627C772A-66A2-47E1-B766-1621076BDB2B.jpeg
    179.8 KB · Views: 44
  • 7E331DAE-8C3D-4C1E-BF9B-E82BE19BD950.jpeg
    7E331DAE-8C3D-4C1E-BF9B-E82BE19BD950.jpeg
    140.9 KB · Views: 42
... hold it over the middle of the firebrick....
I'm a little late seeing this thread so I probably would have argued against the brick in the first place for a 1500W max heat source...it will just take too long to reach temp...but at least make sure you fashion a thin metal heat shield to go below between the element and the lower brick. This is very effective at reflecting the infrared radiation from the hot element back up to your meat. Two is better. Shiny side up, adding black paint on the bottom sides helps.

And you want to keep your smoker tube away from the element...a heat shield could help here too. As Dave noted last month, close to a heat source and it can burst into flames and you lose your smoke. If that were the only problem you could choke off some air flow around the tube and live with higher ambient heat. But the real problem here is your controller is switching your heat source between two extremes of fully on and fully off. That's a nice feature of electrical heating in terms of getting precise temperature control but it raises Cain with a smoke tube that closely sees the temp swings.

Lastly, I'll ask if your power is 15A or a 20A circuit. A 1500W filament is pushing the limits of a 15A...if there's anything else on that circuit you'll likely have trouble. If it's a 20A you have headroom and that's preferable. 20A should use 12AWG wiring and it looked like you might have that in the picture you posted. Also it looked like you were recently pulling wire here so you may appreciate a 2nd circuit out here. It's legal to bring out 220V 3-wire cabling (plus green ground) and split the phase between the upper and lower duplex plug, giving you two separate 120V circuits on your porch. That would allow you to add a 2nd 1500w filament if you find it's just taking too long to get up to temp. Note the 2nd element would only need to run during start-up so needn't be on your controller. I'd suggest just a simple count-down timer for it, should you need it. (or just wire it direct to a plug and remember to unplug and you get close to temp.)
 
Thanks for the great info Bill.
The brick is held in with a few screws so it can come out if need be. To be honest I’m tired of building around it.
The wire is 12 and the breaker is 20 amp. I wish I’d known about the 2 different circuits. That would have been awesome and doable I think. I’ve already ran conduit all the way to my breaker box though.
It is 15 “ from my smoke tube to the element. Think that’s far enough? And the temp probe will be in the top right per Auber Ins. Hopefully this will be far enough that the smoke tube won’t confuse the PID.
I will make a shield on your advice, thanks.
Don’t know what it will look like yet.
 
That looks like a great build.

You are going to love the Auber controller, You will have to set the relay action so that it is on for for each step of your cooking profile for smoke generator outlet to be able to run your fan.
 
  • Like
Reactions: texbowhunter316
The brick will be a heat sink. For long smokes, and once you figure out the tune, it will be a nice asset.
I bricked the floor of my propane heated smoker. Takes a bit for the heat to balance, but once there is nice to have. This is a great build, more involved than most, but will be worth it in the end. You will love it.
 
  • Like
Reactions: texbowhunter316
That looks like a great build.

You are going to love the Auber controller, You will have to set the relay action so that it is on for for each step of your cooking profile for smoke generator outlet to be able to run your fan.
Thanks kbarnes. It doesn’t show up on the app yet but I haven’t plugged the fan up. Hopefully it will show up when I do.
 
Thanks Edge. I have a time for each step when I smoke sausage. It will be nice to have it programmed and not use a stop watch.
May have to retuned like you said, I’m used to dealing with the temp swings and hope not to have as many.
 
  • Like
Reactions: SmokinEdge
Thanks kbarnes. It doesn’t show up on the app yet but I haven’t plugged the fan up. Hopefully it will show up when I do.
It is showing, its where it says RelayAction: Off. I am attaching pictures of yours and mine that I have set to be on. It is a bit complicated, but I would be glad to try to help you set it up when you get to that part if you want.

relay action.jpg Cold 2.jpg
 
  • Like
Reactions: texbowhunter316
Ohhhhhhhh.
I was looking in the cooking profile where you set the temp, time , food temp , etc.
I’ll check it out again.
I also can’t seem to get the app on my phone. Went on my iPad like a breeze!!!
 
I was also planning to put the heating element in the center. Does it need to go there? It would be easier to go closer to the back wall.
 
The Blackstone and Firedisc on the new part of the deck. I could only paint half of the deck because of the weather. Now to move the monstrosity and finish it in place.
 

Attachments

  • 8495BEDE-6813-45CE-A763-92A299E708E9.jpeg
    8495BEDE-6813-45CE-A763-92A299E708E9.jpeg
    154.9 KB · Views: 56
  • Like
Reactions: bill1
...I wish I’d known about the 2 different circuits. That would have been awesome and doable I think. I’ve already ran conduit all the way to my breaker box though.
It is 15 “ from my smoke tube to the element. Think that’s far enough? ...
1. Not sure where you're drawing your power from, but if from a panel or subpanel, and you have a spare circuit there that's the opposing phase of what you already have here, all you have to add is one more wire to that run. Maybe the conduit run is long and full of bends so this is too risky but maybe you could use one of the wires that's there to pull two new ones? Or pull a string with the 3 you have and then use the string to pull 4?
Unfortunately I see now in an earlier pic it's only 1/2" PVC conduit so you may be stuck with what you have. Although filling tables allow you to put EIGHT 12awg wires in there.

2. 15" spacing is fine. And if it does tend to catch fire, just put a little metal wall (shield) between it and the element. Unlike conductive or convective heat, radiant heat is line-of-sight only. So if you put the tube in the "shadow" of the element, it can't "see" it.
 
  • Like
Reactions: texbowhunter316
Thanks again Bill. Unfortunately I have (6) 90’s in the run. If it doesn’t work I will look into pulling another wire. I’d did look at the breaker after reading your post and I am using one “leg” of a double pole breaker spot. Sorry if I’m not using the correct terminology.
 
I was going to put the element here..... but....
 

Attachments

  • FD03A059-8B00-4D89-BDC6-EE03ACD752AB.jpeg
    FD03A059-8B00-4D89-BDC6-EE03ACD752AB.jpeg
    160.7 KB · Views: 53
..... may put it here just below the first pic on the +
 

Attachments

  • E5170158-616C-4649-87DF-CA1634D06443.jpeg
    E5170158-616C-4649-87DF-CA1634D06443.jpeg
    173.5 KB · Views: 55
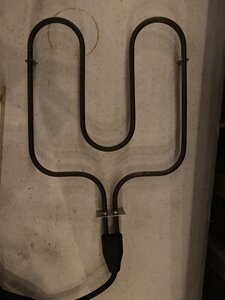
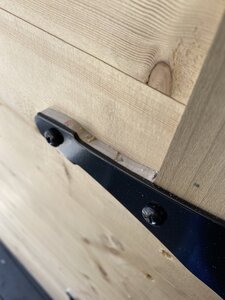
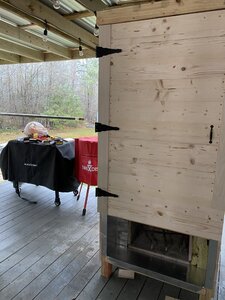
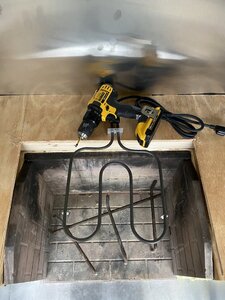
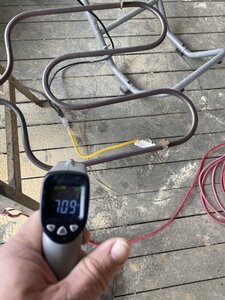
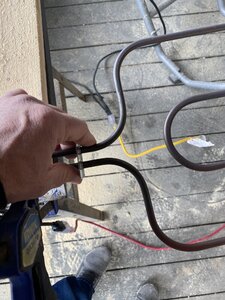
That little mounting plate/tab, where the two elements come back close to each other, is going to get hot. You can't let it touch wood, let alone mount it on wood. I'd say keep at least an inch spacing spacing from any wood, and even then the wood should have some steel sheeting on it to protect it.

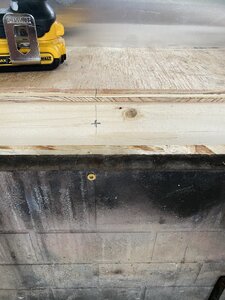
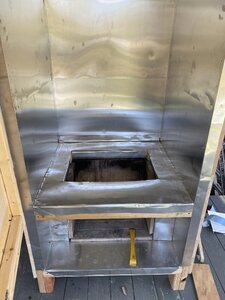
I like where you marked the X. That looks like a 2x4? I'd drill a 2-7/8 hole in it and push through a ~6" length of 2.5" EMT conduit. Make it protrude at least 2" into that squarish hole. Cut slots, ~.5" deep, on the inside of that EMT, at 11 o'clock, 1 o-clock, 5 & 7 o'clock. Feed the cord through from the inside, then bend the resulting tabs you cut in the conduit, inward at 90degreees, so you can attach that heating element mounting tab to it with 2 sheet metal screws. On the other (outside) end of the big conduit, keep the cord end centered by epoxying in some glass marbles or even just 3 appropriately-sized rocks. Stuff the remaining open area with some pulled-apart steel wool that will keep hot air from escaping while not offering a major conductive heat path.

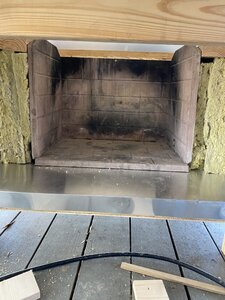
And by all means, get some sheet steel (roof flashing is cheap) to mount ~1" under the element to reflect the IR from the lower half of the element UP into the cooking chamber. As I said before, a shield under a shield is even more effective. Look at the catalytic converter on your car to get the idea.
 
Sounds like a plan Bill.
I may have trouble finding conduit that size but I’m on the hunt.
I did do a test this morning and the element did not get hot until after the two 90’s past the mounting tab. I sure time and radiant heat would get there.
I held it until I needed to takes pics. Guess a 3rd hand would help!!
 

Attachments

  • 031535BA-36D1-4BFF-9280-AC78D91FAC7D.jpeg
    031535BA-36D1-4BFF-9280-AC78D91FAC7D.jpeg
    231.4 KB · Views: 48
  • 71B01FAF-9C86-4E0F-98B2-698A8027CDE6.jpeg
    71B01FAF-9C86-4E0F-98B2-698A8027CDE6.jpeg
    156.1 KB · Views: 48
Last edited:
Middle deck skinned. I hate sheet metal. You can tell by the wrinkles.
Stainless mesh added to protect falling food.
I have to take it apart to incorporate Bill’s idea for the heating element.
Also the door doesn’t close properly with the metal facing. I’ll have to mill down the front 2x4 and may do away with the aluminum there. Getting a little frustrated here at the end.
 

Attachments

  • 4AE1121C-4B8A-4895-AFB4-F3C03753AB93.jpeg
    4AE1121C-4B8A-4895-AFB4-F3C03753AB93.jpeg
    119.8 KB · Views: 50
  • C6256A28-6313-4E8A-95F7-099DFCF0E808.jpeg
    C6256A28-6313-4E8A-95F7-099DFCF0E808.jpeg
    261 KB · Views: 40
SmokingMeatForums.com is reader supported and as an Amazon Associate, we may earn commissions from qualifying purchases.
Great deal on LEM Grinders!

Latest posts

Hot Threads

Clicky