newbies 1st rf smoker

  • Some of the links on this forum allow SMF, at no cost to you, to earn a small commission when you click through and make a purchase. Let me know if you have any questions about this.
SMF is reader-supported. When you buy through links on our site, we may earn an affiliate commission.

Old-Man-Matt

Newbie
Original poster
Dec 16, 2021
27
46
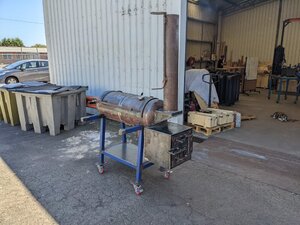
hi and welcome to what i hope will be a decent smoker build.
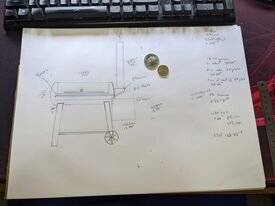
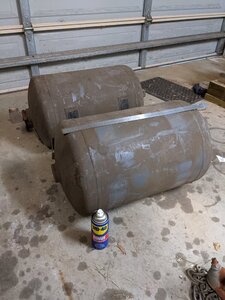
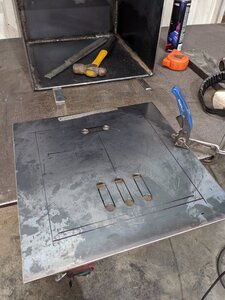
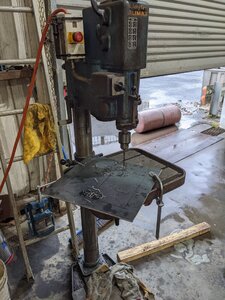
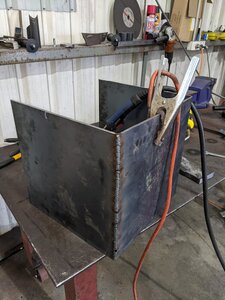
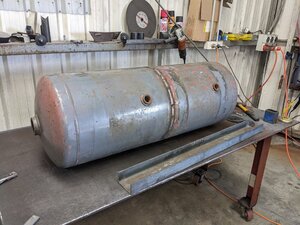
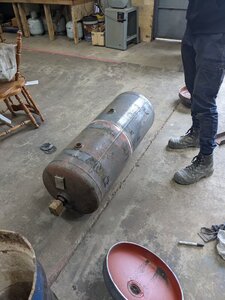
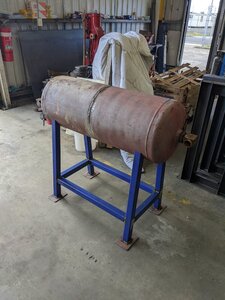
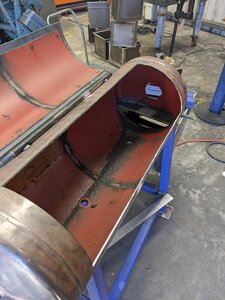
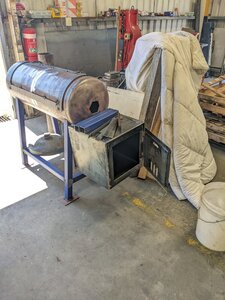
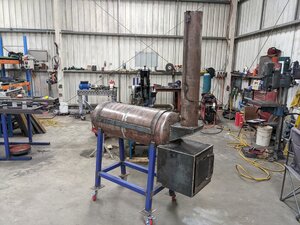
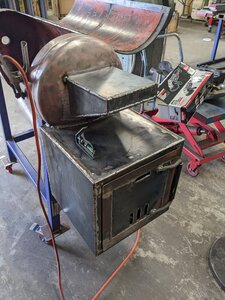
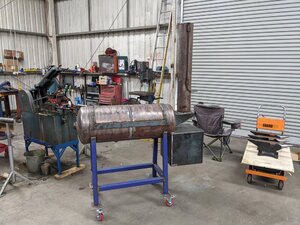
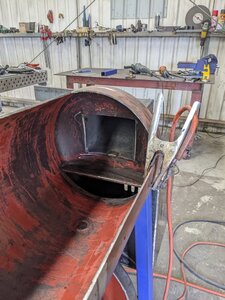
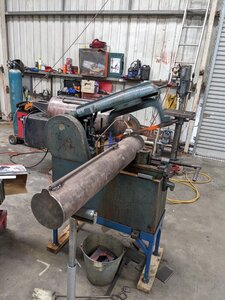
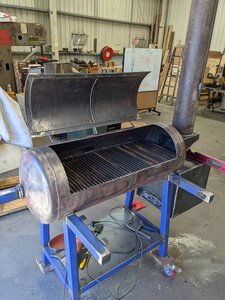
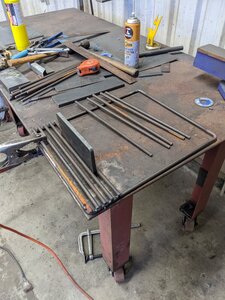
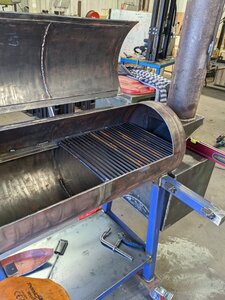
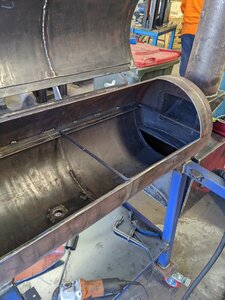
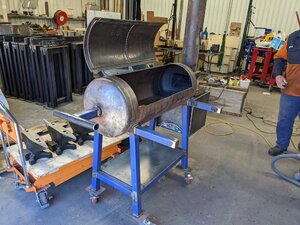
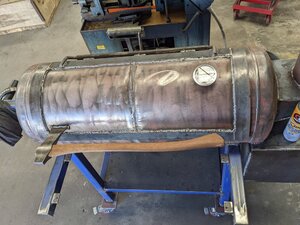
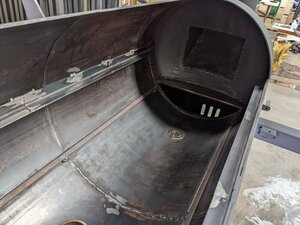
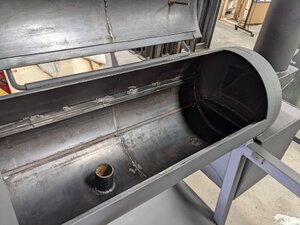
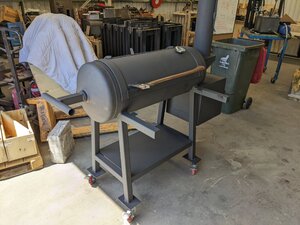
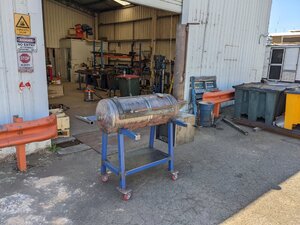
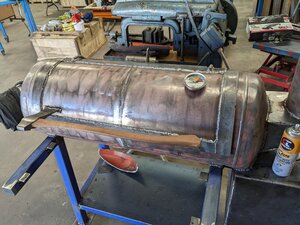
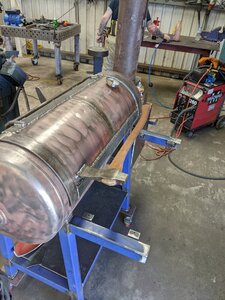
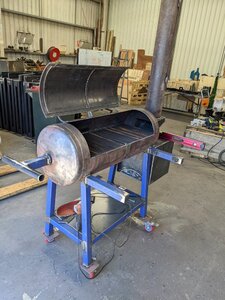
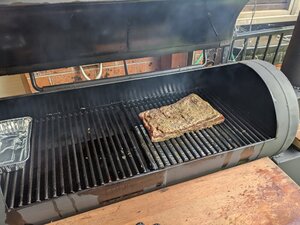
ill be joining these 2 15.7" dia tanks together to make a 33.25gallon cc, im a half decent welder and hobby blacksmith and knifemaker so im not new to metal work but new to smokers.
been looking at the rf calculations you champions have come up with and i think ive got this just about right. a couple questions for the hivemind though.
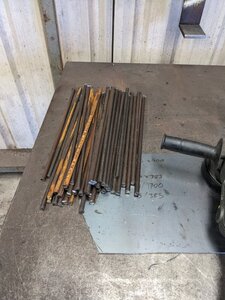
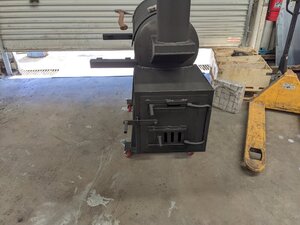
my non math brain is struggling with working out the correct stack size i think a 4"dia pipe at 32" above cc but i could be wrong?
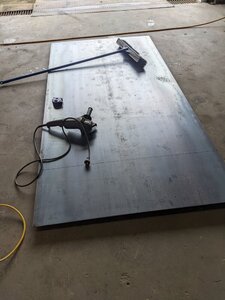
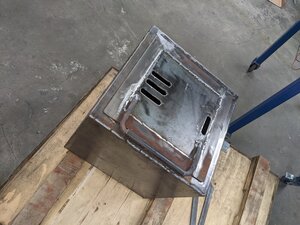
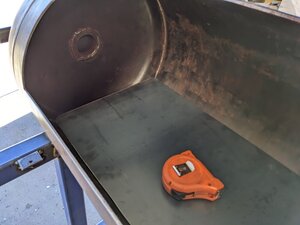
also how do you drain drippings from off of the rf plate i know on a standard offset you just tap the bottom and hang a bucket?
cheers for having a look guys let me know what you think.
ps i know a wider cc would be better but im working with what i could find without trying to get a shop to roll up a tube. most shops are shutting down now for xmas.
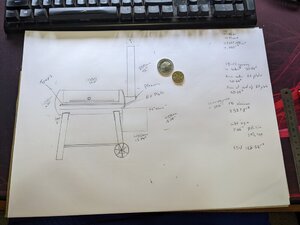
 

Attachments

  • smoker design 1.jpg
    smoker design 1.jpg
    8.9 KB · Views: 83
  • PXL_20211216_094433989.jpg
    PXL_20211216_094433989.jpg
    153.6 KB · Views: 87
  • Like
Reactions: OldSmoke
Hopefully daveomak daveomak will check out your thread and plans and give you any advice you need he's helped lots of members with their build plans and ideas
 
ill post a better pic of the design
 

Attachments

  • PXL_20211217_041921640.jpg
    PXL_20211217_041921640.jpg
    90.7 KB · Views: 73
got to work today with a mates help. we got the cc welded together and the firebox cut out and welded up, now onto vents and doors. the tanks are 4mm thick and the firebox is 5mm thick.
 

Attachments

  • PXL_20211219_055727927.jpg
    PXL_20211219_055727927.jpg
    170.2 KB · Views: 58
  • PXL_20211219_054321989.jpg
    PXL_20211219_054321989.jpg
    198.1 KB · Views: 45
  • PXL_20211219_024137603.jpg
    PXL_20211219_024137603.jpg
    150.7 KB · Views: 41
  • PXL_20211219_005128009.jpg
    PXL_20211219_005128009.jpg
    122.6 KB · Views: 43
  • PXL_20211219_003410125.jpg
    PXL_20211219_003410125.jpg
    174.3 KB · Views: 43
  • PXL_20211219_000327063.jpg
    PXL_20211219_000327063.jpg
    172 KB · Views: 48
today we got the door to the firebox cut and hinged and put together the frame. i found someone locally with a 4ft section of 6 inch pipe to use for the stack too so i have almost everything to finish off this build this week.
 

Attachments

  • PXL_20211220_061314183.jpg
    PXL_20211220_061314183.jpg
    157.1 KB · Views: 49
  • PXL_20211220_060301396.jpg
    PXL_20211220_060301396.jpg
    154.6 KB · Views: 48
  • PXL_20211220_055711876.jpg
    PXL_20211220_055711876.jpg
    171.9 KB · Views: 47
Got the door and firebox mounted
 

Attachments

  • PXL_20211221_042847791.jpg
    PXL_20211221_042847791.jpg
    158.4 KB · Views: 42
  • PXL_20211221_045729404.jpg
    PXL_20211221_045729404.jpg
    167.3 KB · Views: 44
  • Like
Reactions: jaxgatorz
Time to get stacked. I'm starting to worry about how lopsided the weight is to one side on this thing. I guess all the shelves and trays and internal stuff will put more weight directly over the wheels so that should help
 

Attachments

  • PXL_20211227_041113967.jpg
    PXL_20211227_041113967.jpg
    196.8 KB · Views: 39
  • PXL_20211227_004136986.jpg
    PXL_20211227_004136986.jpg
    190.3 KB · Views: 40
  • PXL_20211227_041105330.jpg
    PXL_20211227_041105330.jpg
    184.4 KB · Views: 37
  • PXL_20211227_004128978.jpg
    PXL_20211227_004128978.jpg
    174.1 KB · Views: 36
  • PXL_20211227_032101610.jpg
    PXL_20211227_032101610.jpg
    189.5 KB · Views: 38
got some more done the last 2 days. Fitted the removable RF plate, finished stripping the paint from the inside of the tanks, still need the remnants burnt out. Built the racks and fitted the angle to hold them. Also added some arms to support a wooden bench as well as added on a handle. All thats left is a latch a CC handle and some paint.
 

Attachments

  • PXL_20211230_033045232.jpg
    PXL_20211230_033045232.jpg
    198.5 KB · Views: 39
  • PXL_20211230_033040372.jpg
    PXL_20211230_033040372.jpg
    182.6 KB · Views: 39
  • PXL_20211230_033036163.jpg
    PXL_20211230_033036163.jpg
    183.3 KB · Views: 39
  • PXL_20211230_030038740.jpg
    PXL_20211230_030038740.jpg
    190.6 KB · Views: 38
  • PXL_20211230_023354009.jpg
    PXL_20211230_023354009.jpg
    194.7 KB · Views: 38
  • PXL_20211230_005647221.jpg
    PXL_20211230_005647221.jpg
    176.9 KB · Views: 38
  • PXL_20211230_005633829.jpg
    PXL_20211230_005633829.jpg
    182 KB · Views: 36
  • PXL_20211229_030621941.jpg
    PXL_20211229_030621941.jpg
    189.8 KB · Views: 39
  • PXL_20211229_030614827.jpg
    PXL_20211229_030614827.jpg
    76.4 KB · Views: 40
  • PXL_20211229_030610283.jpg
    PXL_20211229_030610283.jpg
    98.5 KB · Views: 48
Anyone else ever used a Damascus axe for a handle lol. I made the axe ages ago but it had cracks so wouldn't be good as a working axe.
 

Attachments

  • PXL_20211230_235052711.jpg
    PXL_20211230_235052711.jpg
    170.3 KB · Views: 41
  • Like
Reactions: bauchjw
Matt
I used a 3/16 thick piece of c-channel for my RF plate grease drain. I cant find the pix right now. I split the plate in half lengthwise. The c channel is cut in triangle...very thin at the firebox tapering to 2.5 inches at the other side. drilled a hole and welded in a piece of black pipe. Try to go large on pipe drain size. I used 3/4" and it stops up on cold days.

RG
 
  • Like
Reactions: Old-Man-Matt
Matt
I used a 3/16 thick piece of c-channel for my RF plate grease drain. I cant find the pix right now. I split the plate in half lengthwise. The c channel is cut in triangle...very thin at the firebox tapering to 2.5 inches at the other side. drilled a hole and welded in a piece of black pipe. Try to go large on pipe drain size. I used 3/4" and it stops up on cold days.

RG
thats a good idea. ive got my rf plate removable at the moment for just such modifications. im gonna run it with aluminium water trays ontop of the rf plate for the first couple fires just to test everything else first. being in australia cold weather is like 5 degrees celsius at coldest so shouldnt be a massive concern when i add a drain to it
 
  • Like
Reactions: radioguy
thats a good idea. ive got my rf plate removable at the moment for just such modifications. im gonna run it with aluminium water trays ontop of the rf plate for the first couple fires just to test everything else first. being in australia cold weather is like 5 degrees celsius at coldest so shouldnt be a massive concern when i add a drain to it

I found some photos. I thought about leaving the plate un-welded, but you must have a good seal for good air flow and heat transfer. I beveled the edge of my 1/4" plate and welded in some pieces 1/2" x 1/2" angle iron just below it. Just a few pieces to help line up the plate. I had a 1/4" overlap RF plate to drain channel. I also but a small lip (stop) at the end of the RF plate opposite the firebox.

Your build is looking good. Wont be too long before you are smoking some good eats.

RG
2018-01-09-19.26.51.jpg 2018-01-09-19.27.13.jpg 2018-01-09-20.05.39.jpg 2018-01-09-20.06.07.jpg
 
  • Like
Reactions: bauchjw
the day before yesterday i did a small burn in it to check for any major problems and it seemed all good bar a few tweaks.today i got a drain in the rf plate done. gutter to come in future as i didnt have any good stock for it.
i got the oxy torch out and blasted all the remnants inside the cookchamber before letting it cool and hitting it with a scourer and soapy water. ive also got the grills in a tub of vinegar over night to take off any rust.
last thing i did today was get some cans of high temp black paint and spray it. hopefully ill have it on a trailer tomorrow to come home for its first serious burn and oil the inside of the chamber.
last thing i need to do as well is put on the wooden shelf.
 

Attachments

  • PXL_20220102_042015421.jpg
    PXL_20220102_042015421.jpg
    112 KB · Views: 33
  • PXL_20220102_040256250.jpg
    PXL_20220102_040256250.jpg
    146.1 KB · Views: 35
  • PXL_20220102_040250312.jpg
    PXL_20220102_040250312.jpg
    146.3 KB · Views: 36
  • PXL_20220102_040225977.jpg
    PXL_20220102_040225977.jpg
    133.5 KB · Views: 37
  • PXL_20220102_040219968.jpg
    PXL_20220102_040219968.jpg
    156.4 KB · Views: 37
  • PXL_20220102_040138151.jpg
    PXL_20220102_040138151.jpg
    157 KB · Views: 34
  • PXL_20220102_040131646.jpg
    PXL_20220102_040131646.jpg
    148.9 KB · Views: 34
  • PXL_20211231_001130138.jpg
    PXL_20211231_001130138.jpg
    180.7 KB · Views: 33
  • PXL_20211231_001121271.jpg
    PXL_20211231_001121271.jpg
    191.8 KB · Views: 30
  • PXL_20211230_235052711.jpg
    PXL_20211230_235052711.jpg
    170.3 KB · Views: 31
  • PXL_20211230_235049241.jpg
    PXL_20211230_235049241.jpg
    182.8 KB · Views: 31
  • PXL_20211230_235035108.jpg
    PXL_20211230_235035108.jpg
    188.6 KB · Views: 32
  • PXL_20211230_033040372.jpg
    PXL_20211230_033040372.jpg
    182.6 KB · Views: 34
This is looking GREAT...

I also left my RF plates loose (not welded in) ... As for any gaps/cracks in it... I don't see where they would create any problems as small as any of them would be... They will get covered up with seasoning (drippings) ... I left them loose for a couple of reasons... One for cleaning underneath it... Two for removing it and putting in a piece of expanded metal so I can use it as a grill (although I haven't tried it that way yet) ...
 
  • Like
Reactions: Old-Man-Matt
get the heavy bastard home and seasoned it yesterday. today i got some beef short ribs and did a spog dry rub. tomorrow will be the first cook.
 

Attachments

  • PXL_20220104_090051273.jpg
    PXL_20220104_090051273.jpg
    207.1 KB · Views: 33
  • PXL_20220104_085921300.jpg
    PXL_20220104_085921300.jpg
    184.9 KB · Views: 37
  • PXL_20220103_041203427.jpg
    PXL_20220103_041203427.jpg
    184.7 KB · Views: 41
3 hours in and I just gave it a wrap of butchers paper. I found it hard to maintain a good temp at first but after 2 hours the coal bed was stable and temp was a lot easier to maintain. I’ve also thrown on some thick slices of Christmas ham on for about an hour just to see what would happe, was delicious.
 
  • Like
Reactions: Ringer and bauchjw
3 hours in and I just gave it a wrap of butchers paper. I found it hard to maintain a good temp at first but after 2 hours the coal bed was stable and temp was a lot easier to maintain. I’ve also thrown on some thick slices of Christmas ham on for about an hour just to see what would happe, was delicious.
That is awesome, this has to feel very satisfying to get your first cook going! Amazing work and discipline. Can wait to see some pics of the meat!!!
 
the flavor was awesome. good smoke ring
at hour 7 i un wrapped it and basted with bbq sauce for another 25 before resting for half an hour in paper.
so damn worth it i loved it although it stalled at 165 and i should have left it on for another hour or two i was getting hungry
 

Attachments

  • PXL_20220105_085934621.jpg
    PXL_20220105_085934621.jpg
    210.8 KB · Views: 32
  • PXL_20220105_085644588.jpg
    PXL_20220105_085644588.jpg
    177.8 KB · Views: 32
  • PXL_20220105_085606893.jpg
    PXL_20220105_085606893.jpg
    195.9 KB · Views: 28
  • PXL_20220105_084611365.jpg
    PXL_20220105_084611365.jpg
    157.8 KB · Views: 25
  • PXL_20220105_083305117.jpg
    PXL_20220105_083305117.jpg
    165.7 KB · Views: 25
  • PXL_20220105_082217382.jpg
    PXL_20220105_082217382.jpg
    207.1 KB · Views: 24
  • PXL_20220105_025328530.jpg
    PXL_20220105_025328530.jpg
    192.6 KB · Views: 23
  • PXL_20220105_001441876.jpg
    PXL_20220105_001441876.jpg
    165.1 KB · Views: 29
  • Like
  • Love
Reactions: iowatt and bauchjw
SmokingMeatForums.com is reader supported and as an Amazon Associate, we may earn commissions from qualifying purchases.

Latest posts

Hot Threads

Clicky