MES Rewire Simple Guide - No Back Removal Needed!!!

  • Some of the links on this forum allow SMF, at no cost to you, to earn a small commission when you click through and make a purchase. Let me know if you have any questions about this.
SMF is reader-supported. When you buy through links on our site, we may earn an affiliate commission.
I think this is a closer picture .
View attachment 718180
I came off the mailbox with 4" . You want the pressure inside the mailbox to be higher than the pressure of the flow / path . That's the reason for the 4" , and it's used to help start the flow of the smoke . The flow will naturally migrate from high pressure to low pressure .
Also , I used a start collar / standing collar coming off the mailbox . It has a shoulder on it , and the fingers bend on the inside and are not visible . I personally like to keep it " clean " . No fingers or tape on the outside . After the run ( horizontal ) , I necked down to 3" for the rise ( vertical ) . This causes a " choke point " of sorts and keeps the solids / condensate out of the smoker .
I have mine dialed in . No trouble with smoke flow .
View attachment 718181
WOW! Yeah that's definitely dialed in. I'll be working on this soon, thank you for the details and pics!
 
Testing the Auber. This thing is amazing, you guys were right. The wifi got a little hit or miss for a bit, but it's back on track now. 2 slabs of ribs tomorrow for the *first smoke.
20250517_160721.jpg

20250517_162509.jpg
Screenshot_20250517_162904.jpg
 
  • Like
Reactions: tallbm
One last question. If I understand correctly, it looks like I can create custom programs right? For example:
Set the smoker to 275, then when the food probe reads 160 drop the smoker temp to 180 for 4 hours. Or whatever you want?
 
It's lookin good, how's it workin?
I haven't had a chance to fire it up yet... right after I finished we had some people over and I grilled a bunch of burgers/brats. Have to eat that up before I make anything else.
The parts I needed weren't supposed to be here until the 27th so it wasn't in any of my weekend plans haha.

I did drill through a wire on the top when installing the exhaust, but it was super small. I'm guessing it was either to the controls or an internal light. Both of which I don't care about.
Yeah it's no issue since you've completed the rewire for it to work with a PID. You are correct the wire would be a tiny one going to the controller or slightly bigger one going to the bulb. None of that is wired up after the rewire was performed. Power is now going from the MES cord to the heating element with the high temp safety limit switch in the wiring and that is all :D
 
  • Like
Reactions: moussaka
I also don't know if there is a prescribed way to add a top exhaust, but I 'sealed' the foam insulation with a layer of high heat silicone and put foil duct tape over that. I wasn't sure if I had to do any of it, but figured it couldn't hurt.
 
I also don't know if there is a prescribed way to add a top exhaust, but I 'sealed' the foam insulation with a layer of high heat silicone and put foil duct tape over that. I wasn't sure if I had to do any of it, but figured it couldn't hurt.
That's exactly what I would have done. High temp food safe RTV silicon to seal and foil flue tape!

When I have to replace any foam insulation I have removed, I replaced with high temp fiberglass fire place insulation that I just lay and push into place. It will not burn up or melt down in any way in the smoker. It is not rigid but it does the job for insulating when I've had to remove any significant amount of insulation in the past.
 
  • Like
Reactions: moussaka
One more random question... what's the highest temp these things can run at? I did replace the thermal safety switch with a ~350° one, but I'm not sure if these were actually made to run up to that temp or anything close.
 
One more random question... what's the highest temp these things can run at? I did replace the thermal safety switch with a ~350° one, but I'm not sure if these were actually made to run up to that temp or anything close.
Generally speaking the design of the MES doesn't really allow for temps above 275 but with the higher limit switch you can run at say 325 for an hour or two but I wouldn't push it to much past that.
 
  • Like
Reactions: tallbm and moussaka
One more random question... what's the highest temp these things can run at? I did replace the thermal safety switch with a ~350° one, but I'm not sure if these were actually made to run up to that temp or anything close.
The foam spray insulation is not really rated to be working continuously over 300-325F from what I found in the past BUT, I run 325F for NO MORE than 4 hours when I do chicken or turkey smokes so I can get edible skin.
That is the only time I run over 275F and again I never run it at 325F for more than 4 hours. Never had an issue doing so.

My temp probe is clipped under the bottom rack dead center via an alligator clip. I find this to be the most responsive spot in my smoker since I have all the stuff over the heating element removed and I flipped my heating element to be more centered.
 
  • Like
Reactions: moussaka
Forgot I got a new phone so my auber wasn't showing up in the app. Did a factory reset cause I'm an idiot and had to reconfigure it lol. Oh well. Almost 2 hours into the first cook and it's going smooth. Just trying some country style pork ribs for an easy test.
1000001093.png
 
Forgot I got a new phone so my auber wasn't showing up in the app. Did a factory reset cause I'm an idiot and had to reconfigure it lol. Oh well. Almost 2 hours into the first cook and it's going smooth. Just trying some country style pork ribs for an easy test. View attachment 719303

Oh man that is looking nice and steady! Can't wait to see how it all comes out and then hear how you feel about it once it's done :D
 
Oh man that is looking nice and steady! Can't wait to see how it all comes out and then hear how you feel about it once it's done :D
🤣
About 3 hours in I noticed the meat had stalled around 105. Thought that was odd. I turned the smoker up to 250. Another hour, not much progress.
At the moment, I don't have a true multi-probe setup. I have both air and food for the auber and my chef alarm (that can only be used one at a time). I plugged in my air probe on the chef alarm and quickly realized I had it and the auber locations swapped. So, the auber was closer to the element and the non-important one was closer to the food. This obviously resulted in the smoker running at a cooler temp at the food than I wanted.
I wrapped everything up and finished in the oven. At least it's edible - not succulent and tender though lmao.

That said, smoke flowed great. I filled the tube a little over half and it smoked for just over 4 hours. I learned a lot. This is why I started with a cheaper cut. I knew it wasn't going to be all roses. Definitely much easier than smoking on my dad's WSM though. Basically set it and forget it.
Good report back.
As with any system there will be the tuning and learning and a rewired MES is not an exception to that rule.
I think once you get your probes all sorted out you will good to go.

My probe setup is that I have my auber probe on the UNDER side of the lowest smoker rack placed center of the rack via a probe alligator clip. This gives me the fastest response times.
I then have a probe on the lowest rack in the back left corner and one under the lowest rack on the front right corner.
My element is flipped and exposed and my MES vent is back right corner at the top of the MES. The flipped element makes the left side of my smoker hotter than the right side.
Those 3 probes give me the full range of temp across my lowest rack.

I use 3 probes for rack/smoker temp and then 2-3 more probes for Internal Temp (IT) of the meat, depending on how big the meat is, how much meat is in there, and how many racks I'm using.

As you can see having your PID probes and a separate 4probe wireless thermometer can give you about all the temp data and flexibility you need.

I also took a sheet of untreated birch wood and cut a rectangle out that fits on TOP of my MES wire rack holders. This way If I'm only using 1 or 2 racks (I always go bottom up) I can set the sheet of wood on the next highest rack holders above the meat and it traps the heat in pretty well instead of letting it just fly right to the vent. This simple space limiting modification really helps keep consistent heat trapped in the areas the meat is in.

Anyhow, you see how my setup is configured and tweaked to work with a PID controller and I'm positive others have their own unique methods as well but we all can speak to great success and ease of use once we fiddled with our systems and using a PID.

Also, country style pork ribs, pork ribs in general, and pork butts wont care what temp you are cooking them at as long as you aren't burning them or the sugars in your rub (if you use sugar, I dont). So feel free to crank up the heat on those suckers :D
You are super close to being set and forget and satisfied. I can't wait to see how quickly things evolve and hear about the good food you end up making :D
I was going to ask how in the world you're getting accurate temps where the food is if your probe is right above the element. But the wood sheet kind of answered that, I guess. That's actually what my problem was - my probe was on the bottom rack, but by my meat was in the middle and ~50f less. I didn't flip my element, but I did put an exhaust dead center on the top and it was wide open the whole time. Maybe I should try half open?
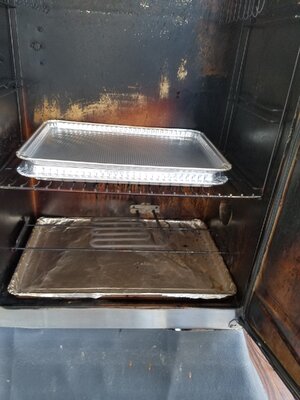
Do you put a drip tray above or below your element? I had a tray on the bottom most rack with the probe underneath. Maybe the tray was reflecting heat back on the probe?
Where ever your Ambient probe is, it changes the variables on the PID from the other area you've tried. So the higher in a Mes 40 on the second rack from the top (my go to rack), clipped near the food on that rack, I need the fastest response when running 265+ which is my butts, briskets and ribs so I'm in Auber's P mode P=1, I=0 and D=0 with no overshoot with meat inside the smoker. It's full power until 1/2 degree below set temp, then flashing 50% power until set temp and off at set temp but on the down swing is where you need this fastest 50% flashing power to keep from dropping 5 degrees+ below set point for recovery . Every cycle gets tighter until holding to the degree as meat is half way cooked. Also, No waiting over an hour to get to set temp with a load of meat right after it's put in the smoker when in cold weather, being full power to the set temp, as with other settings that come out of full power flashing the open/closed circuit many degrees below set temp. With Mes 40 size, open top vent, mailbox mod, measuring ambient temp next to your food or between racks with multi rack smokes I keep going back to Auber's P mode in their manual instructions. I use the top rack to hang/manage probe cables and for dishes or smoke a pizza for 15 minutes before fully cooking it or just letting it ride until done. Bottom rack has an aluminum disposable baking sheet as a drip pan on it over the open flipped element. Slide it a half rung left or right front or back to find your even heating on the middle two cooking racks. Since this pic I've ditched the double pan insulating bottom two pans and went with the bigger $1.25 Dollar Tree Disposable pan directly on the bottom with foil in it to pitch burnt food on the foil and drain fat and reline the baking sheet for several uses. The baking sheet in the pic are now disposable bottom grease pans for the Mes 30 and Dollar Tree rectangular disposable cake pans slide right where the oval oem pan went.

269.jpg
 
  • Like
Reactions: tallbm
SmokingMeatForums.com is reader supported and as an Amazon Associate, we may earn commissions from qualifying purchases.

Latest posts

Hot Threads

Clicky