n4ynu
Meat Mopper
Ok, like I had said previously, I saw the need in a few areas where having a little more "Exhaust" Vent might be good, so found the Stack I wanted and went from there, the following is the info on the Smoke Stack :
The Part is from a Master Forge Grill that Lowes sold, I do not see them at the Lowes here but they may be sold elsewhere for all I know.............
Smoke Stack Info (MOD)
Master Forge 50.2-in 20 lb Cylinder Electronic Ignition Gas Vertical Smoker
Item # 190449 Model # MFY784CDP
Made by Lowes:
For replacement parts, call our customer service department at 1-800-963-0211, tell them you need a "Smoke Stack" , give them the Model, Payment info and your done, it was $11.99 to my door.
Monday – Thursday, 8:00 a.m. – 5:00 p.m. EST, Friday.
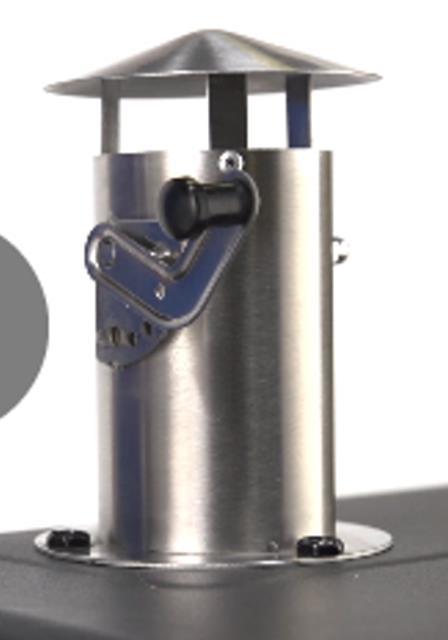
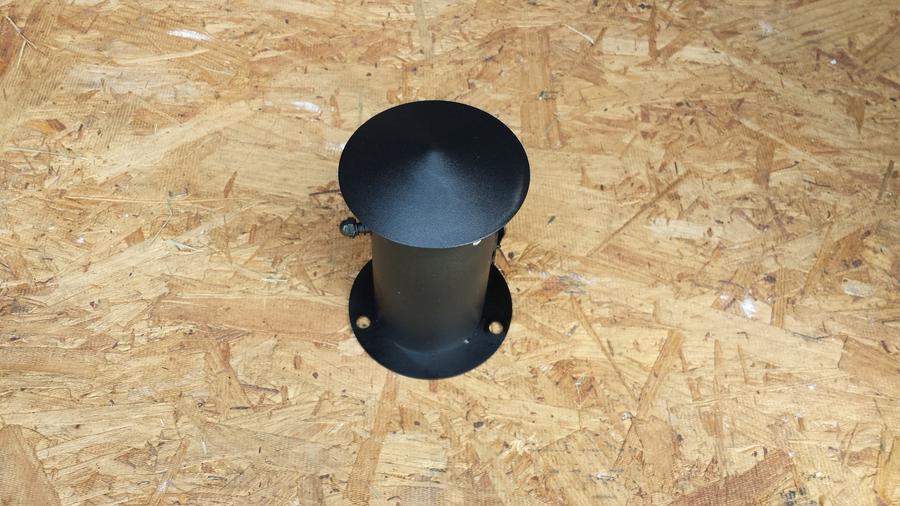
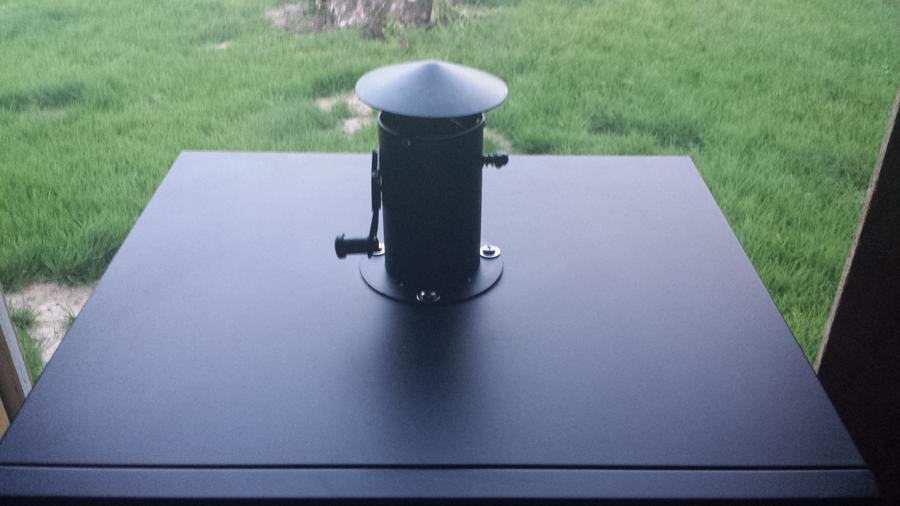
Here it is, they also have a SS Model, but wanted to keep it Black, I do have the SS Hardware at least hehehe, I like the Black though :
So then I check the ID of the actual pipe the Stack is made of and it is 2 1/2", so I had a 2 1/2 bi metal hole saw and found my center corner to corner on the top of the box (with the door closed) and drilled the hole high speed but with light pressure, you do not want to rip thru this mild steel nor press hard, patiently with very little pressure and you will have a good clean hole with no damage to walls, once thru the top of the double wall, remove the metal puck and then do the inner wall the same, nice and easy and you will have your hole.
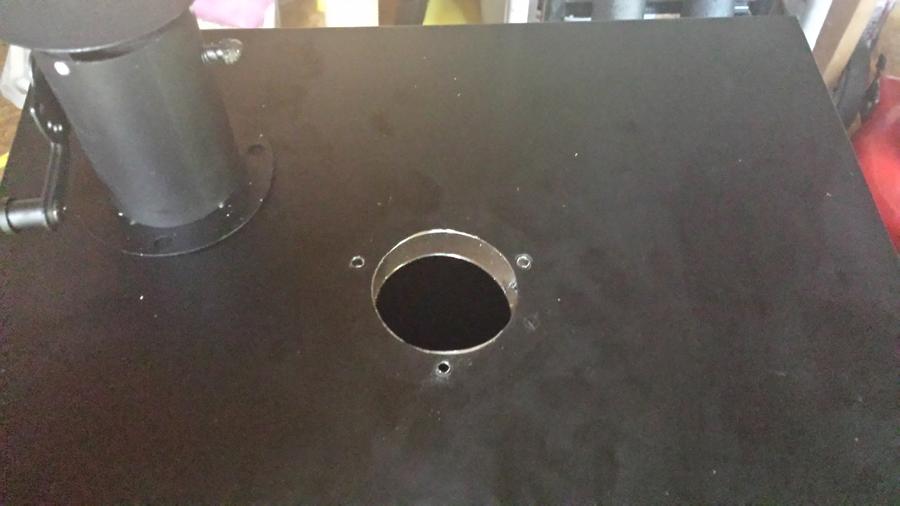
Then get your Smoke Stack in position and mark your mounting holes and drill, I used a 3/16" bit, marked each hole, remove stack and take care to also not use a lot of pressure downward to avoid damage to the walls and to the inner wall when you get through the outer wall, and try and make sure you are drilling the holes straight thru as opposed to at a angle which would mess up the mating of the bushings between the inner and outer wall, once that is done we are here :
Now I take the bronze flanged bushings I bought from Lowes, they are 1" long with a 3/8" ID / 5/8" OD at Flange, I could have just cut copper pipe into collars and used that, but anyway, the double wall separation on this Smoker is 3/4", so I used my angle grinder on the flat side and trimmed those bushing down in about 60 seconds hehehe
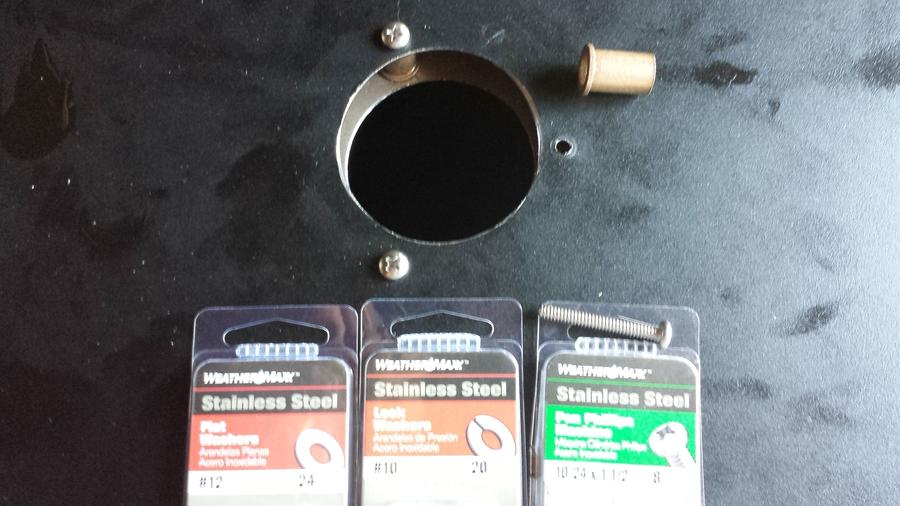
From there I placed them, here is a shot of the Collars placed in between the double walls and the screws in the mounting holes, I left one bushing out so you could see it, I also have the hardware I used here
#12 SS Flat Washers (larger washer to better mate with bushing as to make a better / stronger mount and to prevent any tightening warpage or bending)
#10X24 SS Nuts
#10 SS Lock Washers
#10X24X1 1/2" SS Phillips Machine Screws
And the Bronze Bushing 5/8" Flange - 3/8" ID - 1" long
I bought singles for the nuts (loose stock) :
So now begins the fun, I got 4 tubes (the largest the Auto Store had), I actually used 3 Tubes of this :
I have used this for years in automotive, motorcycles, marine and small engine stuff as well, and it will easily handle the max temp of 400 degrees this oven can generate, plus we are not dealing with pressures or hot oils, just smoke from a AMNPS and Heat
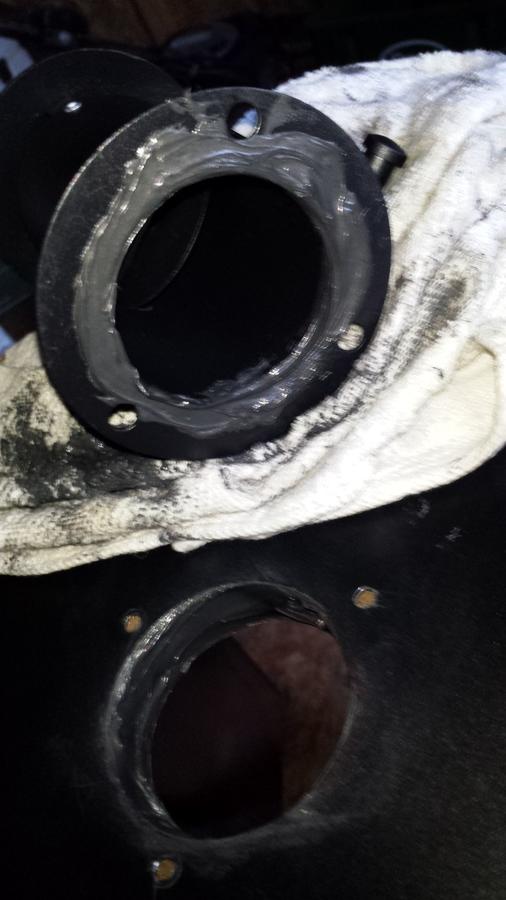
It would seem to me when doing this that maintaining the double wall integrity and seal would be paramount, otherwise you are changing the dynamics of the design regarding (for the most part) a sealed double wall, and also migration of smoke to places it was not designed to be not to mention hot spots and all kinds of issues, so we need to seal the space between the walls, I used the RTV Silicone to do this by pumping in between the double walls and filling the space all the way around the hole at least 3/4" back from the edge of the hole "on the inside", I most likely am about 1" back on this, so pump it in and make sure you have contact with the inner wall of both walls, it is messy, make sure you start from one end of the hole and work around to the other end, once you got at least 2 tubes used up and were consistent going around pumping it in you should be good, then just carefully smooth it out so it is level between the edges of your holes, then I put a small bead of the RTV Silicone on the bottom inside of the bottom of the Flange on the Smoke Stack and we are here :
That Pic (sorry a bit fuzzy.....) you can see the RTV Silicone just wiped level between the edges of the hole, and the gold you see in the mounting holes, that is the bronze bushing, and the RTV Silicone on the bottom of the Smoke Stack Flange, so I very carefully mated the Smoke Stack and slid my mounting screws in and then went inside the box to take a look and add the washers, lockwashers and nuts and finger tightened them until the RTV Cures, this will give you another vantage point on the RTV Silicone in the double walls :
Another Fuzzy, I am sorry............. but here you can see the RTV Silicone again wiped level between the two edges of the holes, completely sealed 360 degrees, and you can see the next step in the back right, the original "Exhaust Vent" plugged, that is next but first, here is the finished product :
I am letting the RTV Silicone Cure for 24 hrs, then I am going to fire up the AMNPS and slow heat it, I did not tighten mounting hardware yet, just finger tightened until it cures, I just do this so if there is any compression, it will be cured and will improve seal, with the bushings in place, it is most likely not going to be much compression going on anyway.
So now we have another issue, you were wondering why that other tube of RTV
Since now I have a Smoke Stack that is Adjustable, I do not need the hole in the back anymore which is the Stock Exhaust Vent.
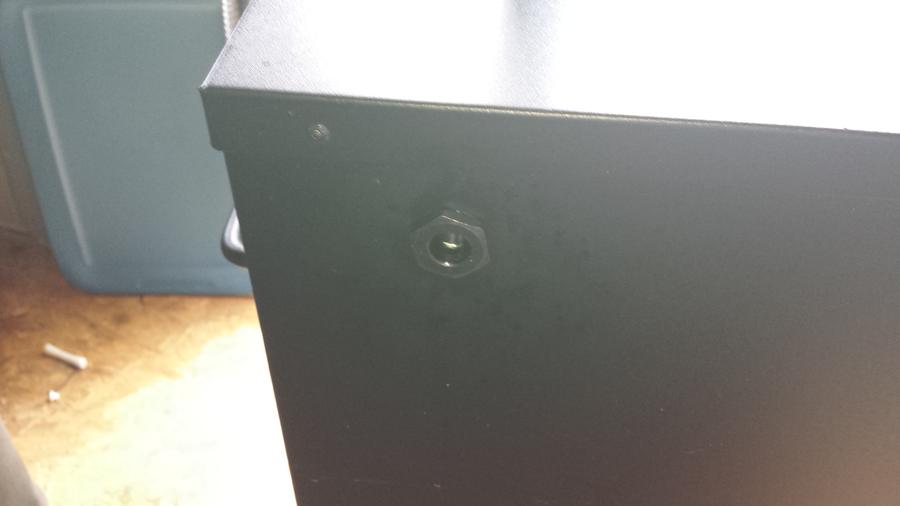
So here it is in the left top corner of the back of the Smoker :
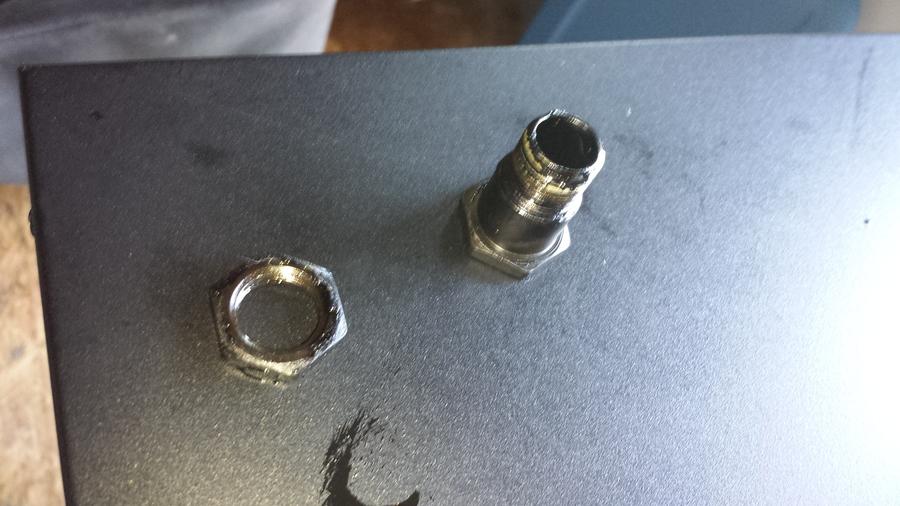
It unscrews on this Model, just a sealing tube / collar that allows it to function as a exhaust for the smoker and maintains the seal for the double wall construction, just unscrew the nut and take it out, if your interior is really dirty, you may need to get a couple of adjustable wrenches or some sockets, whatever your pleasure.
Here it is :
And here is the hole after removal :
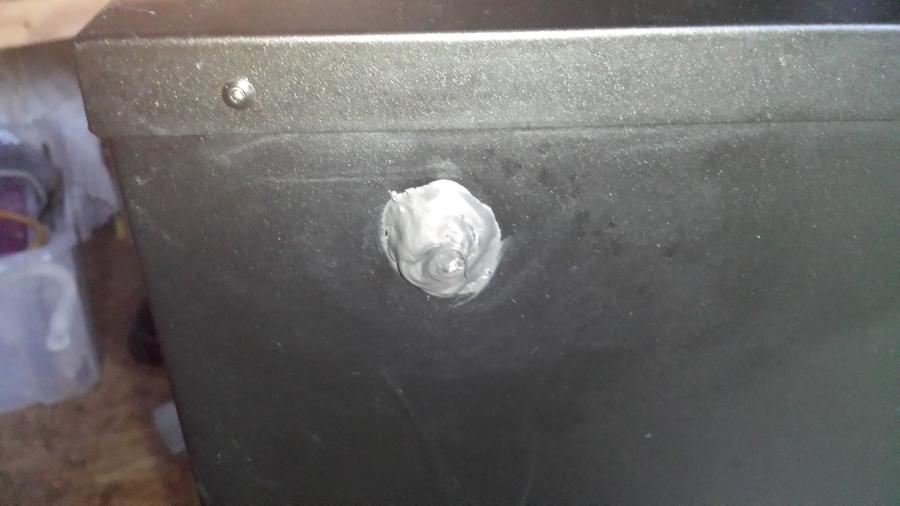
Same deal as the hole in the top for the Smoke Stack, pump the RTV Silicone all around evenly around the inside making sure it is sticking to both walls, but unlike the hole in the top, we want to seal this one, so once pumped real good fill the hole and leave a little button mound on it and bring the edge of the RTV Silicone on the outside past the edge of the hole, I have a purpose for this, will be sharing it in a few days, but do the same for each side, here are shots :
See that white on the wall, that is where the nut was and it kept the smoke off the metal and the metal was clean as a pin, but it also shows how far I came past the edge of the hole with the RTV Silicone, this is why I used almost a full tube of RTV Silicone on this hole, because of what I have planned for this little old exhaust port, but in a few days.
So all that said and done, I only see one thing I may do further, the adj on the Smoke Stack has a stop, a little Tab to stop the Arm from moving past what would be about 3/4 closed, I am planning on Flattening the tab and maybe adding another stop a little further up, not sure I would need another stop knowing how to use it I would know, anyway, doing this would allow me to close the Stack more, which would allow me to be able to reduce the air leaving to about that of what it had using the collar / sealing tube that I just plugged, I am guessing it is designed that way since it is a propane stove it is made for so they did not want you to be able to completely (not really) shut it off.
I am looking forward to using it to speed my Jerky drying just a bit and some other ideas I am mulling over, I am also looking forward to being able to see the smoke, with the small hole in the back, any breeze at all and I could not see the smoke, now it has no choice but to come out of the stack.
Looking forward to taking it in a test run, got some serious meats coming tomorrow, but I have to cure this silicone well after the 24 hours, so I will fire her up tomorrow evening and do a bunch of smokey burgers, then it will be Jerky time !!!!!!
The Part is from a Master Forge Grill that Lowes sold, I do not see them at the Lowes here but they may be sold elsewhere for all I know.............
Smoke Stack Info (MOD)
Master Forge 50.2-in 20 lb Cylinder Electronic Ignition Gas Vertical Smoker
Item # 190449 Model # MFY784CDP
Made by Lowes:
For replacement parts, call our customer service department at 1-800-963-0211, tell them you need a "Smoke Stack" , give them the Model, Payment info and your done, it was $11.99 to my door.
Monday – Thursday, 8:00 a.m. – 5:00 p.m. EST, Friday.
Here it is, they also have a SS Model, but wanted to keep it Black, I do have the SS Hardware at least hehehe, I like the Black though :
So then I check the ID of the actual pipe the Stack is made of and it is 2 1/2", so I had a 2 1/2 bi metal hole saw and found my center corner to corner on the top of the box (with the door closed) and drilled the hole high speed but with light pressure, you do not want to rip thru this mild steel nor press hard, patiently with very little pressure and you will have a good clean hole with no damage to walls, once thru the top of the double wall, remove the metal puck and then do the inner wall the same, nice and easy and you will have your hole.
Then get your Smoke Stack in position and mark your mounting holes and drill, I used a 3/16" bit, marked each hole, remove stack and take care to also not use a lot of pressure downward to avoid damage to the walls and to the inner wall when you get through the outer wall, and try and make sure you are drilling the holes straight thru as opposed to at a angle which would mess up the mating of the bushings between the inner and outer wall, once that is done we are here :
Now I take the bronze flanged bushings I bought from Lowes, they are 1" long with a 3/8" ID / 5/8" OD at Flange, I could have just cut copper pipe into collars and used that, but anyway, the double wall separation on this Smoker is 3/4", so I used my angle grinder on the flat side and trimmed those bushing down in about 60 seconds hehehe
From there I placed them, here is a shot of the Collars placed in between the double walls and the screws in the mounting holes, I left one bushing out so you could see it, I also have the hardware I used here
#12 SS Flat Washers (larger washer to better mate with bushing as to make a better / stronger mount and to prevent any tightening warpage or bending)
#10X24 SS Nuts
#10 SS Lock Washers
#10X24X1 1/2" SS Phillips Machine Screws
And the Bronze Bushing 5/8" Flange - 3/8" ID - 1" long
I bought singles for the nuts (loose stock) :
So now begins the fun, I got 4 tubes (the largest the Auto Store had), I actually used 3 Tubes of this :

I have used this for years in automotive, motorcycles, marine and small engine stuff as well, and it will easily handle the max temp of 400 degrees this oven can generate, plus we are not dealing with pressures or hot oils, just smoke from a AMNPS and Heat
It would seem to me when doing this that maintaining the double wall integrity and seal would be paramount, otherwise you are changing the dynamics of the design regarding (for the most part) a sealed double wall, and also migration of smoke to places it was not designed to be not to mention hot spots and all kinds of issues, so we need to seal the space between the walls, I used the RTV Silicone to do this by pumping in between the double walls and filling the space all the way around the hole at least 3/4" back from the edge of the hole "on the inside", I most likely am about 1" back on this, so pump it in and make sure you have contact with the inner wall of both walls, it is messy, make sure you start from one end of the hole and work around to the other end, once you got at least 2 tubes used up and were consistent going around pumping it in you should be good, then just carefully smooth it out so it is level between the edges of your holes, then I put a small bead of the RTV Silicone on the bottom inside of the bottom of the Flange on the Smoke Stack and we are here :
That Pic (sorry a bit fuzzy.....) you can see the RTV Silicone just wiped level between the edges of the hole, and the gold you see in the mounting holes, that is the bronze bushing, and the RTV Silicone on the bottom of the Smoke Stack Flange, so I very carefully mated the Smoke Stack and slid my mounting screws in and then went inside the box to take a look and add the washers, lockwashers and nuts and finger tightened them until the RTV Cures, this will give you another vantage point on the RTV Silicone in the double walls :
Another Fuzzy, I am sorry............. but here you can see the RTV Silicone again wiped level between the two edges of the holes, completely sealed 360 degrees, and you can see the next step in the back right, the original "Exhaust Vent" plugged, that is next but first, here is the finished product :
I am letting the RTV Silicone Cure for 24 hrs, then I am going to fire up the AMNPS and slow heat it, I did not tighten mounting hardware yet, just finger tightened until it cures, I just do this so if there is any compression, it will be cured and will improve seal, with the bushings in place, it is most likely not going to be much compression going on anyway.
So now we have another issue, you were wondering why that other tube of RTV
Since now I have a Smoke Stack that is Adjustable, I do not need the hole in the back anymore which is the Stock Exhaust Vent.
So here it is in the left top corner of the back of the Smoker :
It unscrews on this Model, just a sealing tube / collar that allows it to function as a exhaust for the smoker and maintains the seal for the double wall construction, just unscrew the nut and take it out, if your interior is really dirty, you may need to get a couple of adjustable wrenches or some sockets, whatever your pleasure.
Here it is :
And here is the hole after removal :

Same deal as the hole in the top for the Smoke Stack, pump the RTV Silicone all around evenly around the inside making sure it is sticking to both walls, but unlike the hole in the top, we want to seal this one, so once pumped real good fill the hole and leave a little button mound on it and bring the edge of the RTV Silicone on the outside past the edge of the hole, I have a purpose for this, will be sharing it in a few days, but do the same for each side, here are shots :

See that white on the wall, that is where the nut was and it kept the smoke off the metal and the metal was clean as a pin, but it also shows how far I came past the edge of the hole with the RTV Silicone, this is why I used almost a full tube of RTV Silicone on this hole, because of what I have planned for this little old exhaust port, but in a few days.
So all that said and done, I only see one thing I may do further, the adj on the Smoke Stack has a stop, a little Tab to stop the Arm from moving past what would be about 3/4 closed, I am planning on Flattening the tab and maybe adding another stop a little further up, not sure I would need another stop knowing how to use it I would know, anyway, doing this would allow me to close the Stack more, which would allow me to be able to reduce the air leaving to about that of what it had using the collar / sealing tube that I just plugged, I am guessing it is designed that way since it is a propane stove it is made for so they did not want you to be able to completely (not really) shut it off.
I am looking forward to using it to speed my Jerky drying just a bit and some other ideas I am mulling over, I am also looking forward to being able to see the smoke, with the small hole in the back, any breeze at all and I could not see the smoke, now it has no choice but to come out of the stack.
Looking forward to taking it in a test run, got some serious meats coming tomorrow, but I have to cure this silicone well after the 24 hours, so I will fire her up tomorrow evening and do a bunch of smokey burgers, then it will be Jerky time !!!!!!