Masterbuilt Vertical 2 door Smoker Mods

  • Some of the links on this forum allow SMF, at no cost to you, to earn a small commission when you click through and make a purchase. Let me know if you have any questions about this.
SMF is reader-supported. When you buy through links on our site, we may earn an affiliate commission.
Hey guys, I wanted to make an update. I know this is not specifically related to mods for our Masterbuilt smokers, but I think it's good info. I bought a smoke tube off of Amazon last week and gave it a try yesterday when I smoked a 4lb pork shoulder. Prior to using this tube I used an 8" cast iron which sat on the burner, with 2-3 large wood chunks for smoke. I used the stock water pan lined with aluminum foil full with water, meat placed on rack 2nd from the top, and smoker temp thermometer on same rack. I used this method for 2 years, and although it requires a ton of fiddling with needle valve and babysitting the smoker, i maintained temps from 215-235 for hours at a time. Yesterday I used the cast iron on the burner but with no chunks in it. I figured cast iron is very good for heat retention, and will allow consistent temps. I filled water pan and warmed her up to 225. Once at 225, I followed the instructions from the tube and filled it with pellets and lit vertically, and let burn for 10 minutes. I then placed it in the smoker as well as the meat. For the first 2.5 hours I had very consistent temp of 220-235, but at the 2.5 hr mark my water had completely boiled away. Instead of replacing it I mistakingly removed it based on thinking I'd be able to let er roll without having to add water every 2.5 hrs. Big mistake, lol. I had a hell of a time keeping the temp consistent, and from hour 4 on had to fiddle with it until 9.5 hrs when I took it off. This is all unrelated to the tube, which did perform well and lasted about 4 hrs . The key is to let it burn for the 10 minutes before laying it flat. I didn't do this the second fill, and it didn't smoke well. So, I am a believer in the tube, but would like to know the setups of you guys who use the tube with these smokers. Are you guys using cast iron still for radiant heat? I know I messed up removing water pan, but what other things are you doing to achieve consistent temp?

Thanks!

Where in the smoker did you place the tube? The tube needs to be above the flame.
 
Hi OldSmoke
Hi Old smoke about the 3 parts to install on the smoker. Well i have all the parts put them together , No problem so far. Removed the propane line from the smoker
and than about to hook up the 3" pipe to where the propane line was. Did you have to add something else as what i need on the end of my 3" pipe would have to be the same as my propane nut.
Sorry i hope this makes sense
Thanks in advance
David
 
Hello all,
I've had this smoker for a little over a year now. Thanks to all of the various tips on modding the Masterbuilt propane units! First mod I did was the cast iron pan replacing the hardly useful chip tray the unit came with. I place the 8" cast iron directly on the burner ring, and have excellent results. Second mod I did was install a needle valve in line, which really helps to control temperature as well as keep it consistent. I have smoked all kind of meats with this very budget friendly unit, with awesome results. Last time I smoked with it was Christmas Eve and being in NE Ohio, we had snow falling and pretty consistent winds. My unit has no good flame protection, and with the winds I had to go ignite the flame 10+ times throughout the 8 hr smoke. To fix this today I welded on skirts using scrap sheet metal , which I really think will make a difference. I do find this unit to be very needy, and sort of wish I had an electric unit for consistency.

What other mods do you all suggest to make this unit the absolute most consistent?
I wonder if you could show a pic of the cast iron tray and how you install it. You say you put it right over the fire ring. Does that mean you remove the diffuser?
 
I wonder if you could show a pic of the cast iron tray and how you install it. You say you put it right over the fire ring. Does that mean you remove the diffuser?
I think chad does what me and others are doing , cast iron frying pan right on the ring over the flames. Chad should get back to you to say what he does for sure

David
 
Did you have to add something else as what i need on the end of my 3" pipe would have to be the same as my propane nut

I am very sorry for being late to respond. Does this help?

294B4AB5-EB69-4C45-BFC9-7DB307940105.jpeg
 
I am very sorry for being late to respond. Does this help?
Never a problem about that. I did find a coupling and a female end at a propane supply shop here in Metro. I chanced the 3" to a 2" so everything still fit under the smoker. I just did not know what you had the 3" screwed into as mine needed a female end to connect to the smoker. The needle valve works great . Much easier to adjust the temps now. Thanks,
David

DSC_2280.JPG

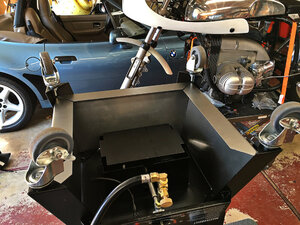
I also added heat shields to the Smoker Shack, don't really need them until I do. Hopefully I never do
DSC_2256.JPG


Thanks for the help
David
 
  • Like
Reactions: OldSmoke
Never a problem about that. I did find a coupling and a female end at a propane supply shop here in Metro. I chanced the 3" to a 2" so everything still fit under the smoker. I just did not know what you had the 3" screwed into as mine needed a female end to connect to the smoker. The needle valve works great . Much easier to adjust the temps now. Thanks,
David

View attachment 490848
I also added heat shields to the Smoker Shack, don't really need them until I do. Hopefully I never do
View attachment 490851

Thanks for the help
David
 
Looks like you did a nice job. I bet you like like that needle valve.
 
Yes the needle valve makes it much easier to regulate the temp now. I am not running back and forth to the shack to adjust
David
ps: just noticed your other post about your hobbies very nice bike build
 
Might be a dumb question... but for those that use a cast iron skillet for the wood burning tray (instead of the OEM one), do you use 8Inch? 10inch? Will the skillets handle fit?
 
do you use 8Inch? 10inch? Will the skillets handle fit?
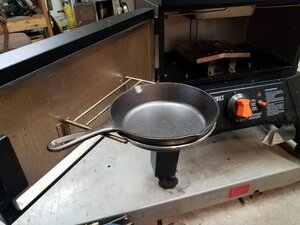
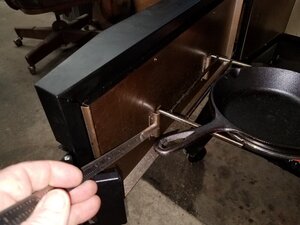
Hi maevansvh, first off never dumb questions, I just checked and mine is 10" and like I said I removed about 2" off the handle so i could still pick up with gloves on and put in or out as needed easier while hot. It sets in/on the original ring pan
DSC_2325.JPG
DSC_2326.JPG


Hope this helps
David
 
I think chad does what me and others are doing , cast iron frying pan right on the ring over the flames. Chad should get back to you to say what he does for sure

David
Working on sheet metal covers for the bottom of the smoker to prevent the wind from extinguishing the burner. Will probably cut some sheet metal to suit and attach with piano hinge. More on that later. Curious as to the needle valve installation. Seems as though the rigs pictured don't have a temp-specific range . Mine does, and it's pretty accurate from what I can see by placing a thermometer in the rig and setting the temp with the big dial out front, so I'm gonna pass on that part of the mod. Here are some pics and what my intentions are.

20210412_091238.jpg 20210405_110408_LI.jpg 20210412_103559.jpg
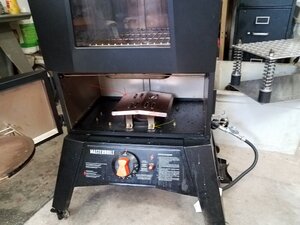
Bought the 8" frypan. Fits perfect in the stock smoke pan cradle. 2nd pic shows the arrows pointing to the heat diffuser. Wondering if I should remove that. If I do, I will be able to lower the frypan by cutting into the channels that are pointed to in the 3rd pic. Do I need to worry about heat distribution in the smoker if I remove the diffuser? Do I actually need to in order to get good enough heat on the frypan to ignite the wood chunks and keep them burning while smoking? Any thoughts on the subject greatly appreciated!!!
 
Last edited:
I posted pics and descriptions, but they are awaiting moderator approval. I'll return later to see if it posted.
 
Thanks for the replies. Now that the forum is back online :-). I purchased an 8 inch pan and hope to use it this weekend.
 
2nd pic shows the arrows pointing to the heat diffuser. Wondering if I should remove that. If I do, I will be able to lower the frypan
Hi Omar, I am not sure about your smoker. Have you tried to use the frying pan now with where it sits. I would try that first if you have not. Just to see how your wood chunks smoke, you don't want to get them too close that they burn up instead of just smolder. With my frying pan on the ring that came with my smoker it is a good height, but if i have the heat up high when doing something that needs high temp even my chunks will catch fire. So i try to have the smoking finished before i raise the temp.

As for the needle valve , I installed on mine because the dial that is on the smoker is hard to adjust real accurate, but now i can almost keep it right to the exact Deg. i want I have much better control now.

Hope this helps a little
David
A great help. I'll give it a whirl soon and report on my findings.
 
SmokingMeatForums.com is reader supported and as an Amazon Associate, we may earn commissions from qualifying purchases.

Latest posts

Clicky