help with vents on 250 gallon RF

  • Some of the links on this forum allow SMF, at no cost to you, to earn a small commission when you click through and make a purchase. Let me know if you have any questions about this.
SMF is reader-supported. When you buy through links on our site, we may earn an affiliate commission.

tig65

Newbie
Original poster
Jan 22, 2020
10
0
Texas
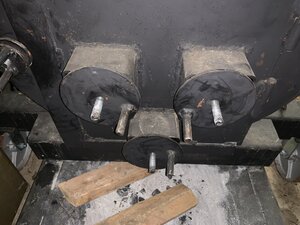
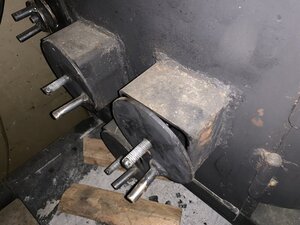
I have been building a 250 gallon RF smoker the past few weeks and have almost everything ironed out except the vent for my firebox. Since my fire box is a 30” dia 1/2”thick pipe 32” long I can’t easily put vents on side of pipe leaving all vents to the door side. According to calculation I need 65 sq inches of vent and would like to make it on a slide but need it to fit on the door(I think). Seen several ways people have done them but surprised I haven’t seen more for 250 gallon propane tanks. I’m afraid I can’t fit a horizontal slide in the space I have and still keep everything solid. I want the door to go to bottom of firebox for easy clean out with a half moon shaped scraper. Any advice would be appreciated. Have to let air out of tires to get out of garage .

58364978-40FA-48CB-B363-4C74B7BFAD64.jpeg


8E25AABA-F953-4516-857A-BE518BB2D2B8.jpeg


C205ACB9-F38B-4956-A713-428FBB4944B3.jpeg


8E25AABA-F953-4516-857A-BE518BB2D2B8.jpeg


BA714554-E971-4FE2-93A8-AF1298FCBD5F.jpeg
 
I have gone to using this design for all of my builds. I calculate the total required inlet, add 10% and divide by 3. Then select appropriate sized square tube to give required openings. Inlets are positioned on door so that lower one has 1-2” of available opening below the fire grate, the other two are placed about mid door centered on either side of the bottom one. The adjustable covers ride on threaded rod, providing nearly infinite inlet adjustment. Since going to this design, I have much better draft placement and control. Also far few issues with temp spikes due to wind gusts, etc.
 

Attachments

  • 57627B00-7FE1-44D1-A8DF-C92E3AA2FF58.jpeg
    57627B00-7FE1-44D1-A8DF-C92E3AA2FF58.jpeg
    135.1 KB · Views: 50
  • CF724415-EAF6-4ED3-AE8E-4B84758BE1AC.jpeg
    CF724415-EAF6-4ED3-AE8E-4B84758BE1AC.jpeg
    131.4 KB · Views: 50
wow i haven't seen that one and i really like that idea. makes me think i might add some of the exhaust stack to the side of the firebox and then have the smaller slides on the door. the exhaust ID is 6.25 so i would almost have more than enough by that alone. I have been reading a lot about location of vents and was wondering where your are sitting? one below grate and two even if not slightly above?
 
Personally, I would ditch the door slides, go with all of the vent tubes on the door, and leave the sides of the box alone.
If you are needing 65 square inches, of total opening and will be using 6.25id pipe I would figure on 3 inlets. (65+10%= 71.5sqin minimum requirement)
Each individual 6.25” opening will be 30.68 square inches x 3 provides 92 square inches.
That sounds large, but remember, you have total control of the actual inlet opening from 0-92 with the vent covers.
I have the best luck with one vent centered on lower part of door such that about 1-2 inches of the opening is located below the bottom side of the firebox grate (if you use 6.26id pipe, that would mean the grate will be located in about the middle of the hole when the door is shut. Other two would be mounted on same door at (or just below center) of the firebox. (As depicted in the pictures)
 
I would add 15 to 20% to intake size. Put them at or below fire level. I usually run my RF wide open and control temp by fire size.

I made these butterfly valves out of 2" black pipe. They work pretty well and were simple to make.


RG

2017-07-23 16.24.45.jpg
 
Well I still need to add the baffle but did as suggested. Need to see if I have to add another but really not much room.
0BF73166-7755-4C69-BB44-1FD58AB20253.jpeg
 
Looking good! Real estate on the door is always an issue. Nothing wrong with firing it up and seeing how it works with what you have. I recommend doing a long burn (10-12 hr) to test how they perform as ash builds up under the fire grate. I have found as the ash builds, the third inlet located higher up the door becomes more important in terms of supporting clean combustion and regulating cc temps.
 
That makes sense and i plan on cleaning out the ash from time to time during the cook with a half moon shaped scraper which is why i wanted the bottom of the door to follow the shape of the pipe. thanks for the advise.
 
anyone have a suggestion on how large i should make the wood storage on the trailer? i understand it depends on how much wood it uses but i figure i could get close and only store enough wood on the trailer for a 20hr cook or something. just don't want to take up a lot of real estate if not needed. I still plan on adding a fajita cooker (or what ever they are called) from the extra 17 inches of the firebox i have with some plate i also have left over so would like to position it in a covenant place that's not in front of the smoker tongue side.
 
A lesson from the school of hard knocks....cleaning ashes during a cook can result in a bad case of “ash seasoning” on anything in the firebox. Having inlets positioned above the grate greatly helps keep clean combustion air flowing when ash starts to bridge on the fire grate .
 
A lesson from the school of hard knocks....cleaning ashes during a cook can result in a bad case of “ash seasoning” on anything in the firebox. Having inlets positioned above the grate greatly helps keep clean combustion air flowing when ash starts to bridge on the fire grate .
i considered that but thought with the RF plate the ash wouldn't go that far but it is definitely something i would keep an eye on.
 
I would use a 3 inch x 12 inch slide on each side of the fire box. your grate that you place your wood on should be 4 inches above the bottom of the fire box. the vents should be on the side and below the grate. installing a flat or square surface to a round surface is a pain. that is why I make square fire boxes. I am starting a double 250 gal propane reverse flow with tuning plates, double fire boxes. wood storage 36 x 48, tandum 4 inch drop axles 2 chimneys 6 inches diameter x 48 inches from the top of the cooking chamber I may add storage and 2 burner propane stove and ss tables.
 
  • Like
Reactions: tig65
I would use a 3 inch x 12 inch slide on each side of the fire box. your grate that you place your wood on should be 4 inches above the bottom of the fire box. the vents should be on the side and below the grate. installing a flat or
F439F0DA-8555-433C-814A-1C256C58FACD.jpeg
2E589AB3-340B-4AC0-A0AB-E0D5389691F5.jpeg
38C828D0-6FA4-42C6-AC3F-37C98EF0F852.jpeg
8D97C55A-BE92-410B-94F5-D3B74247663B.jpeg
F439F0DA-8555-433C-814A-1C256C58FACD.jpeg
2E589AB3-340B-4AC0-A0AB-E0D5389691F5.jpeg
square surface to a round surface is a pain. that is why I make square fire boxes. I am starting a double 250 gal propane reverse flow with tuning plates, double fire boxes. wood storage 36 x 48, tandum 4 inch drop axles 2 chimneys 6 inches diameter x 48 inches from the top of the cooking chamber I may add storage and 2 burner propane stove and ss tables.
I did this which seems okay thus far but only had two cooks on it. High temp paint is full of shit. Square firebox would of been great but the 1/2” thick pipe I got for firebox was to hard to pass for $100. Only thing I have noticed is that my RF plate doesn’t seem to be draining the drippings like I hoped. Also I realized I should of made a 150gallon smoker instead. It seems hard to fire this thing up for a single rack of ribs but it seems to do a great job.
38C828D0-6FA4-42C6-AC3F-37C98EF0F852.jpeg
8D97C55A-BE92-410B-94F5-D3B74247663B.jpeg
 
SmokingMeatForums.com is reader supported and as an Amazon Associate, we may earn commissions from qualifying purchases.
Clicky