First UDS is underway!

  • Some of the links on this forum allow SMF, at no cost to you, to earn a small commission when you click through and make a purchase. Let me know if you have any questions about this.
SMF is reader-supported. When you buy through links on our site, we may earn an affiliate commission.

duffygould

Fire Starter
Original poster
Jan 17, 2008
73
19
San Antonio, TX
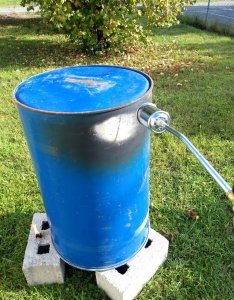
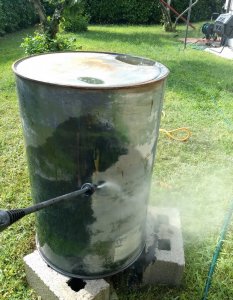
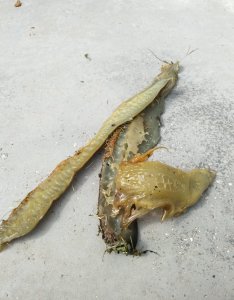
Living in Italy has made it difficult in finding a drum, but I finally snagged one. I picked up all the pipe fittings in the last two weeks and started taping them off and painting them up. Then this weekend I finally picked up the drum. I torched the drum and then power washed it. In the pics you can see the weird glue that I burned out of it. It sure looks weird! After that hit it with the sander. That's as far as I've got so far, now I'm just waiting for my step bit from Amazon since the hardware store wanted €80-€120 depending on the size of bit. So untill then I'll just be drawing out the holes on the drum and waiting very impatiently. I'll follow up with more pics and updates.
 

Attachments

  • IMG_20190907_091947.jpg
    IMG_20190907_091947.jpg
    292.5 KB · Views: 75
  • IMG_20190907_105257.jpg
    IMG_20190907_105257.jpg
    229.9 KB · Views: 81
  • IMG_20190907_121320.jpg
    IMG_20190907_121320.jpg
    165.6 KB · Views: 80
Do you know what was originally stored in the drum?
If it was a food grade drum with a coating on the inside, you got to get rid of that too.
 
That "glue" you reference is not good. This will need to be ENTIRELY removed before you can use this drum. Does it coat the whole inside of the drum or...? I'd like to hear more about that before you worry about the drilling stage
 
Last edited:
Do you know what was originally stored in the drum?
If it was a food grade drum with a coating on the inside, you got to get rid of that too.
The drum had a polyurethane hot glue of sorts. So it didn't have a liner. Just paint on the outside, bare metal inside with a bit of the left over glue. I burned the drum upside down so it would drop out. Power washed it out, then sanded it as well. Do y'all think it should be safe? I feel that burning a liner out can't be much different than a little hot glue burning out... But again this is my first UDS.
 
That "glue" you reference is some sort of epoxy. This will need to be ENTIRELY removed before you can use this drum. Does it coat the whole inside of the drum or...? I'd like to hear more about that before you worry about the drilling stage
Not entirely, just a few clumps. That pic of the glue is all that was in there. It's all removed now. I've got a few pics at home I'll post them later.
 
  • Like
Reactions: fivetricks
If you're sure that you burned out all of it, then sanded like you say it should be fine. You'd be able to feel it with your hands. Just to be safe I'd burn one more hotter than hell fire in it before I used it, but you do you. I wasn't there see see the first fire
 
  • Like
Reactions: SecondHandSmoker
The drum had a polyurethane hot glue of sorts. So it didn't have a liner. Just paint on the outside, bare metal inside with a bit of the left over glue. I burned the drum upside down so it would drop out. Power washed it out, then sanded it as well. Do y'all think it should be safe? I feel that burning a liner out can't be much different than a little hot glue burning out... But again this is my first UDS.

As long as you got all that toxic crap out of there you should be fine.
 
well as it turns out I made a noob UDS mistake and warped the lid. I'm trying to get with the spot that I bought the drum from to get another drum and lid or just lid. I'll post more updates after I figure that out. But I was able to create a charcoal basket so that's good.
 
Do you have the retention ring? May be easier and cheaper to buy one of those. That should help you get the ring in place with a bit of help and you can beat the rest of the lid back into submission
 
well as it turns out I made a noob UDS mistake and warped the lid. I'm trying to get with the spot that I bought the drum from to get another drum and lid or just lid. I'll post more updates after I figure that out. But I was able to create a charcoal basket so that's good.

Any flat sheet of metal will work. Some guys use a Weber Kettle lid.
 
  • Like
Reactions: Razyr Sharpe
well, I got another drum from the same place. This came with another lid that didn't fit the first barrel since it's slightly different than the original drum. Anyways, I burned it out this past weekend this went off without any issues. Also, this time I didn't burn the lid, I took my time and ground it down as well as sanded all the paint/rust off. Everything went smooth this time. I drilled some holes for intakes (3 x 1") and a 1 1/4" Exhaust. Put some handles on there and then got the wheels/stand all mounted as well. All that needs to be mounted still is the bolts for the grill grates and then I need to rework the charcoal basket to some smaller bottom grate.

I wanted to get yall's opinion on something: The exhaust, see pics below. Should I just leave the extra elbow off so that it sends the smoke off to the back of the drum, or keep the elbow on to drop the smoke down? Either way, I like how it looks, I've got the extra piece and didn't know if it would affect the performance at all.

And a tip for those that made a mistake like me: My Nipples were too long and I don't have a saw! At least two of them where. I couldn't get them snug on the intakes so I ended up using the step drill bit to cut them shorter. I just installed the male to male nipples into one of the exhaust pipes and started drilling until I thought it was enough. That was able to cut it down about 1/2 the way. And now I can tighten all the fittings just right!
Here are some pics so far:
IMG_20190926_183934.jpg
IMG_20190926_185809.jpg
IMG_20190930_191358.jpg
IMG_20190930_191410.jpg
IMG_20190930_191417.jpg
IMG_20190930_191646.jpg
IMG_20190930_191702.jpg
IMG_20190930_190833.jpg
IMG_20190930_190815.jpg
IMG_20190930_190720.jpg
IMG_20190926_183934.jpg
IMG_20190926_185809.jpg
IMG_20190930_191358.jpg
 
Your exhaust needs to draft. That crookneck might not draft. I think that just the one elbow should be OK. Don't need the ball valve on the exhaust.
 
  • Like
Reactions: fivetricks
Personally I would go with at least a 2''x 6'' long nipple for the exhaust with no 90* fittings or valves. I'd just buy an IPS cap to close it off to kill the fire and for storage.
 
SmokingMeatForums.com is reader supported and as an Amazon Associate, we may earn commissions from qualifying purchases.

Latest posts

Hot Threads

Clicky