Curing Chamber Modification

  • Some of the links on this forum allow SMF, at no cost to you, to earn a small commission when you click through and make a purchase. Let me know if you have any questions about this.
SMF is reader-supported. When you buy through links on our site, we may earn an affiliate commission.

SCBBQ

Smoking Fanatic
Original poster
SMF Premier Member
Apr 2, 2021
433
418
All my parts have arrived to control humidity etc - installing with my handyman Monday and will be putting product in on Wednesday. What do you clean your chambers with between cures?
 
What do you clean your chambers with between cures?
Absolutely nothing! I want the mold that I inoculated the salami with to saturate all the interior surfaces with beneficial mold spores.

Now when you shut the chamber down for major changes/upgrades, wipe dpwn the walls and all surfaces with 50/50 vinegar/water. Then with your first batch, spray the walls and all the surfaces you can reach with the left over mold 600 solution.
 
  • Like
Reactions: SCBBQ
BTW, I run my chamber 24/7/365....I have some large pieces drying year round...
The Culatello need minimum 15-18 months drying/seasoning before they are ready. The magic really starts happening around 12-14 months....when the mold transforms the meat into Culatello.
 
  • Like
Reactions: JC in GB and SCBBQ
Here's my mod - it worked out well. I'm not sure I needed to replace the fans but it's done. The unit I have has internal ducting columns so the fans don't really blow directly around the cabinet like some others do, but regardless I have two added with the controls turned all the way up and you can barely feel air moving at all.

Don't pay attention to the readouts - I think we just had the doors opened to load or something. They appear to be working good.


IMG_5171.jpeg
IMG_5170.jpeg


IMG_5173.jpeg
 
  • Like
Reactions: JC in GB
Just monitor the salami to see how they dry. It is ok for the humidity to spike to 85-90%RH for the first few days after dding a lot of new product, but should be maintained below about 82%RH after the first week or so.

One test is to check the bottom tie point on the salami...it should remain plyable...as in very slightly soft. This is an indication of correct drying. If it is dry and hard-you are drying too fast. If it is super soft-you are drying too slow.
 
  • Like
Reactions: SCBBQ
It looks good
 
So I looked up the model you have...and found a video.

I like the air distribution vents. This explains how you had constant airflow without case hardening. I do not know how strong those fan are...but I do know that in a TRUE cooler, the fans blow too strong and must be replaced. You should still be good with the replacement fans as they have been tried and work...have given excellent results. Can you tell difference between the replacement fans and the originals as far as how strong they blow?
 
Checked it today. Emptied some water in the dehumidifier. it was about half full. When I checked it, the control for it was on, so it was lowering the humidity hopefully after I left.

IMG_5185.jpeg
 
Are your controllers situated so you can view them easily? If not, you should move them so that they are. Have you verified the dehumidifier is not overwhelmed and can actually handle the amount of product you have hanging? Another way to ask this is does the dehumidifier reach your low set point? Or does it just run constantly?
 
Well it’s not filling up in the first day so I would assume it’s not working constantly - not sure I have a way to measure how much it’s running other than the water it captures .

Unfortunately the controls are on the back . I gave the cabinet pulled out and can easily walk around it - it’s in a unused area of the property so all good .
The inkbird humidity controller (the blue one) has a little green light that comes on (on the right side of the unit) when the dehumidification cycle turns on. You should be able to look at the controller and see if the light is on...and for how long. If it never goes off, then your dehumidifier is on constantly.
 
Yes I know where the light is and it was on when I went down there to check - what I don’t know us how long it runs a day - I’m not sitting there staring at a light for any length of time … so I just will have to gauge by how much water it creates and continue to observe humidity levels .
 
Thanks for asking - dehumidifier is collecting around 6-8 oz a day .. range every day I check is right at 80 across all three gauges plus or minus . Temps holding well .
 
  • Like
Reactions: indaswamp
All my parts have arrived to control humidity etc - installing with my handyman Monday and will be putting product in on Wednesday. What do you clean your chambers with between cures?
Hi there,
I built my Curing Chamber approx 5 years ago and have had good results.

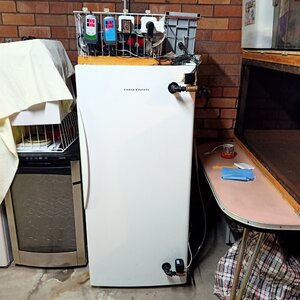
I arranged most of the control equipment into a wire basket which I place on the top of the fridge with cabling and airflow control equipment going through the door. This is handy in the event that the fridge dies. You can remove the entire equipment installation in approx 30mins, and as I always have a spare fridge standing by (with the appropriate holes drilled in the door) I can tranfer and reinstall the equipment in a similar time.

The functions the equipment carries out are as follows:

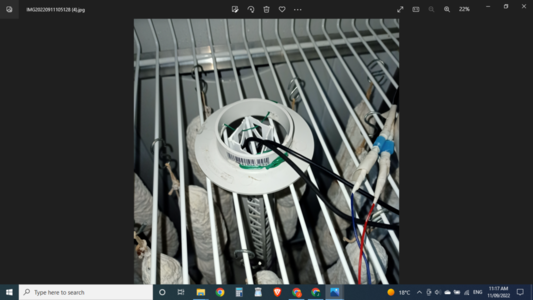
Inkbird Temp controller operating the Fridge cooling and 12V down light for heat ing when needed

Inkbird Humidity controller operating the 24V Humidifier and 12V Dehumidifier as needed. Both these units have a mechical on/off switch (this is a must).

12V Airpump operated by a 24/7 programmable timer to exchange the air in the fridge ( I exchage air 3 times a day)

Hospital grade Particle and Carbon filter to clean the fresh air entering the fridge during the air exchange process.

12V Auto return Inlet (at bottom of door) and outlet (at top of door) ball valves (on front door to open and the seal the fridge before and after the air exchange process

IMPORTANT!! The Airpump and inlet and outlet Ball valves are operated by a 24/7 programable timer connected to a 10 second delay that opens the ball valves first and 10 seconds later activates the air pump) . The delay prevents air pressure building up in the filter while the Ball valves are in the process of opening.

12V computer fan operated by a 24/7 Programmable timer to move air around the chamber (I program it it operate for 15mins every 2-3 hours.

An important safety aspect of this design is that all cabling and equipment inside the chamber operates on 12V or 24V's.

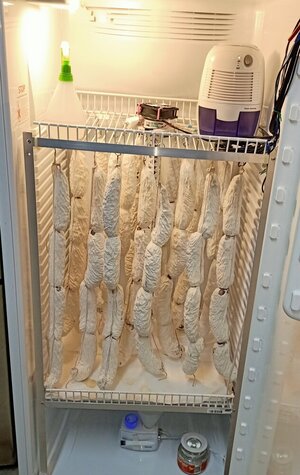
You will note the aluminium frame inside the chamber. I built this frame as a free-standing unit that can be easily removed and tranferred to another fridge chamber. The reason for the frame is that all fridges today use glass shelving which obviously is not suitable for a curing chamber.

I am currently considering installing a shielded ultraviolet light to further enhance the purity of the air circulating in the chamber. (If anyone has any advice on this, it would be welcome)

Attached are a few images that will give you an idea of how this set up is laid out.
 

Attachments

  • IMG_20220910_235705.jpg
    IMG_20220910_235705.jpg
    126.3 KB · Views: 39
  • IMG_20220910_235740.jpg
    IMG_20220910_235740.jpg
    137.1 KB · Views: 39
  • IMG20220910235045.jpg
    IMG20220910235045.jpg
    176.9 KB · Views: 39
Last edited:
  • Like
Reactions: indaswamp
12V Airpump operated by a 24/7 programmable timer to exchange the air in the fridge ( I exchage air 3 times a day)

Hospital grade Particle and Carbon filter to clean the fresh air entering the fridge during the air exchange process.

12V Auto return Inlet (at bottom of door) and outlet (at top of door) ball valves (on front door to open and the seal the fridge before and after the air exchange process

IMPORTANT!! The Airpump and inlet and outlet Ball valves are operated by a 24/7 programable times connected to a 10 second delay that opens the ball valves first and 10 seconds later activates the air pump) . Thie delay prevents air pressure building up in the filter while the Ball valves open.
Good plan. I had the idea to use control valve as well for air exchange. I like your set up. great mold growth and proper spacing of your salami. How long have you been making salumi?
 
Good plan. I had the idea to use control valve as well for air exchange. I like your set up. great mold growth and proper spacing of your salami. How long have you been making salumi?
I've been making salumi for about 7years.
I made up the rig about 5 years ago so I could make salumi all year round. I tried to implement all the factors that commercial salumi producers use to control the curing process.

As for the perforated tube you refer to in your second post to me, I used 2 short lengths of flexible plastic 'corner reinforcing' used by plasterers, held together with elastic bands and garden ties (so it can be easily disassembled and cleaned), to create a perforated tube through which I lower the Temp and humidity sensors to they are located in the centre of the chamber amongst the hanging salumi but not touching them. I then sit the fan on top of the tube to draw air in from the centre of the curing chamber and blow it up to the roof. Though if I find some salumi are firming up more than others, I move the fan around to compensate.
The attched photo shows how simple it is to attach it to the wire frame, using a piece of plastic plumbing component. both items are readily available at any large hardware store and cost only a few dollars.

I hope this helps.

Cheers
 

Attachments

  • Screenshot (184).png
    Screenshot (184).png
    487.6 KB · Views: 40
Last edited:
  • Like
Reactions: indaswamp
SmokingMeatForums.com is reader supported and as an Amazon Associate, we may earn commissions from qualifying purchases.

Latest posts

Clicky