Crosley Shelvador fridge build

  • Some of the links on this forum allow SMF, at no cost to you, to earn a small commission when you click through and make a purchase. Let me know if you have any questions about this.
SMF is reader-supported. When you buy through links on our site, we may earn an affiliate commission.
Th
Were it me, I'd go for 6~7cubic inches for the intake and 12~14 cubic inches for the exhaust flew.

the area of a 2" dia, circle is ~3.1cu. inches
the area of a 3" dia. cirlce is ~7cu. inches
the area of a 4" dia. circle is ~12.5 cu. inches

Thanks! That's exactly what I will do then. 4" exhaust flew & a 3" intake. The pipe that connects my firebox on the bottom, goes up 13" to reach the cooking chamber.......what diameter would you say that should be?
 
Not sure how your fire box design looks, but I suggest (2) 2" holes on opposite sides. More even air flow to feed the fire, and it's closer to the 1:2 ratio.....
 
Not sure how your fire box design looks, but I suggest (2) 2" holes on opposite sides. More even air flow to feed the fire, and it's closer to the 1:2 ratio.....
Firebox is a plain 22" square cube ....I will use the 2" inlets on both sides for even air flow, makes great sense. Thanks for all your help. I will be post more pics as we progress. So far we have secured almost all the iron for the project, as well as the insulation, so it should go fairly good if my neighbor gets some time before the fishing picks up. I'm planning on using a 6" duct from the firebox , up to the cooking chamber for now, it'll have to be 13" tall just to reach thru the bottom (where compressor was) up to the main fridge area.
 
image.jpeg
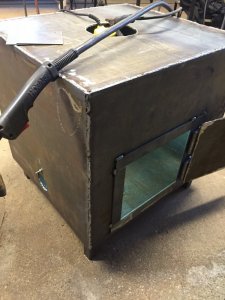
Friend got the firebox welded up today.....(pic was taken after tack welding & before he finished the welding) ....the fridge will be attached on top of this 24"W X 22"L X 22"Tall firebox, made of 3/16" steel.....The firebox will have legs to hold it off the ground.,....then a 6" diameter X 15" tall stove pipe goes up from the firebox to the cooking chamber for heat and smoke transfer.......fire bricks will line the bottom of the firebox....it's coming together! Little more spendy than I first imagined, surely will be worth it tho.......The sheet of 3/16" steel used for this firebox was $112 at the junkyard........40 cents/# for scrap sheet steel @ 260# plus tax.....plasma cutter cut thru it like butter. Good neighbors are invaluable!!
 
Last edited:
I would sure welcome any suggestions. Seriously no idea where to start for the thermometer to monitor internal temp of cooking chamber. I'd love a wireless device that had meat probes also so I can temp the cooking chamber and different cuts of meat also.....if such a product exists?
 
image.jpeg
image.jpeg
Really making some progress .......firebox has legs, (sorry pic is goofy) also the FB door with hinges is in place..... Just need fire brick & the door latch & paint to be done with firebox......firebox air intakes are cut in too , just not in the pic.....the fridge outer shell is insulated.......the door is insulated & skinned with sheet steel.......ready to install the inner cooking chamber part of the fridge & connect the pipe up into it from the firebox......also ready to install the exhaust flu ......cooking chamber shelves are reinforced with rolled steel........ This thing is heavy duty, just hope it smokes da meats when I'm done!!
 
Yup. That's actually how it was taken but the firebox is upside down there. The legs are on the bottom......terrible pic, I'll post better when I can. Maybe the whole unite very soon. Fingers crossed.
 
Yup. That's actually how it was taken but the firebox is upside down there. The legs are on the bottom......terrible pic, I'll post better when I can. Maybe the whole unite very soon. Fingers crossed.
 

Attachments

  • 7B0247F2-79EE-45D4-8FC8-8A9DCB84548B.jpeg
    7B0247F2-79EE-45D4-8FC8-8A9DCB84548B.jpeg
    129.3 KB · Views: 18
SmokingMeatForums.com is reader supported and as an Amazon Associate, we may earn commissions from qualifying purchases.

Hot Threads

Clicky