Country style Ribs (Cured & Smoked)
I made "Bacon-On-A-Stick" (cured & smoked Pork Ribs) a few times, so I decided to try Country Style Ribs (CSRs).
It worked out really good, but I think it would be better if the pieces were all more like the larger ones I got, and not so many of the smaller pieces.
Anyway, below is how I did it.
Day #1:
Rinse all pieces under cold water, and pat dry with paper towels.
Divide the pieces into groups that will fit into Zip-lock bags (in one layer). I my case it was 4 groups.
Weigh each group, and calculate how much TQ is needed per group (One half ounce of TQ per pound).
Doing one group at a time, rub the proper measured amount of TQ on the pieces of that group (along with about 2 tsp of Brown Sugar per pound), line the pieces up in one layer in the Zip-lock bag, throw any TQ that fell off, into the bag with the group of pieces it fell off of, to keep the proper amount of cure in each bag.
Squeeze out excess air & close bags.
Put bags on cookie trays to keep them laying flat in their own juices.
Put in fridge (36˚/39˚). I keep mine at 37˚/38˚.
After 24 hours, flip & massage bags, keeping the pieces in that same one layer position in the bags.
Note: In this case we are only using cure for 48 hours. We are not concerned with curing completely to the center, because we will be hot smoking to over 150˚ internal temp. The TQ is only used to get the "Hammy" flavor, just like we do with "Bacon-On-A-Stick".
Day # 3:
Remove pieces from curing bags, rinse well, and soak in ice water for 1 hour.
Slice a couple thin pieces off, and fry to test for salt flavor.
If it tastes salty, soak for another hour. Repeat as needed. These were Perfect.
I have never had to soak anything to get rid of salt flavor, except when I used Hi Mt BBB Cure & Seasoning.
I always do a Salt-fry-test---Just in case!!!
Rinse pieces one more time, pat dry, and put on smoker racks.
I like to put the bigger pieces on one rack & the smaller ones on another rack.
I also sprinkled both sides with Black Pepper, Garlic Powder, and Onion Powder.
Put in fridge, uncovered, overnight, for pellicle to begin forming.
If you don't have a designated "Meat" fridge, you can run a fan over the pieces for a couple hours, just before you put them in the smoker.
Day #4 (Smoking Day):
11:00 AM-----------------Pre-heat Smoker to 140˚ (using MES 40) to finish forming pellicle.
11:30 AM-----------------Put meat in top two positions (bigger pieces below smaller pieces). No smoke yet.
12:00 Noon--------------Reset temperature to 225˚, and put a well lit AMNPS on the bars, to the left of the chip drawer. (I used Hickory Pellets)
2:00 PM------------------Stack all CSR pieces on a wire rack in a foil pan, and cover & seal with double aluminum foil. Put on rack in second position. ON EDIT---Forgot to add, I poured 10 ounces of Apple Juice into the pan (they don't lay in it---it's under the wire rack).
2:00 PM------------------Also Note: I checked with a Therma-Pen, and the pieces were already over 150˚ internal temp at this point.
3:15 PM------------------These pieces of CSRs were kinda small, so I cut back the heat to 160˚ at this time.
4:15 PM------------------Cut heat back to 140˚.
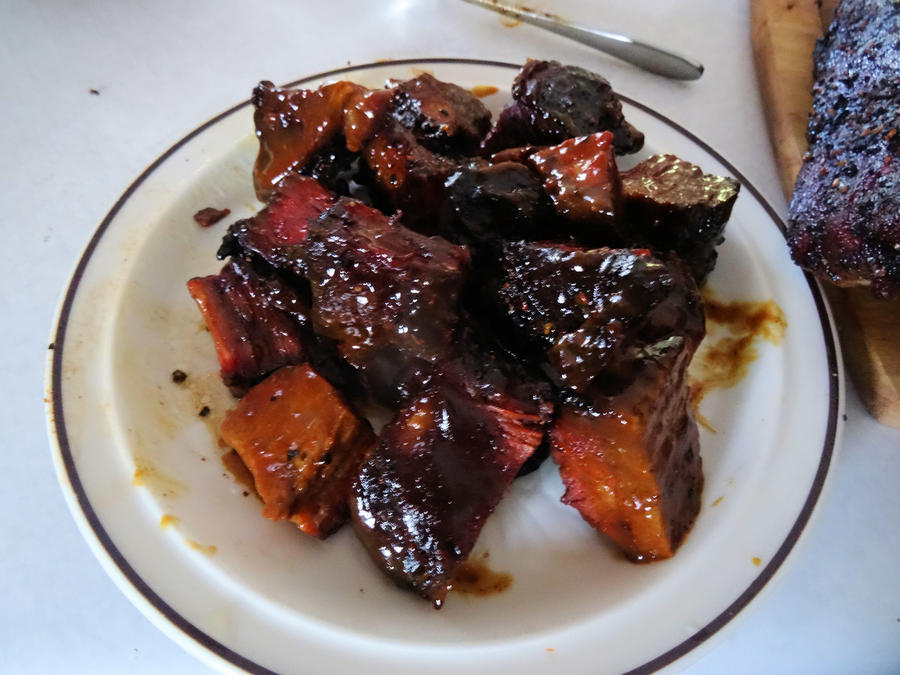
4:45 PM------------------Kill power, and remove from smoker. Take pics, plate, add sides, and eat---MMMMmmmmm.............
Note: All pieces ranged from 163˚ to 169˚ internal temp. Pieces must be at least 145˚ internal temp (USDA).
Thanks for looking!
Enjoy,
Bear
PS: My Step by Steps are "How Tos" not "Must Dos". You can adjust anything you want to suit your tastes, however do not tamper with the amounts of cure per pound of meat (in this case Tender Quick).
Proper amounts of meat & Tender Quick, ready for rubbing:
All rubbed & ready for fridge:
Small slices for salt-fry test:
Fry Test:
Salt-Fry test taste pieces----Perfect!
Ready for over night pellicle forming in fridge:
Fresh out of smoker (163˚ to 169˚ internal temp):
Bear's Plate MMMMmmmmm...............
A Little Extra BearView:
AWESOME LEFTOVERS !!
I had a bunch of leftovers, and I noticed the smaller pieces had the same consistency as my Dried Beef, but the great Bacon flavor, so I got the old slicer out.
I trimmed off all of the excess fat, cut out all of the bones, and sliced the left over meat very thin, like I do Dried Beef & Dried Venison. This stuff came out awesome, and my Son went nuts over it too!!!!
Check out the pics below.
Thanks,
Bear
Three things I got out of the leftovers:
Left----------Real tasty outside pieces that are great cold, and even better warmed up.
Top----------Bones with some meat I left on them---Great to warm up & chew on,
or add to beans & such for the great Bacon flavor.
Bottom------Thin sliced Dried Pork Chips----AWESOME!!!!
Close-up of Dried Pork Chips (very thin):
Meat left on bones----Just like "Bacon-On-A-Stick".
Chew off of bones or add to Beans & such.
View media item 487003
Last edited:


