Building a 3D printer with my 3D printer

  • Some of the links on this forum allow SMF, at no cost to you, to earn a small commission when you click through and make a purchase. Let me know if you have any questions about this.
SMF is reader-supported. When you buy through links on our site, we may earn an affiliate commission.

Chris_in_SoCal

Master of the Pit
Original poster
★ Lifetime Premier ★
Feb 18, 2012
1,009
1,871
SCV - So Cal
I have had more than a few 3D printers over the years but I usually buy cheap ones then regret it later. One of my favorite cheap printers was an ANET A8 plus which gave me a pretty large printing surface to print larger objects but It was like a Harley and I was always having to tinker with it to keep it working. When I got my FLSUN 3D printer I just kind of let it sit for a long time.

Then I decided to spend some money and do a special build. A Voron 2.4r2 300mm. It is not a manufacturer but a process to build a great 3D printer. You can buy kits with most of the parts for around $1500 but you still have print hundreds of 3D parts to build it. I went the stand alone route that will use a few parts from my ANET but end up with a much higher quality printer. I also added extra features I will post later as the project moves on.

The problem I ran into was I had never printed with ABS. It is a higher temperature filament that is known to warp easily. Especially with larger prints needed to build this new printer. So I had to take a pause and build an enclosure for my FLSUN. While I was at it the bed was getting worn out so I replaced it with a removable magnetic PEI bed.

flsun_qqs_pro_encloisure.jpg


I surrounded it with 5mm acrylic on hinges with 3D printed magnetic catches.

flsun_qqs_pro_enclosure_catch_01.jpg


Haha new soldering iron with a tip to insert threaded inserts into the ABS. If you look at the bottom of the printed part you can see the warping but these parts didn't matter for that.

flsun_qqs_pro_enclosure_catch_02.jpg


Here is a hint at the upcoming printer. The frame is at least 100% perfectly square. It is a good start.

voron_24r2_build_001.jpg
 
I stayed up way too late but I had to test the enclosure to see if it made a difference.

This is the same part with the same settings.

Before.

flsun_qqs_pro_enclosure_before.jpg


And After

flsun_qqs_pro_enclosure_after.jpg


I am more than satisfied with the results. Now I can continue printing out parts for the new 3D printer.
 
Just a follow up. For those that are interested but not up to date on 3D printing PLA is the typical filament when 3D printing. It has a low melting point and is the easiest to use in most cases.

There are many other choices these days as 3D printing is getting more mainstream. The thing is the tougher materials require higher temperatures to melt and are more likely to have shrinking issues after printing.

This is where I am. In order to make this new 3D printer I needed to print in ABS. Now that I have it working in my current printer I could stop there. That is not the point.

The FLSUN is great but by today's standard that changes regularly it is very slow.

The prints I showed in the comparison took about 4 hours each to print.

When I get this new printer made it should take about 20 minutes to print the same part at the same or better quality.
 
I have some UV filament that requires substantially higher temps than normal PLA. I wonder if an enclosure would help with that? Good idea.
 
  • Like
Reactions: Chris_in_SoCal
I have had more than a few 3D printers over the years but I usually buy cheap ones then regret it later. One of my favorite cheap printers was an ANET A8 plus which gave me a pretty large printing surface to print larger objects but It was like a Harley and I was always having to tinker with it to keep it working. When I got my FLSUN 3D printer I just kind of let it sit for a long time.

Then I decided to spend some money and do a special build. A Voron 2.4r2 300mm. It is not a manufacturer but a process to build a great 3D printer. You can buy kits with most of the parts for around $1500 but you still have print hundreds of 3D parts to build it. I went the stand alone route that will use a few parts from my ANET but end up with a much higher quality printer. I also added extra features I will post later as the project moves on.

The problem I ran into was I had never printed with ABS. It is a higher temperature filament that is known to warp easily. Especially with larger prints needed to build this new printer. So I had to take a pause and build an enclosure for my FLSUN. While I was at it the bed was getting worn out so I replaced it with a removable magnetic PEI bed.

View attachment 688543

I surrounded it with 5mm acrylic on hinges with 3D printed magnetic catches.

View attachment 688544

Haha new soldering iron with a tip to insert threaded inserts into the ABS. If you look at the bottom of the printed part you can see the warping but these parts didn't matter for that.

View attachment 688545

Here is a hint at the upcoming printer. The frame is at least 100% perfectly square. It is a good start.

View attachment 688546
Chris I was in your shoes a few years ago myself. I too built my own Voron 2.4 300x300x350. I started out with an Ender 3 and managed to print all my ABS parts on it which was quite the challenge for sure. I ended up putting it in an Ikea Lack enclosure to accomplish my printing.

It was however a ton of fun to build. I went the self sourcing path for my build and do not regret my decision. Of course 3 years ago there weren't many kits out there.

Enjoy the challenge, it is fun and rewarding.
 
  • Like
Reactions: Chris_in_SoCal
I have some UV filament that requires substantially higher temps than normal PLA. I wonder if an enclosure would help with that? Good idea.
From my last few weeks of working on this I would say it is definitely worth it. The cost of the acrylic might make you have to stop and think about though. It costs way more than it did 5 years ago.
 
Chris I was in your shoes a few years ago myself. I too built my own Voron 2.4 300x300x350. I started out with an Ender 3 and managed to print all my ABS parts on it which was quite the challenge for sure. I ended up putting it in an Ikea Lack enclosure to accomplish my printing.

It was however a ton of fun to build. I went the self sourcing path for my build and do not regret my decision. Of course 3 years ago there weren't many kits out there.

Enjoy the challenge, it is fun and rewarding.

It is very cool to know another brother on this site has made a Voron printer.

Since you made yours three years ago does it include a tap for leveling?

Did you use a canbus?

I am not knocking your build at all but these two new things seem to make the printer more capable. I added both but am far from using them.
 
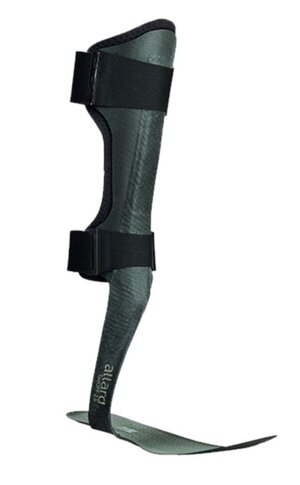
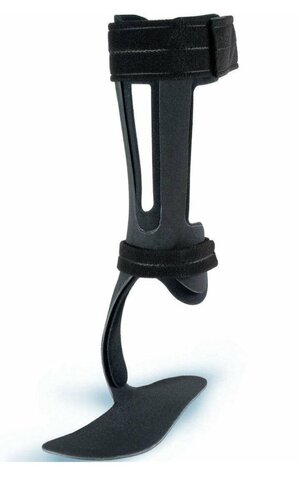
I've been looking into getting a 3d printer for the sole purpose of printing AFO leg braces. Years back, I was in a accident that left me paralyzed from the waist down. It's been a long road, but I learned how to walk wearing just AFOs. The problem is the cost and durability of leg braces on the market. They cost me around 1500 for a pair and usually last about 3 months before they break. I would love to be able to print something similar, to not only save money, but to get the personal satisfaction of not have to depend on medical sales companies. My current AFOs are made of carbon fiber but break in the same spot as all the rest. A durable plastic AFO is what I'm looking to print. Screenshot_20240214_084347_Chrome.jpg Screenshot_20240214_083906_Chrome.jpg
 
It is very cool to know another brother on this site has made a Voron printer.

Since you made yours three years ago does it include a tap for leveling?

Did you use a canbus?

I am not knocking your build at all but these two new things seem to make the printer more capable. I added both but am far from using them.
I did not do tap as it wasn't out there when I built mine. I did switch to the Omron sensor over the spec'd one they had in the BOM from AliExpress. I honestly have had zero issues with my bed leveling. It makes me feel as though tap is over engineering for these machines. But, I can see the use case of wanting to switch build plates and it being beneficial there. But I have had no issues and I use a reversible smooth and textured PEI plate.

I am heavily considering canbus though. I bought a BTT Octopus control board for an MPCNC that I am currently building which is overkill for that use. But, it would make a great swap with native canbus support for my Voron since I am still using the original dual SKR 1.4's. Then I could use one of those for my MPCNC build and have a spare for another project.

Again, this project was awesome and these printers are pretty awesome and capable machines. It's done everything I can throw at it and it does it reliably.

Let me know if you need any help or advice along the way and I will see if I can help.
 
  • Like
Reactions: Chris_in_SoCal
I did not do tap as it wasn't out there when I built mine. I did switch to the Omron sensor over the spec'd one they had in the BOM from AliExpress. I honestly have had zero issues with my bed leveling. It makes me feel as though tap is over engineering for these machines. But, I can see the use case of wanting to switch build plates and it being beneficial there. But I have had no issues and I use a reversible smooth and textured PEI plate.

I am heavily considering canbus though. I bought a BTT Octopus control board for an MPCNC that I am currently building which is overkill for that use. But, it would make a great swap with native canbus support for my Voron since I am still using the original dual SKR 1.4's. Then I could use one of those for my MPCNC build and have a spare for another project.

Again, this project was awesome and these printers are pretty awesome and capable machines. It's done everything I can throw at it and it does it reliably.

Let me know if you need any help or advice along the way and I will see if I can help.

Thanks, it's mostly going to be printing for a while. Lots of parts to print.

I ended up getting kits for the hardware, pulleys/gears and wiring, the three more difficult things to source. I have an Octopus pro with 2209 x8, 7" touch screen, canbus, voron tap and the Stealthburner kit. I am still waiting on the linear rails, got held up for Chinese new year.
 
I ran into a little issue with the higher temps melting ABS. The adhesive on the magnetic bed started separating. After some searching it was solved with red high temperature RTV silicone.

My bed has never been more level since this printer was new. 20 hours of printing since and it is working great.

flsun_qqs_pro_new_metalic_bed_leveled.jpg
 
  • Like
Reactions: 02ebz06
I got lost after looking at the soldering iron 🤔

The Soldering iron can be set to a precise temperature to heat up the metal threaded inserts and melt them into the abs parts. The hole is slightly undersized for a tight fit. In this case 250 Celsius.
 
My son has been playing with printers for a few years, he has gone through a few, but my question to you guys is how do you deal with nozzle plugging? Some are worse than others, plastic wise.
 
My son has been playing with printers for a few years, he has gone through a few, but my question to you guys is how do you deal with nozzle plugging? Some are worse than others, plastic wise.
That is one thing I have never had an issue with. What I would suggest is warm up the bed and extruder to temperature before printing and/or in the slicer set the extruder to a higher temperature.
 
  • Like
Reactions: SmokinEdge
SmokingMeatForums.com is reader supported and as an Amazon Associate, we may earn commissions from qualifying purchases.

Latest posts

Hot Threads

Clicky