Brinkmann Trailmaster Limited Edition

  • Some of the links on this forum allow SMF, at no cost to you, to earn a small commission when you click through and make a purchase. Let me know if you have any questions about this.
SMF is reader-supported. When you buy through links on our site, we may earn an affiliate commission.
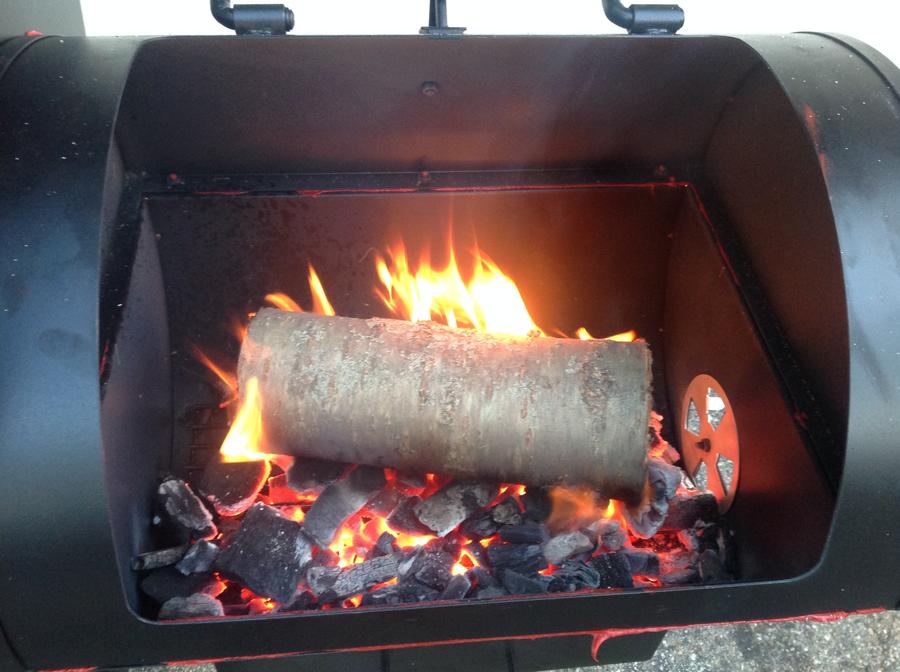
Whew;-) So from what you are saying it sounds like it is an air flow problem. I use a char griller Smoking Pro and I can get the SFB over 500 degrees  ( an accident:-) and can pretty much take the main chamber to 400. Using the dampers, I start wide open t getup to temp, then adjust down to settle at 225 - 250 depending. You should be able to do the same. Are there any obstructions anywhere? I did notice that I have to move ash from the bottom of the charcoal tray in the SFB to keep from smothering  it, but that was an easy fix.  
 
I just assembled and cured my Trailmaster yesterday.  My first smoke is country ribs and chicken.

What I can say so far (hour into it) is that even with the tuning plate, I have about a 25 degree difference between sides.  I will try a much larger water pan next time.  I have a very small on in on the grate.  I will put the large one on the plate.  I need to re-apply the RVT to the ash tray seam (where it meets the fire box) and the seal between the fire box and the main chamber.

Question:  Can I apply it to the outside seam?  OR so I have to pull it all apart... scrape... and redo it?

Next round of mods will be to put a seal on the door of the chamber, and build a charcoal box!


I have had some success with two small water pans that do save some grill space. I am looking at  partially "blocking" the inlet  to the main chamber to deflect some of the heat. I am using aluminum foil  to test sizes and location and will use a more durable  metal for a deflector when I have it nailed down.   You say  you are using RTV - what kind? I use an FDA food safe approved high temp  version and it does not break down. Regular RTV won't really work. IF the RTV g has deteriorated, then you should really scrape and reapply, but just going over the outside seam should do it. Good luck.
 
Thanks for the tip!.  I used two small pans, and it did help.  I think most of my issue was too much fuel.  Once I was just burning a few sticks at a time, it was easier to regulate.

As for the RTV, It is whatever Menards had in their fire place section.  It is rated up to 600 deg.  I think I will go for the outside seam and see what that gets me.


Yes, as my family all can agree on chicken...  Well, in the spirit of both experimenting and experience; I expect a 23% decline in the Chicken population this year alone!  Once I feel like I have a handle on my pit.  I will try a pork butt and a brisket!
 
I hope you are keeping a log of your smoking efforts. Mine is invaluable as both a learning tool as I went and a reference when I need a quick  review. BTW - as a quick review, go over pork butt and brisket smoking techniques in the Forum  as there are  differences  about how you go about  smoking different meats. Brisket is a real trip  especially when you hit a "stall." You might want to have a cooler (Cambro) available for finishing up. An old towel is also handy for wrapping it. Good luck! 
 
@bigbear,  after putting in the 2 small water pans, what temp difference did you see in the chamber?  I have a similar problem with mine where I have a wide temp difference of about 30 deg between right to left sides of the chamber. 
 
jcc16415  I put the two pans in fairly soon in the process, so I don't have a definitive answer.  But I would say it equalized side to side about 10-15 degrees.
 
Has anyone added in a 2nd tier rack?  Cant be that hard, and it would double my cooking space for ribs.  Would JB weld be safe to use and strong enough, or would I need to have it welded in?  Would need a setup that I can remove it easily when smoking butts, turkeys, etc.
 
You can make a second tier rack out of a flat replacement grill.  Many sizes and shapes are available at Home Depot, Lowe's, and ACE, maybe on sale this time of year.  I got four 1/4" diameter bolts 6 inches long.  Each bolt from the head end had the head and a washer that hung down through a corner of the grill. You screw another washer and nut up underneath to lock the bolt into the grill making a leg.  Repeat on other three corners.  You have a small table that will fit on top of the  smoker grill.  

For the bottom, screw a nut up, add another washer, and a second nut.  Tighten the nuts against each other and you have a stop to hold the leg on top of the grate.  You adjust the height to clear foods on the bottom but to also clear foods on the top.  This is movable and just sits on the main grate.  

You can use JB Weld as far as temperature goes, but you don't need it with the bolts setup.  

To repeat from top to bottom:  

bolt head

washer

2nd tier grill

washer

nut

space to clear bottom food

nut

washer

nut

sits on smoker grate.  

Hope this helps.  See picture.  E-mail at [email protected] 

Worked_the_World
 
  • Like
Reactions: lance0623
On the Brinkman TrailMaster LE  can anyone tell me how to fit a 4" round elbow into 4"x 3" oblong hole at the chimney? Would appreciate any ideas. Thanks!
 
You can make a second tier rack out of a flat replacement grill.  Many sizes and shapes are available at Home Depot, Lowe's, and ACE, maybe on sale this time of year.  I got four 1/4" diameter bolts 6 inches long.  Each bolt from the head end had the head and a washer that hung down through a corner of the grill. You screw another washer and nut up underneath to lock the bolt into the grill making a leg.  Repeat on other three corners.  You have a small table that will fit on top of the  smoker grill.  

For the bottom, screw a nut up, add another washer, and a second nut.  Tighten the nuts against each other and you have a stop to hold the leg on top of the grate.  You adjust the height to clear foods on the bottom but to also clear foods on the top.  This is movable and just sits on the main grate.  

You can use JB Weld as far as temperature goes, but you don't need it with the bolts setup.  

To repeat from top to bottom:  

bolt head
washer
2nd tier grill
washer
nut
space to clear bottom food
nut
washer
nut
sits on smoker grate.  

Hope this helps.  See picture.  E-mail at [email protected] 
Worked_the_World

Great idea, thank you!
 
SmokingMeatForums.com is reader supported and as an Amazon Associate, we may earn commissions from qualifying purchases.

Latest posts

Clicky