Another offset temps measuring thread.

  • Some of the links on this forum allow SMF, at no cost to you, to earn a small commission when you click through and make a purchase. Let me know if you have any questions about this.
SMF is reader-supported. When you buy through links on our site, we may earn an affiliate commission.

Chasdev

Master of the Pit
Original poster
SMF Premier Member
Jan 18, 2020
1,228
1,016
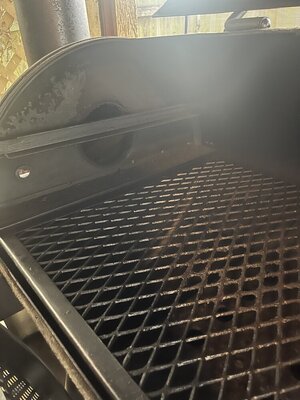
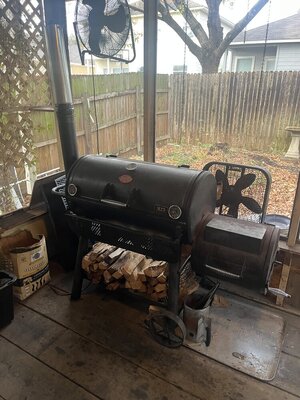
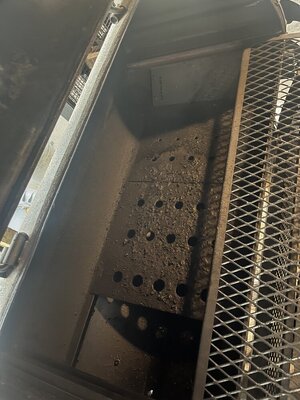
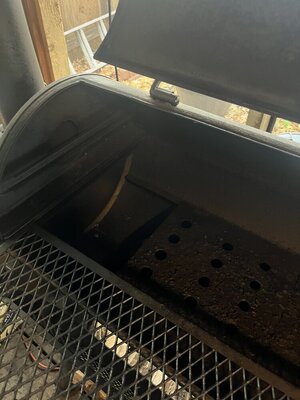
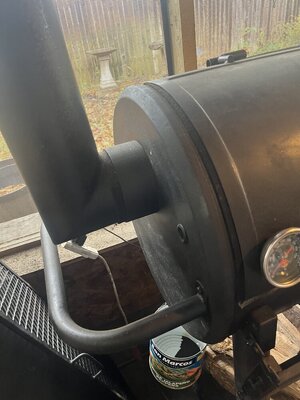
After my most recent stickburner cook, I find that while I can maintain the air/smoke temp in the cook chamber like I want, based on how the brisket turned out there's too much radiant heat coming up from the tuning plate, which distance I estimate to be 8 to 10 inches.
Question is what is the ideal distance from a tuning plate and the cook grate?
On pro rigs like Franklin, Goldie's and many others, how far "up in the air" is the cook grate from the source of radiant heat?
I suspect since they probably don't have to use a tuning plate, the distance is more than 12 inches..
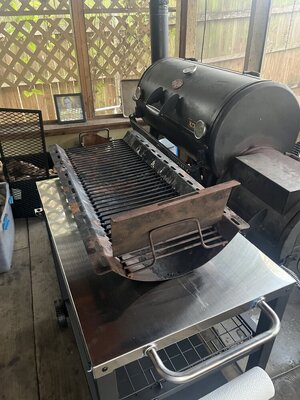
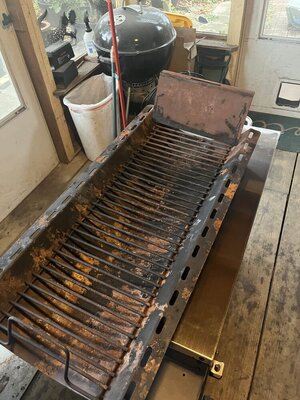
I think I'm going to buy a cheap select grade brisket and cook with no tuning plate, and perhaps no deflector just to see how the underside of the brisket cooks.
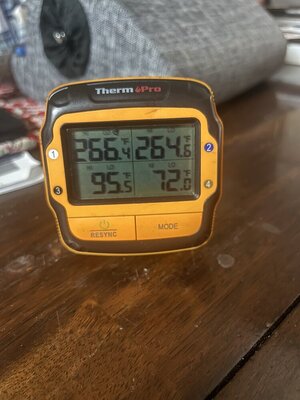
Now the subject of digital probe placement in the cook chamber comes up.
Potato or aluminum foil or rubber mounted post or laying flat on the cook grate on the expanded metal or hanging off the underside of the cook grate perhaps?
Lastly, how well do the digital temp probes sample radiant heat compared to smoke temp, or is there a difference and/or does the difference matter?
 
My RF is about 6 inches from the plate to the grate.

Have you done the bread method with it? Take a loaf and spread it out on the grates and then flip all at the same time and you will see where your hot spots are based on the toast level on the bread. Cheaper than a brisket to test with for sure.
 
Yes BUT, I get to smoke a brisket!
 
What smoker do you have?
I'm pretty sure the Franklin or Glodies smokers have tuning plates
 
I doubt they need or have them too.
There's a large offset smoker outside the "Oak Lodge" in Brownwood state park, the former site of the blacksmith shop which was active when the park and buildings were constructed in the 1930's by the CCC, and the cook grate in it is two feet above the lower chamber opposite the burn box.
That's what got me interested in figuring out how to achieve less radiant heat in the cook chamber.
The builders could have placed the cook grate and lid opening any place they wanted and they chose to put the cook level in the top third of the cooker..
 
I've got a Franklin pit. There's no need for turning plates because of the design. However, the area right next to the firebox isn't that useable. You have two choices. You can take out the tuning plates or cook fat down.

Tuning plates have advantages and disadvantages but one major disadvantage is that radiant heat that comes from trying to trap the heat and let it up slowly across the pit. Pits with a baffle have a similar problem where they just direct the heat to the middle of the pit and make it seem like the pit temp is even. An advantage of tuning plates is they give you a better heat gradient from top to bottom.

Reverse flows have a similar issue. That can be partially resolved by designing the pit with the reverse flow plate farther under the grate. On some of them it's right below the grate.
 
Where does your smoker exhaust ?

What I found with my OC Brazos that exhausted at grate level, is if I used tuning plates the heat/air flow would run under the meats and then mostly right out the exhaust. I would get bottom burn on the meats. It did not show up on my digital and analog temp gauges, because they were all above grate level.

IMO, if using tuning plates ( or what some call a convection plate ) the cooker needs to exhaust out the top.

On the Brazos, I reduced air flow into the cooker with the damper on the firebox door, so the heat/ air flow would rise to the top immediately. But then, the Brazos had a baffle that further complicated things. A baffle and exhausting at grate level are also not compatible.
 
  • Like
Reactions: Dustin Dorsey
Here's the exhaust port, right at the cook grate level.
Also the OEM charcoal tray and the deflector balanced in the position it's supposed to occupy.
Tuning plate config also.
After my last brisket and the way the bottom up radiant heat messed me up, I'm thinking on going back to the OEM arrangement just to see what happens.
Funny how my digital probes, laying flat on the cook grate on each end of the brisket, reported exactly the temp target I wanted, from 225 to one jump to 300 before I moved the coal bed away from the opening.
But they were not warning me about the radiant heat.
I'm scratching my head on how to monitor the radiant.
 

Attachments

  • IMG_3334.jpg
    IMG_3334.jpg
    130.9 KB · Views: 3
  • IMG_3332(1).jpg
    IMG_3332(1).jpg
    178.4 KB · Views: 3
  • IMG_3335(1).jpg
    IMG_3335(1).jpg
    153.1 KB · Views: 2
  • IMG_3336(1).jpg
    IMG_3336(1).jpg
    120.4 KB · Views: 2
  • IMG_3337(1).jpg
    IMG_3337(1).jpg
    134.5 KB · Views: 2
  • IMG_3339(1).jpg
    IMG_3339(1).jpg
    166.7 KB · Views: 4
  • IMG_3341.jpg
    IMG_3341.jpg
    138.1 KB · Views: 2
  • IMG_3346.jpg
    IMG_3346.jpg
    183.9 KB · Views: 2
Last edited:
I deleted the tune plate and re-installed the charcoal grilling tray and deflector as seen in the last picture above and did an upper and lower level heat check in four places both upper and lower cook grate levels.
Decided the middle of the lower cook grate was the best plan.
Here's 1.5 hours into this morning's brisket cook temps...so far.
This brisket has a thin flat so the flat end is already going above the point end.
 

Attachments

  • IMG_3353.jpg
    IMG_3353.jpg
    111.2 KB · Views: 0
SmokingMeatForums.com is reader supported and as an Amazon Associate, we may earn commissions from qualifying purchases.

Hot Threads

Clicky