matt c
Newbie
- Sep 9, 2016
- 8
- 10
Part of me wishes that I had gone with sourcing the parts and designing myself, but the BPS kit is convenient and lots of reviews state it just works!
So I sourced the kit from the UK supplier once they were in stock and bought a new drum for confidence of no nasty residues.
Marked it up and then drilled using the supplied stepped drill bit.
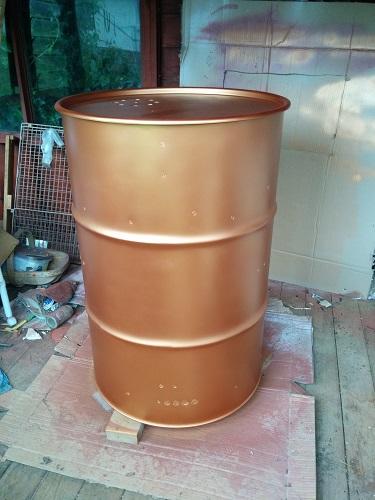
I liked the look of a few copper coloured builds on forums and the like, so I found a source for Stove Bright paint who have a fairly wide range of colours and used this together with a high heat primer as it was going onto a steel surface. I cleaned the outside surface with some paint prep wipes and cleaned again with Isopropyl. Two cans of each (primer and top coat) was used although I bought three. Enough for touch ups if needed down the line I guess.
Then all that was left to do was fit the kit.
Additional to the kit I got a couple of thermometer probe eyelets, one of which is fitted here just above the heat shield and will accommodate two maverick probes.
To season I wiped down the inside with soapy water, dried and then coated with vegetable oil. Then loaded the basket with lump wood charcoal and set her low to start with for an hour or so then increased the temps over the course of a few hours in line with the Stove Bright curing instructions.
The paint gave off quite a lot of odour during the cure, but subsequent cooks have been completely odourless and the paint has cured nicely from my admittedly inexperienced perspective. A few weeks later and three cooks in, it is looking as good as it did after curing. I am optimistic that it will last reasonably well providing my surface prep was good enough.
Now just need to learn to use it properly!
So I sourced the kit from the UK supplier once they were in stock and bought a new drum for confidence of no nasty residues.
Marked it up and then drilled using the supplied stepped drill bit.

I liked the look of a few copper coloured builds on forums and the like, so I found a source for Stove Bright paint who have a fairly wide range of colours and used this together with a high heat primer as it was going onto a steel surface. I cleaned the outside surface with some paint prep wipes and cleaned again with Isopropyl. Two cans of each (primer and top coat) was used although I bought three. Enough for touch ups if needed down the line I guess.
Then all that was left to do was fit the kit.
Additional to the kit I got a couple of thermometer probe eyelets, one of which is fitted here just above the heat shield and will accommodate two maverick probes.

To season I wiped down the inside with soapy water, dried and then coated with vegetable oil. Then loaded the basket with lump wood charcoal and set her low to start with for an hour or so then increased the temps over the course of a few hours in line with the Stove Bright curing instructions.
The paint gave off quite a lot of odour during the cure, but subsequent cooks have been completely odourless and the paint has cured nicely from my admittedly inexperienced perspective. A few weeks later and three cooks in, it is looking as good as it did after curing. I am optimistic that it will last reasonably well providing my surface prep was good enough.
Now just need to learn to use it properly!

