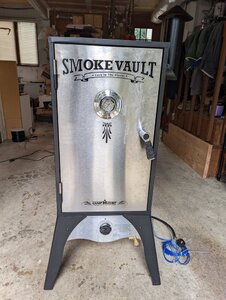
Smoke Vault gas smoker makeover

  • Some of the links on this forum allow SMF, at no cost to you, to earn a small commission when you click through and make a purchase. Let me know if you have any questions about this.
SMF is reader-supported. When you buy through links on our site, we may earn an affiliate commission.
Keep it mind these are not a normal fan. They do not blow at you, they are more like a paddle wheel. Getting centered on the back panel seems best. I’ve seen some mounted in a corner or on the top panel and I wonder about the effectiveness.

Yea, I thought of using one to maybe help push/pull the smoke out of the mailbox, then I looked at it and saw how the blades were. They still move air, it is just causing turbulence. Where ever I put it, will have to be between where the shelves are, and I have to decide how close it can be to the thermometer, which also has to go between shelves.
 
The good thing about the exhaust out the side... condensation drips won't land on the food as if it (exhaust vent) were over top of the food...

As for closing off the top vent... a magnetic matt (ie. signs for cars)... cut to fit the whole top of the smoker....
 
  • Like
Reactions: Nefarious
As for closing off the top vent... a magnetic matt (ie. signs for cars)... cut to fit the whole top of the smoker....
It turns out that a 4" plate used for round junction boxes just fits and only costs under $4. It is close and maybe just the washer from under side holds it on. If it doesn't work i'll certainly look into the magnetic matt. But if they had beer logo's on them, i'd be all over it.

Thanks.
 
I don't think I have seen anyone do a mailbox mod on a propane smoker so looking forward to seeing the results!
It's getting better and better every day. There are.still.a.couple of.issues but I think it. is under control now. The big problem is I don't really know how much smoke I should see out the stack. I asked the admin if I could see the smoke pic's people submit to be OTBS and so far he haven't responded.

I'll post.some smoke pics in a couple of days once I get the stack put on for real instead of the drainage pipe stack.
 
This is my fan setup. Although it should be mounted in the middle of the back panel, I recommend not mounting it directly to the back of the smoker. It gets really hot. I ended up adding some standoffs to leave a bit of an air gap to provide some cooling. Most of the convection fans have a long shaft so this should not be a problem. I also put some screened vents in the sides of the box to help cool. I used a metal electrical junction box.

I do believe the fan is a game changer for these little cabinet smokers. I get consistent temps throughout the cabinet, better smoke dispersion, and better bark. It is great for jerky where you need some drying action.

View attachment 526819
Is this a multi speed fan, all I've seen are single speed versions. Whats the circuit board do?
 
Yes. I can control the fan speed using a speed controller. I can just stir the smoke around and equalize temperatures, or move the air around in the cabinet more aggressively to form better bark. It also shortens the cook time a bit. It is also great for drying jerky (which it is doing right now). I repurposed the speed control from a unit sold on Amazon.
 
Yes. I can control the fan speed using a speed controller. I can just stir the smoke around and equalize temperatures, or move the air around in the cabinet more aggressively to form better bark. It also shortens the cook time a bit. It is also great for drying jerky (which it is doing right now). I repurposed the speed control from a unit sold on Amazon.
So then it is a pwm control?
 
I appreciate the link, thanks.

At this point I am not wanting any dials or switches on the smoker and want to try to control everything I can with the microcontroller.

The UI for the controller will be implemented on the smoker with a couple of 320x240 touch screens and would like to use this as the interface to controlling the fan as well.

I have been busy trying to learn about curing meat to make some corned beef. It turns out I have been making it for years in potentially an unsafe way and I need to correct that. I'm having foot surgery in a few weeks and need to get the corned beef resolved before surgery.
 
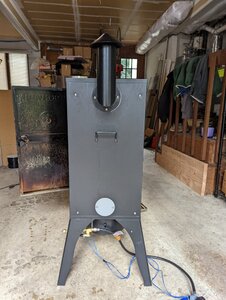
I have a question. I ordered the exhaust stack that will stick out the side opposite the mailbox so the draw will be cross smoker. Maybe this is useful, maybe not. The question is, how important is it to be as close to the top as possible?

The problem is there is a lip on the top of the side of the smoker where the top is attached to the smoker. It is about 3/4 of an inch high. If I mount the exhaust stack below it, it will push the exhaust down an additional 3/4" and from the drawings it is already 1" down because of the exhaust flange.
 
The top has been plugged and the stack is supposed to arrive today. Other then deciding how low I am willing to mount it, under the lip or over it, 3/4" difference, probably not a problem either way.

The fan is a different story. The blade diameter is wider then the shelf height, and will require losing a rack, probably the middle one. Another alternative is to put the fan on the top. To me this doesn't make too much sense as.the blades do not push or pull, they just mix. Mixing at the top doesn't serve the right purpose.

i spent many hours yesterday and today deciding if I can be ok with losing the middle shelf and I guess I am. But, thats where the pid thermometer is at the moment. The thermometer can't go on the sides because thats where the thermal mass goes. If I could find 2 fans with smaller blades and mount them on the sides.of the thermometer, i would be golden. I'm going to draw up the dimensions this afternoon and will add an image of it.
 
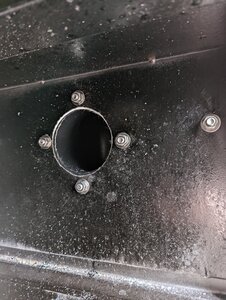
I got the stack installed today, not much to talk about. I had to take the mailbox off for a couple of reasons, most importantly I have to make an attempt to deburr the outside of the air intake holes. That will come tomorrow. It also has not been leak tested until the mailbox is returned.

PXL_20220304_224120269.jpg PXL_20220304_224055297.jpg PXL_20220304_224144380.jpg
 
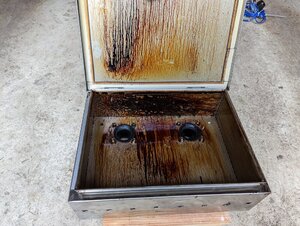
Here is a picture of the inside of the mailbox. I have to wear gloves every time I touch it. Everything has an not so pleasant smell. Not sure I made this any better. This is the buildup from about 6hrs of cook time.

PXL_20220304_225649246.jpg

Creosote is caused by wet and poorly burned wood. Given this mod uses pellets I'm not sure how much I can reduce this. The smoker is going to have to sit on a plastic mat, this will not make someone happy.
 
The good thing about the exhaust out the side... condensation drips won't land on the food as if it (exhaust vent) were over top of the food...

As for closing off the top vent... a magnetic matt (ie. signs for cars)... cut to fit the whole top of the smoker....
I pup a small round plug bolted just over the hole. One problem with this is, it isn't flat so I can't put big things on top like a table. I have thought about your suggestion several times and am looking into it. I appreciate your perspective.
 
N Nefarious your stack is almost identical to mine. I'd put a drip pan under it. Condensation will likely collect on the inside of the rain hat and drip down the outside of the stack. Mine is on an mes 30 so your mileage may vary.
 
I think this will wrap up this part of the build.


I got to thinking that if it's pressure that is blocking the flow of smoke into the smoker from the mailbox, how can I reduce the pressure, just so I know.

If you recall the ideal gas law PV=nrT we see that the pressure is proportional to the temperature. If I can lower the temperature the pressure should lower. I had the smoker running so I started closing the needle valve. Sure enough, at around 160° smoke starts to come out of the new stack.

Once I figured this out, I want to see if there is enough smoke and I had a piece of salmon in the garage refrigerator that should have gone to the compost bin. I cooked it between 150 and 160. I couldn't eat it, I could tell from the outside that it got some good smoke, not sure how much, the tube ran out of pellets somewhere in the middle, I was busy watching the sounders lose a match vs real salt lake, so I couldn't attend to it.

Maybe this is the answer, or so I thought. I started thinking how can I reduce the pressure in the box, I got good results from a 3' stack, but that's not implementable. What if I added a second stack. Two stacks will reduce the pressure because of a larger area, the longer stack increases the speed the gas leaves the smoker, so in the end the same result.

To prove this I was going to go out and take the patch over the original exhaust vent off and put in a drain pipe stack. This would give me an idea of how the smoker would work for a higher temperature cook. Then I considered how this would effect the lower temperature cooks and it would not have enough pressure to keep any smoke in the smoker, which is why the original exhaust was a pin wheel damper. These dampers reduce the area to 1/2 so with two of them I would be in the same position as having one tube. I did find the top part of a 3" damper but would require some welding.

I just couldn't get myself to go out and try it. I can't see a path forward so I have decided that the mailbox mod will not work on this smoker given the skills I have, plus more cost. I got the smoker for about $250 and the mailbox and stack are sitting close to $200 and anymore investment seems like a poor use of money.

So, I will take the mailbox off and use it as before except I will use the smoke tubes for smoke instead burning off of the flame diffusion plate.

I can still build the PID or just go buy one, I'm not sure. We will see how the box works with the smoke tubes.
 
SmokingMeatForums.com is reader supported and as an Amazon Associate, we may earn commissions from qualifying purchases.

Hot Threads

Clicky