This may get moved but I'm putting it in General Discussion because although I modified this smoker specifically for sausage, the concept can be used by many for all-round smoking. There is some info here that's good stuff and may be of benefit :-)
Soooo....I started making sausage at Christmas with the help of several fantastic people in this forum. Since then, I have made about 150# of sausage and about 35# of bacon. Yes Disco, even if there were a 12-step program I don't think I'd attend the meetings....hee hee hee. I have a great support group right here and that's all I need. After several runs on the big smoker and fine-tuning recipes and techniques, I decided that I'd like to have a vertical smoker versus using the horizontal T-Pit that I have. Did tons of reading and research on the units and figured out pretty quick that no matter what I bought it'd need some serious modifications to run (and maintain) the low temps required. I stumbled upon a screaming deal on a brand new Masterbuilt 2-door vertical propane unit. After reading about the horror stories of one member with his same unit I was reluctant to go with the Masterbuilt but figured that worst case, I'd trash it and start over....it was that cheap. I put the thing together, took it out on the patio, and fired it up.
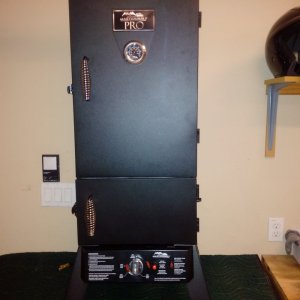
Here is the base unit.
Figured out immediately that I'd never be able to get low enough temps with the factory valve system. At it's lowest setting it was running 100 degrees too high for sausage smoking. Needed a way to control the flow of propane in a much more precise manner. In my inventory of parts left over from previous mods, I had a micro adjustable needle valve that I dug up. In order to use the factory burner and igniter, the factory valve system had to remain in tact. Took the unit out to the garage, disconnected the factory gas line, played with positioning of the needle valve, and installed it using 4 rubber clad cable clamps bolted through the bottom of the smoker. There was very little space to work with so I had to buy and attach a couple of brass fittings to change the angle that the gas lines connected to the factory valve, but that was easy stuff, just another trip to the hardware store.
A couple pics of the valve installation and gas lines.


Back out to the patio, hooked it back up, and VOILA!! It worked perfectly. I was able to dial the flame down to almost nothing and maintain it. So far, so good. Now to the next big hurdle: the metal housing on this thing was so thin there was no density at all to maintain temps. Needed to work something out to keep the heat stable inside the smoker. Went to Lowe's and bought a sheet of 1/4" concrete board (tile backer). Special note: use Hardi Board, not DuraRock or Wonder Board. Too many chemical components in the latter two that I don't want in my sausage. You can smell it when you cut the stuff.
The pieces were carefully cut to fit the sides, back, and top. Door was already somewhat lined so I left that alone. Didn't worry about the bottom because heat rises, it's not going to fall out the bottom :-) I have more pics but this will give you the idea. All the concrete board was secured with several dabs of high temp silicone caulk, also left over from a previous mod.


Next....taking care of the leaking doors and get them sealed. I had a roll of gasket material, which is the same stuff used on the BGE's. I had to adjust the door latches (very simple) to account for the thickness of the gasket material but it's sealed tight as a drum. No smoke or heat loss at all.


The highest holes in the frame for the rails that the cooking racks slide onto were way too low. I needed to get them all the way to the top so I drilled 4 holes as high as I could get them and clicked the rails into place.

Then several pieces of #3 Rebar were cut so go across the rails for hanging the sausage from

One set of the rails was used at a lower level to place the Maverick temp probe, and the stock pan at the bottom makes a great pan for my smoker wood as well as acting as a heat deflector plate. This radiates the heat throughout the unit versus having one direct heat blast going straight up the middle.

The mods took a bit of thought and creativity but at the end of the day it works amazingly well. I have less than $200 (and a few hours of time) invested in a smoker that is perfect for what I wanted it to do. Just for giggles I ran the temp up to 235 to see if I could maintain higher temps in the event I was ever overloaded on my big smoker and needed more space. Once again, it went right to temp and stayed there. What's really interesting is that even at 235 the metal outer housing of the smoker was barely warm to the touch. All of the heat was staying inside the unit where it needs to be by virtue of the concrete board. I guess in essence I've created a brick lined convection smoker :-) The only thing you can see that makes you think it's been modified is the small brass knob on the lower left side for the needle valve. Outside of that, it looks like it did straight out of the box. All in all I couldn't be happier with the results of this. I've done a lot of mods to smokers but this was the most challenging due to space constraints and what I was looking to accomplish. Hope some folks can find useful info here that may help them with similar units. If I had to do it again it'd probably only take a couple of hours and was well worth it. I have smoked 6 batches of sausage on it (have one going as I type) over the past week and a half and all have come out exceedingly well. In the infamous words of Hannible, "I love it when a plan comes together"
Sausage smokin' in Lago,
Robert
Soooo....I started making sausage at Christmas with the help of several fantastic people in this forum. Since then, I have made about 150# of sausage and about 35# of bacon. Yes Disco, even if there were a 12-step program I don't think I'd attend the meetings....hee hee hee. I have a great support group right here and that's all I need. After several runs on the big smoker and fine-tuning recipes and techniques, I decided that I'd like to have a vertical smoker versus using the horizontal T-Pit that I have. Did tons of reading and research on the units and figured out pretty quick that no matter what I bought it'd need some serious modifications to run (and maintain) the low temps required. I stumbled upon a screaming deal on a brand new Masterbuilt 2-door vertical propane unit. After reading about the horror stories of one member with his same unit I was reluctant to go with the Masterbuilt but figured that worst case, I'd trash it and start over....it was that cheap. I put the thing together, took it out on the patio, and fired it up.
Here is the base unit.
Figured out immediately that I'd never be able to get low enough temps with the factory valve system. At it's lowest setting it was running 100 degrees too high for sausage smoking. Needed a way to control the flow of propane in a much more precise manner. In my inventory of parts left over from previous mods, I had a micro adjustable needle valve that I dug up. In order to use the factory burner and igniter, the factory valve system had to remain in tact. Took the unit out to the garage, disconnected the factory gas line, played with positioning of the needle valve, and installed it using 4 rubber clad cable clamps bolted through the bottom of the smoker. There was very little space to work with so I had to buy and attach a couple of brass fittings to change the angle that the gas lines connected to the factory valve, but that was easy stuff, just another trip to the hardware store.
A couple pics of the valve installation and gas lines.
Back out to the patio, hooked it back up, and VOILA!! It worked perfectly. I was able to dial the flame down to almost nothing and maintain it. So far, so good. Now to the next big hurdle: the metal housing on this thing was so thin there was no density at all to maintain temps. Needed to work something out to keep the heat stable inside the smoker. Went to Lowe's and bought a sheet of 1/4" concrete board (tile backer). Special note: use Hardi Board, not DuraRock or Wonder Board. Too many chemical components in the latter two that I don't want in my sausage. You can smell it when you cut the stuff.
The pieces were carefully cut to fit the sides, back, and top. Door was already somewhat lined so I left that alone. Didn't worry about the bottom because heat rises, it's not going to fall out the bottom :-) I have more pics but this will give you the idea. All the concrete board was secured with several dabs of high temp silicone caulk, also left over from a previous mod.
Next....taking care of the leaking doors and get them sealed. I had a roll of gasket material, which is the same stuff used on the BGE's. I had to adjust the door latches (very simple) to account for the thickness of the gasket material but it's sealed tight as a drum. No smoke or heat loss at all.
The highest holes in the frame for the rails that the cooking racks slide onto were way too low. I needed to get them all the way to the top so I drilled 4 holes as high as I could get them and clicked the rails into place.
Then several pieces of #3 Rebar were cut so go across the rails for hanging the sausage from
One set of the rails was used at a lower level to place the Maverick temp probe, and the stock pan at the bottom makes a great pan for my smoker wood as well as acting as a heat deflector plate. This radiates the heat throughout the unit versus having one direct heat blast going straight up the middle.
The mods took a bit of thought and creativity but at the end of the day it works amazingly well. I have less than $200 (and a few hours of time) invested in a smoker that is perfect for what I wanted it to do. Just for giggles I ran the temp up to 235 to see if I could maintain higher temps in the event I was ever overloaded on my big smoker and needed more space. Once again, it went right to temp and stayed there. What's really interesting is that even at 235 the metal outer housing of the smoker was barely warm to the touch. All of the heat was staying inside the unit where it needs to be by virtue of the concrete board. I guess in essence I've created a brick lined convection smoker :-) The only thing you can see that makes you think it's been modified is the small brass knob on the lower left side for the needle valve. Outside of that, it looks like it did straight out of the box. All in all I couldn't be happier with the results of this. I've done a lot of mods to smokers but this was the most challenging due to space constraints and what I was looking to accomplish. Hope some folks can find useful info here that may help them with similar units. If I had to do it again it'd probably only take a couple of hours and was well worth it. I have smoked 6 batches of sausage on it (have one going as I type) over the past week and a half and all have come out exceedingly well. In the infamous words of Hannible, "I love it when a plan comes together"
Sausage smokin' in Lago,
Robert


