- May 27, 2024
- 12
- 8
This weekend I will was watching some BBQ competition show and noticed one of them had temperature controller on smokers, I elated! The set it and forget it aspect of a pellet grill was the only reason I never got an offset smoker but now I finally had the best of both worlds. It was just funny because I had remembered purists screaming from the roof top that pellet grills temp control wasn’t true BBQ and now this stuff is mainstream even the norm in competitions….
Anyway took a dive into commercial units and spending $250-$400 on something that takes less than $100 to make yourself… I’ve always wanted to make a PID for other hobbies I have like my dry age fridge, heat treatment kiln for my knife making and now a smoker. This holiday weekend I have spent 8 hours learning everything I can about how to do this on my own so I don’t potentially buy the wrong stuff.
I pulled the trigger and now I just wanna make sure i got the right stuff and don’t blow my PID accidentally lol.
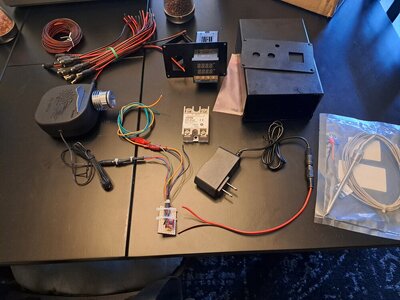
So here is the list of things I purchased, if people with actual experience take a look at it I’d appreciate it…
This is the power cable I will use to power the PID
https://a.co/d/5YoFN5B
The Rex-c100 PID
This is the blower, I made sure to buy 12v and >1amp DC
https://a.co/d/gTQAco9
I purchased the 12v 2amp DC plug for the power source of the blower. 2amps in case I end up needing a bigger fan
https://a.co/d/1vdf2mH
This is a little upgrade I got alligator clip
https://www.auberins.com/index.php?main_page=product_info&products_id=172
I purchased this to be able to hook up the female adapter to the PID, I heard u had to use the same cable
https://www.auberins.com/index.php?main_page=product_info&products_id=179
Here is the female plug for the enclosure
https://www.auberins.com/index.php?main_page=product_info&products_id=426
Buzzer for the PID
https://www.auberins.com/index.php?...ducts_id=215:b756d8a14e401468095386ae4ef72d15
I wondering if I could get advice on running this without the SSR using this diagram can I run what I purchased without it and without the mosfet?
Another thing I was thinking since the PID I purchased will come with the SSR should I just use it since it couldn’t hurt and will the power cable i purchased be sufficient to do that….
Lastly I could use some suggestions on enclosures for this… this will initially be used for a 22 Weber kettle, I figured Id somehow mount it to one of the legs or set it on or get 3 more clips like they use for the ash tray and add a second shelf that way and set the PID on that… later on i do plan on getting an offset Oklahoma just hope i can get this proof of concept done….
Im new to this so if im missing something let me know, if i can be doing something better let me know that too!
Anyway took a dive into commercial units and spending $250-$400 on something that takes less than $100 to make yourself… I’ve always wanted to make a PID for other hobbies I have like my dry age fridge, heat treatment kiln for my knife making and now a smoker. This holiday weekend I have spent 8 hours learning everything I can about how to do this on my own so I don’t potentially buy the wrong stuff.
I pulled the trigger and now I just wanna make sure i got the right stuff and don’t blow my PID accidentally lol.
So here is the list of things I purchased, if people with actual experience take a look at it I’d appreciate it…
This is the power cable I will use to power the PID
https://a.co/d/5YoFN5B
The Rex-c100 PID
This is the blower, I made sure to buy 12v and >1amp DC
https://a.co/d/gTQAco9
I purchased the 12v 2amp DC plug for the power source of the blower. 2amps in case I end up needing a bigger fan
https://a.co/d/1vdf2mH
This is a little upgrade I got alligator clip
https://www.auberins.com/index.php?main_page=product_info&products_id=172
I purchased this to be able to hook up the female adapter to the PID, I heard u had to use the same cable
https://www.auberins.com/index.php?main_page=product_info&products_id=179
Here is the female plug for the enclosure
https://www.auberins.com/index.php?main_page=product_info&products_id=426
Buzzer for the PID
https://www.auberins.com/index.php?...ducts_id=215:b756d8a14e401468095386ae4ef72d15
I wondering if I could get advice on running this without the SSR using this diagram can I run what I purchased without it and without the mosfet?
Another thing I was thinking since the PID I purchased will come with the SSR should I just use it since it couldn’t hurt and will the power cable i purchased be sufficient to do that….
Lastly I could use some suggestions on enclosures for this… this will initially be used for a 22 Weber kettle, I figured Id somehow mount it to one of the legs or set it on or get 3 more clips like they use for the ash tray and add a second shelf that way and set the PID on that… later on i do plan on getting an offset Oklahoma just hope i can get this proof of concept done….
Im new to this so if im missing something let me know, if i can be doing something better let me know that too!