Old fridge - slow build will start soon

  • Some of the links on this forum allow SMF, at no cost to you, to earn a small commission when you click through and make a purchase. Let me know if you have any questions about this.
SMF is reader-supported. When you buy through links on our site, we may earn an affiliate commission.
Made some more progress over the weekend.

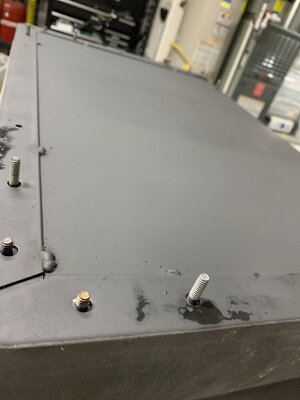
New floor is in and tac-welded in place. Put some weld studs on that I had laying around (hence the different lengths) that'll be used to line up the legs and temporarily hold them in place. Eventually they will be welded on.

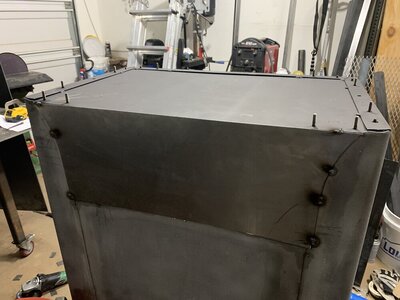
Getting the rear filler panel shape figured out was a bit of a PITA but got it done. Unfortunately I cut it about 1/8-1/4" short where it connects to the fridge body, so I've been going slow and filling the gap with some fat & ugly tac welds. Normally, I'd of just cut new metal for it, but this isn't structural. Will grind smooth when done.. plus, it's the back so if it's not 100% perfect... it's not the end of the world. No one should be checking out the butt of the smoker anyway :emoji_laughing:


Gunna take some time to weld these two sections in place fully, trying to avoid dumping too much heat and warping the whole thing.


Suffice to say, slow build is going slow.

edit to add: ugh, looking at the pictures those lower welds are FUGLY. Thank god I'm a better grinder than a welder.

I never should of tried to fill that gap with a welder, I should of either come up with a filler plate to go there or re-cut the top plate. Some lessons are best learned the hard way.
 

Attachments

  • 12A34AEF-9877-4B96-95EA-CFD649249EE8.jpeg
    12A34AEF-9877-4B96-95EA-CFD649249EE8.jpeg
    73.1 KB · Views: 46
  • 83AD9A58-DB80-4A79-9A88-29248B508DB4.jpeg
    83AD9A58-DB80-4A79-9A88-29248B508DB4.jpeg
    108.7 KB · Views: 36
  • 54D7C330-2676-42A8-84A8-12E05BA64B55.jpeg
    54D7C330-2676-42A8-84A8-12E05BA64B55.jpeg
    104.2 KB · Views: 37
Last edited:
Had some time today so I did a little more work getting the frame ready for install.

Since I'm using angle iron as a frame, I needed space to mount the existing hinges and door latch.

Cut some scrap angle iron down to a size where it would fit inside the corner radius. Marked where the original holes lined up and drilled some holes in the angle iron then dropped in the weld T-Nuts.

Ordered the wrong size for the hinge side, so I'll have to wait to finish that one up till they get here.

Didn't take many pictures during this part; but I was 100% shocked when the holes on the hinge side lined up perfectly with the inserts once everything was done. I had planned on having to make "adjustments" following the first attempt - I'm a hobby welder after all.

Hinge support side. Drew on the metal with a sharpie to make the center punch more visible along with other "notes" as I worked. Used a spring center punch with in place on the fridge body to get the initial mark, then used a traditional center punch to leave a better mark afterwards.

This side is longer because I was worried about the twisting motion when the door opens. Trying to prevent distortion issues.

1DA3ED7E-D220-4885-923E-C54F0EF79077.jpeg

Door latch support on the other side.
B9FC764C-4938-479F-96C8-944271EEC349.jpeg

It ain't pretty, but it works.
 
  • Like
Reactions: Plinsc
Made some progress this weekend.

Main frame is installed/welded in place. All the holes for the latch & hinges line up and will be good to go when I get to that point.

Pellet hopper hole is cut and have a sub-frame welded around that for supports. Still need to run some square up the center to tie in the top. Once that's done, the hopper shouldn't go anywhere.

AA215672-EC25-479D-ACA4-78183C283F0D.jpeg


Starting to slowly weld the bottom to the frame. Don't want to warp the crap out of it (learned that lesson on another project)

And yes, my welds are ugly - there is a reason I don't do this for a living. A sheet of 12ga will cover this eventually and you'll never know how bad I really was.

edit to add:

I bolted everything in place and welded it to the frame where where it rested against the body. The body has a slight curve and I wanted to avoid gaps between the DOM tubing to prevent denting/collapsing the curve in the body. The 4 sections of DOM welded inside the square are all touching the outer body.
 
Last edited:
Slight design change after talking to Smoke Daddy (hopper manuf). I'm going to put a sliding vent in the rear, about level with the pellet burn pot.

With an insulated cabinet, they said I *might* run into problems running lower temps and that a lower vent would fix that if that happened. It'll be easier now just to install it versus having to go back later.... so here we are.

Didn't take any pictures, but I installed 3" tube around the meat probe port and the cold smoke ports to block off the insulation from the entrances.

Cut some templates out of chip board as well, and figured out where the holes will need to be in the sheet that'll line the inner cabinet walls. Should be a lot easier to transfer from the chipboard templates to the sheet metal than trying to figure it out alone on just the sheet metal.

Next I'll have to figure out where I want to put the cabinet temp probe. I had planned on having it on the same side as the pellet hopper; however once the hopper lid is open I had a clearance issue with where I wanted to run the probe (the wires for the probe will be in EMT conduit outside the smoker).

Current thought is just to put it on the back of the smoker - not what I was originally planning, but right now seems like the best bet. I'll be able to center the probe inside the cabinet fairly easily from the back.
 
Had a realization the other day... and thought I'd mention it for others who do something like this.

The original legs of the fridge are 18ga steel; I'm adding a LOT of weight to the body of this fridge, between the 1/8" angle and the 12ga sheet. I became concerned with the legs buckling, especially with the casters attached.

I ended up making caster plates out of 1/4" plate. 2 Bolts for the casters go through the original legs to the new plate, 2 bolts are in the rear of the plate where the original legs wouldn't contact. The plates are cut to match the shape of the legs and will ultimately be welded to the legs. I'll use some body filler to smooth out the appearance and make it look uniform before I paint.

In the center of the caster plate, I attached 2" square tube and welded it to the underside of fridge body - to the new 12ga plate that I used to make the bottom. I also ensured that where the support tube hits the floor is inline with the angle iron frame of the body. Trying to get maximum support here; and the factory legs will be for decoration only.

Also, selected casters that not only lock, but have rotation lock. I would really like to avoid this thing falling over.

This part has been a huge PITA, makes me wish I had a plasma cutter. Hopefully it'll be worth it in the long run.


Side note: If you have a chop saw that's for mild steel and think cutting some thin stainless steel will be fine.... Nope. It won't. New blade cost about $70 and I learned a valuable lesson. They had blades rated for stainless, I just didn't have one and thought I could get away with it. Chewed that blade up pretty bad. Still love my cold-cut chop saw.
 
Some more progress.

F5EABA92-0CF5-4EF9-AFBD-5F9B87CE0441.jpeg

Rear vent hole framed out. Still have a little bit more work to do in that area, but it is coming along. Used some weld-nuts in the sheet metal to attach the vent; the top holes are in the cross bar that I tapped.

Damn that gap fill on the left side of the opening is FUGLY. At least it looks fine on the outside. The inside will be covered when I install the insulation/cover.


F58CE702-600B-44BD-95DB-659B6782C785.jpeg
Smoke Stack is attached!

Need to get my clearances perfect so I can install the damper, but this felt like a huge accomplishment. This part got on my nerves as there was an existing hole in the lower cabinet that I used, and then tried to match it up (perfectly straight) to the top cover. Turns out the hole was off-set 2.5" from center towards the rear of the cabinet. Lot of careful measurements and I was able to get it spot on. Took my time on this part as I had one opportunity to make the cut without making it ugly.

Need to install some reinforcements on the lower section as there is some flex if there is pressure put on the tube. I'll be able to sort that out eventually.

In the center of the door opening on the main cabinet, I had to patch some holes. There were numerous screw holes for a trim ring that used to go around the top (that is NOT going back on it), as well as a 1" opening where the compressor lines used to go.


9E6A0E8C-896F-48C9-9C1D-B7FB936F0E8A_1_201_a.jpeg

1A207B92-7E84-40EB-927A-9392CB880761.jpeg

Casters and supports are welded in. Need to smooth out some welds on the visible areas, but it's a LOT easier to work on now that I can roll it around. Prior to the smoke stack installation, it stands about 5'3" tall.
 
Thanks!

I've only been welding for a little bit now. Started by learning on making a dog kennel for our travel trailer. Tried to hire 5 different shops, but after giving a bid they wouldn't actually take money to start the project. Said screw it and bought a welder and some tools.

Youtube helped me get started, then a buddy stopped by and showed me a few things for about 15-30 min. He ended that lesson with "I've shown you enough for you to learn on your own from here. Don't ask me for help, I hate doing this @#$@#$"

The kernel came out great in the trailer and does exactly what we were hoping for. After that I built a "security cage" for our generator that we travel with.

Other than that, it's been really small projects that needed a tac-weld here and there. This is by FAR the most complex project that I've tackled. Spent a lot of time planning, looking at just about every build on this site, taking measurements, etc.

I know some others woulda had this thing knocked out FAST - but I'm taking my time to try to get everything right the first time. I really don't want to go back and have to fix something later. Spent plenty of time trying to figure out the order of operations to doing some things, so I don't screw myself later in the project.
 
Enjoying the ride as well! Enjoy your build...sounds like you are. Otherwise it will feel like work lol. :emoji_blush:

Ryan
 
Appreciate it!

When I start getting pissed off at the build, I know that is when I'm done for the day. Have a few small things to figure out still, but I'm getting there.

One of the things WAY down on the list is to figure out how I'm going to make racks to hang sausage. The current thought is 1" sections of angle iron mounted like a "V" on the sidewalls with a metal pole slid into it. Not 100% sure how well that would work just yet.
 
One of the things WAY down on the list is to figure out how I'm going to make racks to hang sausage. The current thought is 1" sections of angle iron mounted like a "V" on the sidewalls with a metal pole slid into it. Not 100% sure how well that would work just yet.
You could take a rectangle of plate, drill a row of holes down the center, cut the plate in half, and weld each half to a piece of angle for mounting.

Forgive the crude drawing, but something like this:

1659023071994.png
 
Well, did a little googling today to see what other solutions have been... and now I'm pissed at myself for not coming up with this idea on my own.

20431745_10208952950371089_7400042099351003990_n.jpg.jpeg

Since I'm going to have a lot of sliding racks within the smoker, I'll just build a rack that slides out that's sole purpose is hanging meat! This will make loading/unloading the smoker a LOT easier versus trying to hang poles full of sausages.
 
  • Like
Reactions: 48°North
There are benefits to having poles...You can use the poles to hang the sausages at room temp, to let them warm up and form a pellicle. This keeps the temp. from dropping too much if you were to load them in the smokehouse with the door open.
 
  • Like
Reactions: strikerfired
....also keeps smoke out of your eyes while loading on the poles.....
Isn't that 75% of the fun of smoking meats? Can't count how many times I've "smoked myself"

My first smoker was a Camp Chef Smoke Vault - that thing gave me a smokey aroma more times than I'd care to admit, from opening the door.

I'd like to say it was rookie mistakes, but I never did find away around it; short of opening the door and running away.
 
I like the sliding hanger idea... BUT ... I'm with Swamp and the poles/dowels ... Load/unload, left hung to bloom, before and after the cook carried inside the house and hung on chairs that are turned back to back...
 
Isn't that 75% of the fun of smoking meats? Can't count how many times I've "smoked myself"

My first smoker was a Camp Chef Smoke Vault - that thing gave me a smokey aroma more times than I'd care to admit, from opening the door.

I'd like to say it was rookie mistakes, but I never did find away around it; short of opening the door and running away.
Well, building it yourself, you can always change it later if you don't like it....one of the great things about learning to fabricate your own stuff....
 
Welp, it was time to work on the door this weekend. Installing some angle iron in the door to create room for the insulation. After gutting the door when I stripped everything down, the door had been sitting in a corner in the garage.

Previously, there was a wooden frame inside the door. Well, looks like there was a slight warpage in the metal that the wood was hiding.

Originally planned to use 16GA angle to create the space I needed, now I'll be using some square or rectangle tube to brace it to force the warpage/twist out of the door skin.

4B7A63D8-7C9C-478F-B4DD-371ECC907FE4.jpeg

When installing the angle iron, I used some scrap to shim it up so that it would be nice and tight. I will still need to get under the angle iron to install the screws that hold the door latch and hinges; it's about 1/2" of gap under the angle.

Had a slight delay as I waited for new clamps to arrive from amazon. My old/cheap clamps from Tractor Supply bent during another part of the project - they also were not deep enough to clamp the way I wanted during this part. Found some deeper clamps to work with. Should be getting back at it in the next day or so.
 
SmokingMeatForums.com is reader supported and as an Amazon Associate, we may earn commissions from qualifying purchases.

Latest posts

Clicky