Noob lucked up and found a proofer for $25. Can you help me with the build?

  • Some of the links on this forum allow SMF, at no cost to you, to earn a small commission when you click through and make a purchase. Let me know if you have any questions about this.
SMF is reader-supported. When you buy through links on our site, we may earn an affiliate commission.

cajun joe

Newbie
Original poster
Dec 31, 2012
17
10
North Georgia Mountains
Hello, all!

I am totally new to the forum - I've only said hello on roll call - but I'm hoping you guys will show some love and help me out.  :-)

Here's the story... I grew up in S. Louisiana where there are awesome specialty meat stores everywhere, and I have an aunt who owns a sausage kitchen that makes the best smoked sausage and tasso I've ever eaten.  So, what's a cajun to do when he finds himself living in the hills of North Georgia?  Make his own sausage and tasso... what else?!?!

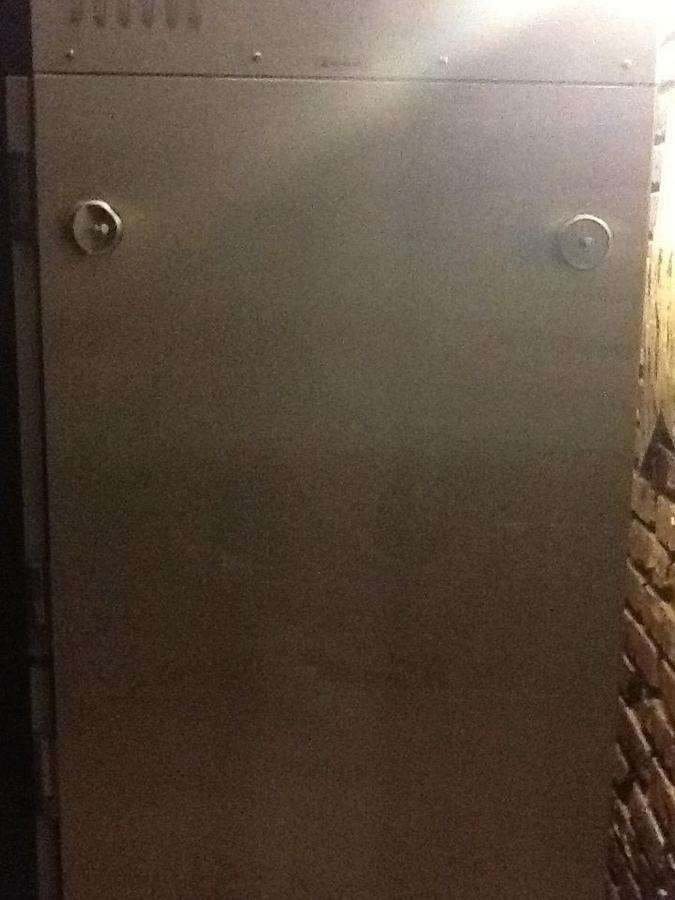
I currently have an electric masterbuilt with a smoke pistol installed, but I'm hoping you'll help me upgrade.  TODAY, I stumbled into a WORKING Metro C200 for $25.  It is in great shape.  It reaches and holds temperature to 240 degrees.

Will you guys help me build this thing the right way?

Here are my questions... 1) What should I use as my vent?  2) Where should I place the vent based on what you see going on with the C200 in the link above?  3) Where would you place the port for the smoke pistol? 4) Any suggestions for hanging rods? (Anybody make their own V rods? If so, how?)

Here are my KNOWN variables: A) The C200 reaches temp, holds temp, and circulates air throughout.  B) I want to use the smoke pistol as my smoke source.  C) My C200 is a front loading two door design.  It is not a pass-through.

Thanks to anyone willing to help out.  Please, talk to me AND to each other about what you think will be the best way to proceed.

-Joe

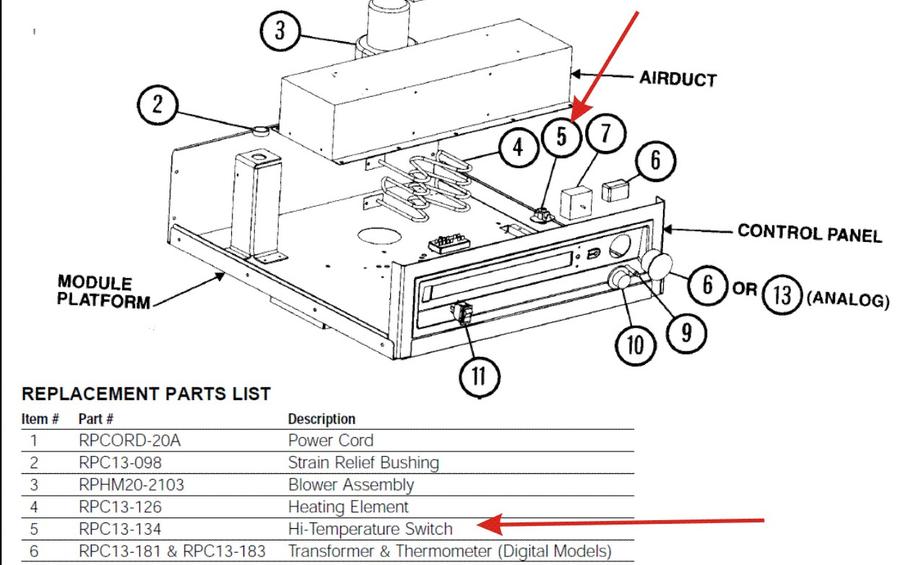
PS... If anyone wants to REALLY look at the C200's specs, here's a link that provides great detail: 

www.metro.com/literature/LO1-182
 
Last edited:
Joe, evening....  Nice find.....  I'd like to stumble or be dragged into a deal like that....   Smoke generating...  unless you are totally in love with the smoke pistol, I would recommend you look at the AMNPS as a smoke generator....  no moving parts... no creosote... burns up to 12 hours on one loading of pellets.. no electricity needed....  The best smoke generator on the market.....  Todd Johnson makes and distributes them.... 

About the smoker.... You do not want to mess up the insulation between the panels.... Putting in vents properly, will require removal, cutting and installing vents of some sorts... Probably 2 each 8 sq inches, 1 on each side in the top of the side panels and 2 each 6 sq inches, 1 on each side of the bottom of the side panels...  make access for wiring, therms or anything else in the future that may arise before reassembly... vents should have adjustable dampers on them for tweaking airflow... There have been a few of them built on here... check them out and ask the builders for any tricks they learned or should have learned...    Keep us in on the build.... Take pictures so others can learn also....

Dave

Check them out.... you will not be sorry for at least looking...   

                click on this link

http://www.smokingmeatforums.com/a-maze-n-products
 
Dave, thanks for the link. I will definitely check out the other builds and the smoker you suggest. I really appreciate the advice. I know nothing about this stuff - yet.

Cutter,
The heating element is at the top and a fan moves the heat through two internal side chimneys for equitable distribution throughout the unit. I'm curious about whether there is a need to be concerned about drying the meat too much. There is a water pan immediately beneath the heating unit with a variable vent for humidity control. I wonder if that's enough.
 
Also, Dave...

I'm ESPECIALLY appreciative of the tip to dismantle to avoid compromising the insulation. I would have gone at it with a drill and a saws-all this weekend.
 
Dave, The reason I wrote that....  I tried to drill through an aluminum wall with insulation inside.... The insulation wrapped up on the bit and then the trouble began... What a PITA.... pulled insulation from every corner of the cabinet.....  First hand experience is planted deep in the brain...
 
What a lucky find! I'd love to find one like this to make a drying chamber for some good dried sausages. I'd like to see what you end up with. Coonass ingenuity.
 
Well, I got 'er built up and going. I'm running a 10# batch of andouille to test her as I'm typing this. I decided to stick with the smoke pistol for now - mainly because I had this new, super cool smoker and couldn't wait for the other to ship. ;-)

So, here's what I did...

For the life of me, I couldn't figure out how to make vents look "nice" without a welder, so I scratched my head and went to Home Depot 4 or 5 times just to walk around and hope an idea would hit me. Well, it did! In the electrical department, I found these compression coupling doodamaflickers... CHEAP!

I bought 6 1"ers and 4 2"ers and hole saws to match... total cost about 65bucks! Then, I took 1/4 inch bolts and made baffles that fit inside the couplings. I can insert them to stop the flow, remove them for full flow, or pivot them for better control.

Basically, it's a sleeve inserted through the walls of the smoker with nuts at both ends.
(I'll post a better pic soon... No flash on my iPad)

It seems to be working well. I'll let y'all know soon... :-)
 
New Question... I originally said that the smoker would reach and hold temperature at 240. That was ambitious. I put a different thermometer in and realized it is shutting off at 220. My question is this: is there a way to insert a new thermostat and controller so that it would reach higher temperatures but still shut itself on and off? I want to be able to cold smoke, but I would also like to be able to cook pork butts and things.
 
Something like this...


This is at http://www.summitracing.com/parts/prf-30112/overview/. It cost $67 and some change. These are used to control the aftermarket electric fan many hot rodders use to save space in the engine compartment and free up horse power. The probe you see at the top of the picture is stuck in between the fins of the radiator and when the fluid in the radiator reaches the set temperature, it turns the fan on. The range from what I can tell for this thermostat is around 180-240 degrees. This may not work with your application, but I bet if you were a semi skilled electrician you could wire this into your system and put the probe in the Cook Chamber. I am not. I do not know how sensitive these thermostats are because the way they are designed to work is with the probe stuck in hot metal, not in hot air. I don't know if that would affect how it operates, but I just thought I would pass the idea on to you. 
 
It has a thermal limit switch to prevent the element from overheating (it's a warmer not an oven).  220 would be about right for one of those cabinets to shut down on the thermal limiter.  Look at page 9 of the manual PDF you posted.  It's item #5 in the drawing (see excerpt photo below).  If you bypass it, or even better replace it with one that has a higher setting (let's you still have a safety shutoff for over temps), I suspect you should be able to get above 220.

From looking at the schematic on page 10 of the manual, just follow the wire off of terminal 18 on the terminal block and you should find the high limit switch. It is wired between the terminal block and one leg of the heating element (probably inside the blower airduct with the heating element from the looks of the image below).  Looks to have spade lugs from the schematics so it should be easy to bypass for temporary testing with a jumper.

Any you could rewire it with a PID controller and SSR if you wanted pin point digital control. I've also seen builds where they use a 2nd PID as an adjustable digital high limit switch. But for now, I'd either bypass or remove the thermal limit switch and see how it performs.  Just keep an eye on it to make sure the temps do not run away on you.

What wattage is the heating element?  I did not see that data in the PDF, but I bet it's a 1750 watt element (or there abouts).

Also I would bet that unit has blown in poly insulation instead of batts.  If you don't plan on going over 240 or 250 I don't think the poly is an issue, but that stuff starts to break down around 270 to 350 depending on the exact chemical composition.  Since it's made as a warmer, I would think it would be on the higher end but I don't know for sure.  What did you see when you cut those holes? Fiber insulation or blown in foam?

 
Last edited:
You guys are AWESOME... Thank you so much for the information.  I'm off to search the internet for a higher temp limiter because that seems like the more straight-forward (and easier for a clueless noob) way to go about it. 

Regarding the insulation... It is a combination of the two.  The walls have batting against the inside wall and poly against the outside wall.  The heating element chamber is insulated with just the batting. 

I saw the high-temp switch in the schematics and thought that might be the right place to focus my thinking, but I was afraid of the temp running away on me if I just removed it.  I really like the idea of switching it out to a higher limit... I'm thinking 275 or so.  That'll let me cook low and slow at 225 or so and then pop up the temp at the end if I felt the need.  Typically, most of what I do is in the 140 - 170 range. 

IF I get this thing up and running at a higher temp, I would have enough capacity to feed a small army.  At that point, I gotta learn how to cook.  :-)

Thanks again for all the info.  I know I need to put some pics up, but I haven't been home in daylight for a while.  If nothing else, I'll post a bunch of stuff Saturday.  If my new Maverick et732 arrives before then, I'm cooking a batch of good ol louisiana style sausage and maybe a couple slabs of tasso.
 
BTW... yes, I know I don't have to have a fancy thermometer to make sausage, but i just LOVE gadgets.  Two probes... 300 feet wireless... oh, heck yeah!
 
I like this build. There is very little building involved and it seems to be a clean reliable source for smoking meat. I may do one of these after the one I'm working on now... And I thought hot rodding was addictive. You can't eat what comes off of a hot engine! Smokers are fun to build, relatively cheap (compared to other hobbies that invlove a welder and torch), and best of all when it's finished, you get to enjoy the delicious meat that comes off of it.
 
Dave...

I just looked up PID... lots of lights and numbers... looks like a gadget... RIGHT UP MY ALLEY! 

So... since that's the very first time I've ever seen PID and SSR (solid state relay, I'm assuming) written anywhere or a picture of either, I'm curious...

Let's say - oh hypothetically - that I have A FRIEND who was going to wire a unit JUST LIKE MINE - with a PID and SSR. Which unit would be the one you'd advise him to put in?  This guy's wife is starting to raise an eyebrow about how much he's sinking into this project - and several others, so he needs to get it right the first time.  ;-)

-Joe
 
Aces,

I agree about the clean build on this thing.  I have been really pleased with the results I've gotten with VERY limited skills.  My only regret is that I bought a cheap holesaw for the lower vent ports that wasn't deep enough to center itself on both walls at the same time.  Because of that, I have a little bit of an alignment issue that created a 1/8" gap on the outside wall of the cabinet.  It doesn't create problems, it just isn't as "finished" looking as I'd like it to be.  My two inch holes up top are nicely aligned and the sleeve of the compression coupling works perfectly.

It's literally just drilling holes, inserting the sleeves, and screwing on the compression nut on both ends to hold it in.  I built up some dampers with nuts and bolts and the drops from the holes I drilled (just used my bench grinder to grind down the circumference enough to fit inside the compression nut).  If I were to do another, I could do it in less than an hour.  Most of my time was spent walking around in home-depot trying to figure out what to use for my intakes and exhausts - hours. 

Joe
 
SmokingMeatForums.com is reader supported and as an Amazon Associate, we may earn commissions from qualifying purchases.

Latest posts

Clicky