Hi, Guys, I just happened to bumbel into this. Please PM (Conversations) so you are sure it will yank my chain and get my attention. Glad to help, if I can.
I brought up
the online manual for the ITC-106
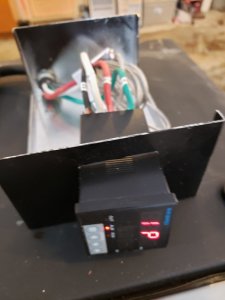
Yes, cord wires:
Wht - Terminal 10 of ITC. (T-10)
Blk - Terminal 9 of ITC. (T-9)
Grn - Ground to chassis, receptacle if used, carries through to all grounding needs. Never switch or fuse any ground conductors.
This is the 120V AC input to the ITC-106.
Do you have a 2-wire, or a 3 wire Thermocouple (Temperature sensor)?
Wire it according to Page 5, Subheading #4, of the manual.
If it is a two wire, be aware that T-4 & T-5 have a jumper tieing the two together. (Mine was a two wire)
If it has 3 wires (Red, Blue, Blue) wire it per the 3 wire.
This tells the ITC the temperature inside your smoker.
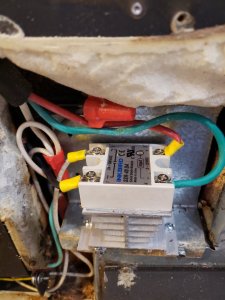
Solid State Relay (SSR) - The Input side of this device has a Positive (Terminal 3), and a Negative (Terminal 4).
Terminal 8 of the ITC connects to Terminal 3 (+) of the SSR.
Terminal 6 of the ITC connects to Terminal 4 (-) of the SSR.
This is the control for the SSR from the ITC.
This part is important, Because we are keeping the Over Temperature device of the MES in the heater element circuit, we want the hot leg (Black wire) ITC T-9, and the SSR T-1 connected. (NOT T-10/T-1 as shown.)
At this point I want you to look at
this segment of this video.
You can follow George's advice fully if you'd like, it works. He just looks at it slightly differently than I do.
The bottom line is we want the ITC and SSR to control a receptacle that we can plug in our MES into.
(This also allows us to use our ITC with SSR to operate other things we'd like to control with temperature sensing. In my case, I have two MES's, a 30 and a 40. The 40 is destined to be a cold smoker only. It's big enough to hang meat in. So it is getting totally simplified. (already has) )
But, by cord connecting the modified OEM MES wiring, the over Temperature device stays in the smokers circuit to protect it from running away.
An important safety issue.
OK, you chew on this for a while, and come back with any questions.
It takes a bit for PM's to circulate. I can't always be in front of my computer.
Double check each wire, and over all. Because electronics are
unforgiving.
You cross anything up and when you power it up, POP. At the speed of light is is junk.
Do one wire at a time, make sure it is correct, then double check it. You'd be amazed how easily a mistake can occur.
And always, ALWAYS!
Unplug anything before you touch it.
Sonny