PolishDeli
Smoking Fanatic
- Oct 9, 2018
- 466
- 726
I got a new smoker recently. The MES30 analog (it was a bday present) It's a step down from my previous unit (MES30 digital). However, with these mods, I expect it'll be a better performer.
The ramblings that follow are my thoughts about this smoker and the mods I made to it. A shopping list is at the bottom of the post.
Out-of-the-box, there are a lot of problems with the analog. If this had been my first smoker, I probably would have found it extremely frustrating. The digital version was far from perfect, but it is definitely a better starter unit than the analog.
The problems boil down to two distinct but related issues: temperature control and air flow.
1 - Temperature control.
The unit has a 1500W heating element, which is controlled with a potentiometer. That same heating element is what burns wood chips for smoke generation. To add more wood chips, you have to open up the chamber. These will all result in huge temperature swings and inconsistent smoke levels.
The fix: Connect a PID temperature controller to the smoker and do not use the heating element for wood burning. I have an MB slow smoker attachment, but mailbox mod would also be great.
(There is also a complete lack of insulation, but I'm not addressing that yet, if ever.)
2 - Air flow
There is no air intake on this unit, and the exhaust is a 0.5 inch hole in the top back corner. The door seel is non-existent, so perhaps that is also supposed to serve as a point of air exchange. I don't know, but I don't like it.
The fix: (a) Open up an intake and attach the mail box mod/slow smoker to it. (b) Open up an exhaust and attach a smoke stack
For temperature control, I got an Auber PID. I expect to get much more stable temperatures with this setup than I had with MES30 digital. I also hope to get a larger range of temperatures. The MES30 digital goes from 100°F to 275°F. With analog+Auber I'm hoping to go from 65° to 350°F (depending on weather and amount of stuff in the smoker).
Having the PID and the inkbird IBT-4XP, there are a lot of temperature probes and wires flying around. Pinching the probe wires in the door works, but I wanted something cleaner. To that end, I installed silicone grommets and a cable gland. The smoker is double walled, and therefore corresponding probe ports were installed both inside and outside the chamber.
The PID probe port was drilled into the center of the back wall. The probe is passed through a cable gland from the outside of the chamber

.....and a silicone grommet to the inside of the chamber.

Silicone ports were installed for the thermometer probes. I was going to install these on the side walls of the smoker but decided to use them for the secondary purpose of covering up the original exhaust. I had to make the hole a bit bigger using a dremmel.
Original exhaust:

Converted to probe port, outside the chamber:

Inside the chamber:

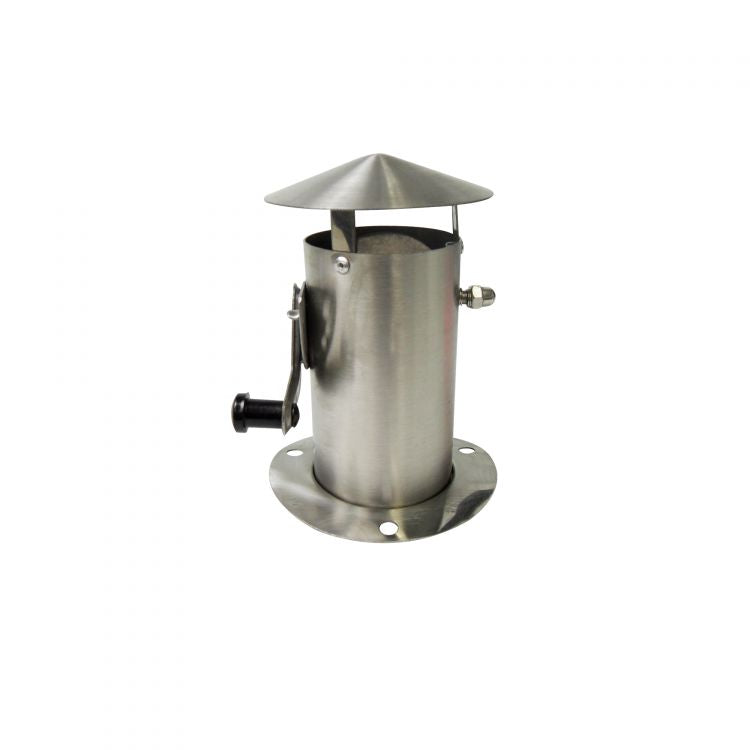
Here is the smoke stack. It's from GHP. Opted for this one because it was a good size, good price ($13 for stainless), and good look. I think it is sold as a replacement stack for a Dyna Glow grill. A 3 inch hole saw, RTV silicone, and nuts-n-bolts to attach it.

Again, the walls are 2-ply. In order to seal the open gap between the roof and ceiling, I cut off a 2cm length of steel duct and inserted it through the exhaust hole and RTVed it in place.
Exhaust as-cut

Exhaust. Gap sealed.

Intake. Drilled a 3in hole, bottom center of the chamber. The bottom is sinlge ply. Inserted an aluminum duct elbow. This will connect to a 3ft duct, which then connects to the slow smoker attachment.

Nomex gasket around the door

Caster wheels

I'll install smoke stick hangers at some point. Other mods I'm sure will come to mind I as use this.
Done for now.

The ramblings that follow are my thoughts about this smoker and the mods I made to it. A shopping list is at the bottom of the post.
Out-of-the-box, there are a lot of problems with the analog. If this had been my first smoker, I probably would have found it extremely frustrating. The digital version was far from perfect, but it is definitely a better starter unit than the analog.
The problems boil down to two distinct but related issues: temperature control and air flow.
1 - Temperature control.
The unit has a 1500W heating element, which is controlled with a potentiometer. That same heating element is what burns wood chips for smoke generation. To add more wood chips, you have to open up the chamber. These will all result in huge temperature swings and inconsistent smoke levels.
The fix: Connect a PID temperature controller to the smoker and do not use the heating element for wood burning. I have an MB slow smoker attachment, but mailbox mod would also be great.
(There is also a complete lack of insulation, but I'm not addressing that yet, if ever.)
2 - Air flow
There is no air intake on this unit, and the exhaust is a 0.5 inch hole in the top back corner. The door seel is non-existent, so perhaps that is also supposed to serve as a point of air exchange. I don't know, but I don't like it.
The fix: (a) Open up an intake and attach the mail box mod/slow smoker to it. (b) Open up an exhaust and attach a smoke stack
For temperature control, I got an Auber PID. I expect to get much more stable temperatures with this setup than I had with MES30 digital. I also hope to get a larger range of temperatures. The MES30 digital goes from 100°F to 275°F. With analog+Auber I'm hoping to go from 65° to 350°F (depending on weather and amount of stuff in the smoker).
Having the PID and the inkbird IBT-4XP, there are a lot of temperature probes and wires flying around. Pinching the probe wires in the door works, but I wanted something cleaner. To that end, I installed silicone grommets and a cable gland. The smoker is double walled, and therefore corresponding probe ports were installed both inside and outside the chamber.
The PID probe port was drilled into the center of the back wall. The probe is passed through a cable gland from the outside of the chamber
.....and a silicone grommet to the inside of the chamber.
Silicone ports were installed for the thermometer probes. I was going to install these on the side walls of the smoker but decided to use them for the secondary purpose of covering up the original exhaust. I had to make the hole a bit bigger using a dremmel.
Original exhaust:
Converted to probe port, outside the chamber:
Inside the chamber:
Here is the smoke stack. It's from GHP. Opted for this one because it was a good size, good price ($13 for stainless), and good look. I think it is sold as a replacement stack for a Dyna Glow grill. A 3 inch hole saw, RTV silicone, and nuts-n-bolts to attach it.
Again, the walls are 2-ply. In order to seal the open gap between the roof and ceiling, I cut off a 2cm length of steel duct and inserted it through the exhaust hole and RTVed it in place.
Exhaust as-cut
Exhaust. Gap sealed.
Intake. Drilled a 3in hole, bottom center of the chamber. The bottom is sinlge ply. Inserted an aluminum duct elbow. This will connect to a 3ft duct, which then connects to the slow smoker attachment.
Nomex gasket around the door
Caster wheels
I'll install smoke stick hangers at some point. Other mods I'm sure will come to mind I as use this.
Done for now.

 so true