MES Chip Tray/Shield Mod?

  • Some of the links on this forum allow SMF, at no cost to you, to earn a small commission when you click through and make a purchase. Let me know if you have any questions about this.
SmokingMeatForums.com is reader supported and as an Amazon Associate, we may earn commissions from qualifying purchases.

klr

Newbie
Original poster
Nov 22, 2019
10
4
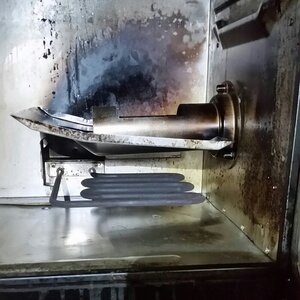
I'm thinking about modifying the chip tray/shield assembly of my MES 140S to give me more even heat and to keep it from dumping heat straight up to the temp sensor and then out the top vent. It seems to me that the top shield is great for keeping heat in the chip tray area, but bad for directing heat to the middle where it can be more evenly distributed.

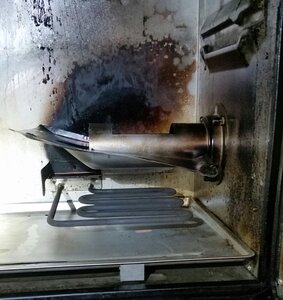
I'm using a mailbox and pellet maze so I don't use the chip tray. It seems to me that I would be better off removing everything surrounding the heating element and then installing a shield that slopes the opposite way so it directs heat towards the middle. I could drill some small holes around the perimeter so that some heat would flow up the right side and towards the heat sensor.

What do you think? I've attached a pic of my smoker. You can see how the smoke/heat exits the back wall. 20200209_183915-1.jpg
 
I added the mail box mod also for the AMNPS and an extension to move the smoke to the center of the smoker... That helps with moving the heat also....


Turkey 2-2016 001.JPG

Mailbox mod hooked up.jpg
 
Maybe disconnect the roof and spin 180° so the hieat moves up the roof to the center of the smoker.
 
Maybe disconnect the roof and spin 180° so the hieat moves up the roof to the center of the smoker.

I thought about that, but I want the shield to come closer to the right side and back.

I flipped over the element in my MES40 Gen 1, so it now resides in the center.

Did you add a shield to keep the juices from dripping on the element?
 
I flipped the element like cmayna. Got rid of all the chip loader setup. I found if you put a 11×15 disp alum baking sheet (two for $1 @ Dollar Tree) on the bottom rack that barely sliding the pan left or right a half or full rung on the rack evens heat nicely. If you don't have a PID controller then don't butt the pan against the back wall that will block heat to the sensor. With a PID then you can butt against back wall because the sensor is threaded down top vent and is up by your food and not on the back wall. Heat rises around the left, right and front of the pan at the door over/around your food brfore going to either top left or top right vent. Now it doesn't matter what side the top vent is on. I got a new element to mod by cutting the alum bracket length wise above the element legs with a dremel heavy duty cut off wheel so the piece with the legs is symmetrical top to bottm and left to right. Now you can flip the element and put back through the original smoker holes to the back access without cutting the smoker. The loose piece with the bracket holes and screws just screws back above the element to hold the silicone gasket. First I mounted the element with a longer ground screw and an aditional nut to hold/support the element from the ground nut hole in the access and covered with shrink tubing to insulate the bolt and keep the hold nut from backing off. You'll first need to carefully bend the element tabs backwards 180° not breaking the welds of the wire to the tab tbefore installing the element to attach the wire lugs since it's flipped. Pretty easy to do just keep tabs flat when bending and use needle nose or small vise grips to hold the tab to the wire. I used two additional pans top edge to top edge before putting the third on top to catch drips. Helps to keep grease from vaporizing so much with the dead air space between the bottom two pans. I cut the outside edge alum bead off the botom pan but not the flange so the beaded other pan is upside down on the other flange to flange like a hat to keep grease out of the bottom pan. It's also locked in place by the top flange bead to slide the pans on the rack without coming apart. Blow up the pic below to see the cut element bracket.
20181207_085549.jpg
 
  • Like
Reactions: MJB05615 and klr
Wow. Thanks for the detailed reply. That set up looks great.

Before you posted that info I tried your suggestion to flip the shield. I need to drill three holes in the mounting flange and use nuts, but it looks like it might work. I'd need to drill a drain hole in the lower right edge and maybe a hole right under the temp sensor.
 

Attachments

  • 20200210_200355-1.jpg
    20200210_200355-1.jpg
    147.7 KB · Views: 54
Get some 1/2 inch wafer head tek screws . They have a drill point with a stack of threads . Go thru both pieces .
 
  • Like
Reactions: klr
Wow. Thanks for the detailed reply. That set up looks great.

Before you posted that info I tried your suggestion to flip the shield. I need to drill three holes in the mounting flange and use nuts, but it looks like it might work. I'd need to drill a drain hole in the lower right edge and maybe a hole right under the temp sensor.
This looks like it should work to. Maybe tent over the top to keep drips from backing out the smoker through the side hole toward the mailbox. I was thinking about cutting the legs at the bottom tray at the element that supports the roof and not flipping it upside down but spinning it 180° so the top of the roof is still up but the chip loader hole in the roof faces the center of the smoker and setting the legs of the roof in the element tray but your upside down roof directs to the center of the smoker as well with less metal around the element and better fastened to the wall. Might not need a hole in the roof below the sensor. But drain holes where drips collect would be good even if you tented the roof the way you have it. I'd test it and see the way it is.
 
Tonight I bent the edges and drilled a hole in the center tube to drain the drippings onto the bottom pan. I also removed the nuts and drilled holes in the flange to install it upside down. The nuts were swaged into the flange so I had to dremel them flush with the flange before I could wiggle them loose.

It bolted up fine. Time to give it a test.
 

Attachments

  • 20200211_202758-1.jpg
    20200211_202758-1.jpg
    63.9 KB · Views: 48
  • 20200211_204343-1.jpg
    20200211_204343-1.jpg
    165.5 KB · Views: 45
Wow. I hope it works as well as it looks. Everything drains back between the element and right wall onto the drip pan or a narrow removable disp alum pan. Looks like you can take a sheet of alum foil and put over the top and contour to the shape with a piece in the tube part and poke a hole at the drain. Push in and tear an opening in the foil on the top and end of the tube for easy clean up when drips get baked on.
 
Looks like you can take a sheet of alum foil and put over the top and contour to the shape with a piece in the tube part and poke a hole at the drain. Push in and tear an opening in the foil on the top and end of the tube for easy clean up when drips get baked on.

Great idea. I hadn't thought of clean up problems. I was planning on keeping my water pan under the lowest rack so not much would drip on the shield. None should reach the central tube.

Should I not use the water pan? I've used it empty so far, but I've only smoked meat three times.
 
My MES40 is dedicated only to fish, so I do not use a water pan. Others might with other meats.
 
Great idea. I hadn't thought of clean up problems. I was planning on keeping my water pan under the lowest rack so not much would drip on the shield. None should reach the central tube.

Should I not use the water pan? I've used it empty so far, but I've only smoked meat three times.
Use it. It's an obstacle to scatter heat as it rises. With an exposed element you may find the bottom rack with a pan on it will help even heating being higher up without oem water pan. Play with different size disp aluminum drip pans on the bottom rack after the oem oval water pan. I did. It looks good. When foiling you may try draping the sides an inch, I don't know to move heat left to tweek it.
 
I played around with it tonight for a few hours. No smoke or meat, so I know things will change, but it appears that it works to even out the heat. I tried without the oval pan, and then with it in different positions. The most even heat was when I had the oval pan positioned with the deepest part on the right side. I used two probes on the top rack and two on the next to lowest. The top one near the vent read about 15 degrees higher than the others, but the others were less than 10 degrees apart.

Without the oval pan the left side was hotter than the right, so I know the modified shield is pushing the heat over to the left.

All I need to do now is smoke enough meat to get things fine tuned.
 
The heat will go left farther when you dedicate the bottom rack for an aluminum disposable rectangular drip pan and no longer have metal around the element. Which will be synonymous with meat on the racks above. It all has to come back across the meat to get out the top right vent. The top rack is my hottest rack from heat stacking like a water heater where it's directing cold water to the bottom like the intake from the mailbox. I think the oval pan lets too much heat up the back wall past the sensor to the vent. Now slide a rectangular pan an inch right for more heat to the left., front or back. Meat is going to give you the best temps left to right.
 
  • Like
Reactions: MJB05615 and klr
SmokingMeatForums.com is reader supported and as an Amazon Associate, we may earn commissions from qualifying purchases.

Latest posts

Hot Threads

Clicky