Masterbuilt Vertical 2 door Smoker Mods

  • Some of the links on this forum allow SMF, at no cost to you, to earn a small commission when you click through and make a purchase. Let me know if you have any questions about this.
SMF is reader-supported. When you buy through links on our site, we may earn an affiliate commission.

chadnicoletti

Newbie
Original poster
Dec 26, 2012
14
16
Hello all,
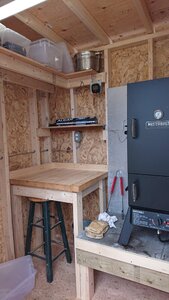
I've had this smoker for a little over a year now. Thanks to all of the various tips on modding the Masterbuilt propane units! First mod I did was the cast iron pan replacing the hardly useful chip tray the unit came with. I place the 8" cast iron directly on the burner ring, and have excellent results. Second mod I did was install a needle valve in line, which really helps to control temperature as well as keep it consistent. I have smoked all kind of meats with this very budget friendly unit, with awesome results. Last time I smoked with it was Christmas Eve and being in NE Ohio, we had snow falling and pretty consistent winds. My unit has no good flame protection, and with the winds I had to go ignite the flame 10+ times throughout the 8 hr smoke. To fix this today I welded on skirts using scrap sheet metal , which I really think will make a difference. I do find this unit to be very needy, and sort of wish I had an electric unit for consistency.

What other mods do you all suggest to make this unit the absolute most consistent?
 
How do you supply wood to the smoker? I use an Amazen tube with pellets right inside the lower door. This places the tube above the burner which gives the tube a good chance in producing smoke. I also added a small smoke stack on top to help produce a better vent than my old original vent in back.
 
How do you supply wood to the smoker? I use an Amazen tube with pellets right inside the lower door. This places the tube above the burner which gives the tube a good chance in producing smoke. I also added a small smoke stack on top to help produce a better vent than my old original vent in back.
I use large chunks of wood. Usually 2-3 large pieces.
 
Have you thought of using a welding blanket to insulate it and keep the wind at bay. If you do, you will need to modify it so you can use your vents.
I also use an Amazen tube like cmayna cmayna suggested as well. When I use the tube I place it above one of the lower vent holes on the lowest rack, I also elevate the open end of the tube slightly. Also at times I use the ci with chunks and the tube at the same time. I have set the tube on the chip tray rack but I did not like the results, it had a very noticeable lack of smoke.
I have thought of using a welding blanket, but as I said earlier, I welded the openings on the base shut today. There is a small vent window for the hose out of the front lower side beneath the flame adjuster. I think this will greatly help reduce the issues I've had with wind.

These Amazen tubes seem to be the cat's meow. I may have to give it a shot.

Thanks!
 
Must have miss read the part about welding lower vents shut, in my head I thought I read that you had welded a skirt on it. Thinking you had welded it on the stand legs along the sides and back to block the wind.
 
Must have miss read the part about welding lower vents shut, in my head I thought I read that you had welded a skirt on it. Thinking you had welded it on the stand legs along the sides and back to block the wind.
ChuxPix, you were correct in your thinking. My unit is the Masterbuilt 2 door vertical propane smoker, which has only 1 vent at the very top of the rear. I welded the bottom areas in yesterday to block the wind.

Masterbuilt 2 Door Propane Vertical Smoker
 
This is my design to block wind. It has a baffle over the vents to create a dead air plenum. I live at the west end of the Columbia Gorge so wind is a constant. I have smoked salmon at 145 degrees in 25+ mph winds successfully with no relights. I added a needle valve and screens to keep out insects. I also replaced the regulator with a two-stage propane regulator. Putting a gasket on the door really helps.

Using a smoking tube is a good move. Even with a cast iron pan I could not get consistent smoke with different woods. Hickory was the most difficult. I have since filled the pan with sand to act as a heat sink. I have two tubes, one in the cabinet and one in reserve for long smokes.

I cut in a butterfly vent in the lower portion of the smoking box to increase air flow and control it.

I am very pleased with the modifications. Next up is to move the smoking tubes and/or tray outside of the cabinet. This should stabilize temperature control even further.

The shelf and wheels are also nice additions.

0243CBC2-AA62-43E0-BBD6-B2C8E2866830.jpeg

0A8CE13F-5EC0-4AFF-90FF-DB677540DCE8.jpeg

92FD65D1-C9CE-4E0F-BB8E-AA893075A2C3.jpeg
 
This is my design to block wind. It has a baffle over the vents to create a dead air plenum. I live at the west end of the Columbia Gorge so wind is a constant. I have smoked salmon at 145 degrees in 25+ mph winds successfully with no relights. I added a needle valve and screens to keep out insects. I also replaced the regulator with a two-stage propane regulator. Putting a gasket on the door really helps.

Using a smoking tube is a good move. Even with a cast iron pan I could not get consistent smoke with different woods. Hickory was the most difficult. I have since filled the pan with sand to act as a heat sink. I have two tubes, one in the cabinet and one in reserve for long smokes.

I cut in a butterfly vent in the lower portion of the smoking box to increase air flow and control it.

I am very pleased with the modifications. Next up is to move the smoking tubes and/or tray outside of the cabinet. This should stabilize temperature control even further.

The shelf and wheels are also nice additions.

View attachment 481653

View attachment 481654

View attachment 481655
OldSmoke OldSmoke , your mods are really nice!! I too added a needle valve and felt gasket around all doors. I smoked a pork shoulder on Saturday with the new skirts welded in ( I know the welds aren't pretty, but I'm working with a HFT flux core unit) and with the 25 degree temp and 10-15 mph winds I had 0 relights and meat came out awesome!! I think my next move is casters like yours. The unit is awkward to move , and I know will be way better with wheels. I will also explore your suggestions surrounding the cast iron. My temps are inconsistent and I have to mess with the heat source several times each smoke.

Thank you all for your suggestions and help!!
PXL_20210123_152931430.jpg
PXL_20210123_152925544.jpg
 
Last edited:
Hello all,
Second mod I did was install a needle valve in line, which really helps to control temperature as well as keep it consistent.

Hello, I have this same smoker Masterbuilt Propane 230S or something. My first time using it was this past Saturday for a Pork Butt in 25-35º weather with winds 15-25 MPH...so it was hard to keep a constant temp.

What is the needle vavle in line and where does this go?
I assume this helps fine tune the propane output?

I noticed it was hard for me to keep it almost vertical in the Minimum range for 225-250-275...I put felt gasket around the doors so maybe it is too sealed off and warm inside but I didn't have t relight the flame.

Thanks in advance
 
  • Like
Reactions: mates64
BJMRamage BJMRamage the Needle Valve I installed is in line halfway to the stock valve/heat adjuster. I bought this one, but I am sure anything similar will work. I have read on this forum that the regulator on these units are low pressure, so search for the proper Needle valve on this forum.

You are correct, the purpose of the needle valve is to lower the output of propane in order to achieve lower temps and add consistency. Just do a quick search on Needle valves and I'm sure you'll find a good setup. I have seen guys replace the stock adjuster with the needle valve itself, so there are a variety of ways to do this. I did what made sense to me at the time, which may or may not be optimal, but works for me.

The felt gasket is not affecting your inability to maintain consistent temps. These units come from the factory with less than stellar parts that make it difficult to maintain consistent temps. I would scrap the shitbox chip tray and get a cast iron pan 8-10" and burn chunks on it. The skirts I added helped a ton this weekend, but I still had to mess with the heat every hour or so to maintain somewhat consistent temps. Half of me wants to scrap this smoker while I'm in the middle of a long smoke, but the other half of me loves messing with it and modifying it. It's a cheap smoker that can produce delicious meats. For me all of the tuning is half the fun. A true set it and forget it smoker is probably down the line for me, but for the $150.00 I have into my unit, I'll keep er for a few more years.

Good luck!

Thank you. I already purchased the cast iron pan 10" I think to use as my chip/chunk tray.

For the needle valve inline thing...can you post a photo? Did you cut the existing line and add this or buy another hose line to attach? I'll look into it on google as well. It looks like I may need the valve and another hose line (possibly added gas line tape to ensure a tight fit).I was looking to see if there was a single hose from Propane Tank to Smoker that would include a separate valve - I found some but looks like they have a 5/8 not a 3/8 in female end

The part about the felt gasket was me thinking maybe Masterbuilt knew the doors wont retain as much heat (gaps) and took that into consideration with the valve thinking more heat will escape so you'd need to turn it up...but when I/we helped seal with the gasket it kept heat inside more.
 
Here's my poor man's smoker skirt in action. 3 pieces of cardboard covering the sides and back of the lower section. Used it yesterday only because I was cold smoking with one of my AMNPS trays and it was very windy. Wanted to block some of the winds from nailing the pellet tray.

Oh and you will need to squint your eyes to see it, but the needle valve is up against the propane tank connector.

This smoker is actually used more now for cold smoking my Salmon and Albacore Lox as well as cheese during the cooler months.

As far as a door gasket, I use automotive high temp gasket goop. Ran a bead on the cabinet's door openings a few years ago. Still livin' strong.
IMG_1998.JPG
 
Last edited:
These are the parts I used:


Missing is a 1/4 x 3/8 reducer that I sourced locally. You also need yellow, not white teflon tape (gas). If you have a good hardware store or propane supplier, they should have everything in stock. At the time in the pandemic, I was ordering everything online. The picture gives you some idea of how I plumbed it together.

84D3F113-F8A0-4120-84A3-D91B864F819E.jpeg


The needle valve is not high pressure or low pressure. the output of the regulator and the type of burner you have is, and yours is low pressure.
 
I have read on this forum that the regulator on these units are low pressure, so search for the proper Needle valve on this forum.

I apologize, if you are going to use a regulator and needle valve combination, chadnicoletti chadnicoletti is correct, use the low pressure version. I mounted mine on the smoker. Putting it on the tank is the easier way to go.
 
  • Like
Reactions: dieseldan723
I'm a long time smoker, but just got a Masterbuilt 30" propane smoker. While seasoning it, it seemed to reach high temps, but within the hour seasoning, I could never get it below 330. After reading this forum, I realized that I should change my regulator to one with a needle valve (?) inline.

I set the smoker to lowest, the valve to almost off and the cylinder about 1/4 on. I'm using a 10" cast iron skillet.

The only thing I didn't do was adding a gasket to the doors. Any suggestions?
 
Welcome!

I feel that a needle valve is a must with these, especially if you want to smoke salmon or jerky at low temps. When you look for a reg and needle valve combo, look for the low pressure variety. Otherwise your smoker cabinet will be performing a SpaceX Starship imitation.

Installing a door gasket should also be high on the list of projects. It is important to be able to control the air going in and out of the cabinet rather than just uncontrolled leaking. The gasket can be found at good BBQ stores or Amazon. Hint: put the gasket on the door rather than the cabinet. It will stay cleaner as you move dripping meat in and out.

BCC3FB8E-0ABF-48E3-AE15-C3A5C764760E.jpeg

By adding the gasket, you have cut the air entering the cabinet. I added an extra vent in the upper cabinet (mine is split) and sometimes crack the lower door when I need more air (like when smoking jerky).

9ABA406D-8599-430D-86B6-A2367DD9D0E7.jpeg

I have also decided that the next best thing is an external smoke generator like a mailbox or Smoke Daddy or similar. Burning the wood in the cabinet adds temperature that is uneven and difficult to control. And it changes depending on the type of wood you use. I built one that uses a smoking tube and pellets and works really well. It really shines when smoking cheese. No heat added to the cabinet at all.

I kind of look at the the small cabinets as a start that requires some fun projects to get right. I am very happy with mine now. Being vertical, it requires very little space which is important to Mrs. Smoke.

Have fun!
 
Hi old smoke, i just got my Masterbuilt 230S adventure series for xmas gift to me. First smoker for me. Looked up and did some mods on it. Gaskets, drilled in gasket nuts on side to have places for my 4 probes so very little air leaks. Cast frying pan. To stop the wind problem i built a shack....i know extreme but thats what i do. Picked up longer gas line and 100lb adapter for large tank, so back up tank 30lb + 100lb
I have been wanting to get the right needle valve so thank you for this post , started by" chadnicoletti " thanks for the path to buy on amazon
David
 

Attachments

  • DSC_2149.JPG
    DSC_2149.JPG
    118.4 KB · Views: 141
  • DSC_2154.JPG
    DSC_2154.JPG
    170.5 KB · Views: 145
DRKsmoking DRKsmoking that is a really nice little shed. No beer cooler?
OldSmoke
Thanks for the like and about the shed. Now for the cooler, i have a fridge that is in the shop right next to shed . That is where the shed is plugged into. And it just happens to fit under the chopping block counter where the stool is now. Not the reason for the height, just lucky planning :)
David
DSC_2133 - Copy (2).JPG
 
  • Like
Reactions: chadnicoletti
SmokingMeatForums.com is reader supported and as an Amazon Associate, we may earn commissions from qualifying purchases.

Hot Threads

Clicky