Landjaeger Press
- Thread starter BGKYSmoker
- Start date
-
Some of the links on this forum allow SMF, at no cost to you, to earn a small commission when you click through and make a purchase. Let me know if you have any questions about this.
You are using an out of date browser. It may not display this or other websites correctly.
You should upgrade or use an alternative browser.
You should upgrade or use an alternative browser.
SmokingMeatForums.com is reader supported and as an Amazon Associate, we may earn commissions from qualifying purchases.
BGKYSmoker
Nepas OTBS #242
Original poster
Staff member
Moderator
OTBS Member
★ Lifetime Premier ★
Group Lead
Thread starter
Well they were gone within 4 days so they musta been good.Those look great! How do they taste?
Well they were gone within 4 days so they musta been good.
4 Days????
You must have been there alone!!!

Bear
Hey Bear, ever think that Nepas doesnt like us no more?? We NEVER get to sample is magnificant looking sausages>>>

RIch

RIch
Yup!!!Hey Bear, ever think that Nepas doesnt like us no more?? We NEVER get to sample is magnificant looking sausages>>>
RIch
Now I hear he's going to sneak out of PA soon, probably under the cover of darkness!!
Bear
daggerdoggie
Smoke Blower
Would you mind sharing your recipe/process that you use? I have tried several and looking to learn. I added a few onces of red wine to mine this time.Well they were gone within 4 days so they musta been good.
daggerdoggie
Smoke Blower
I'm also curious that you say you put them in the press and off to the fridge. All the ones I have done call for fermenting from 3 to 4 days at 80 degrees. I pressed mine for 2 days, dried them for a few hours and then back in the press for another 2 days this time...albiet my press is a lot simpler than yours...I may copy your press for my next batch.I wasnt going to but i had to.
Made some Landjaeger mix.

Had my casing soaking, mixed the meat and did some late night stuffing for the press.

A sheet of freezer paper over the links, the top on and now in the fridge for a day or so.

BGKYSmoker
Nepas OTBS #242
Original poster
Staff member
Moderator
OTBS Member
★ Lifetime Premier ★
Group Lead
Thread starter
Putting in the fridge dries and reduces the green weight, thus making it easier to dry them with 70% R/H. If i remember right these took about 2-3 weeks. They should go longer.
My buddy Mark and I made a press too. Somewhat different than yours. We used 3/4” birch A/B plywood and 1/4” polycarbonate plastic on bottom butted to birch plywood 1” x 2” for easy clean-up. It presses to 11/16”. We put 16 1/4” x 3” bolts ( two in each corner)with counter sunk nuts on bottom . Once the top of press is fitted we use 16 wing nuts ( two in each corner) to tighten. Seems to work for our preferences.I need something to do so we are making some Landjaeger press molds.
Hardwood ply.....NO WAY to much $$
S4S Ply 3/4" for the base and tops.

Poplar for the dividers and slats.

Made a couple spacers so all the sections will be the same width.

After its all together i will cold smoke the press and top so they get a nice season. I'm thinking after the season maybe a coat of chopping block oil?

Slats are 3/4 x 3/4" x 18"
Spacers are 1 1/2" x 1 1/4" x 3/4"
Base and tops 20" x 18" X 3/4 "
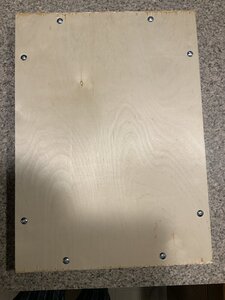 Bottom
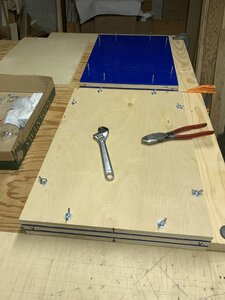 top blue is top piece of press. Bottom board is picture of press tightened down with wingnuts.

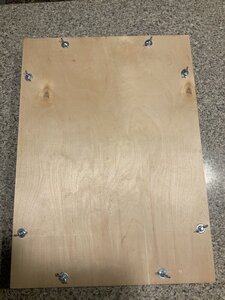 Left bottom of press. Right is picture of full press tightened.
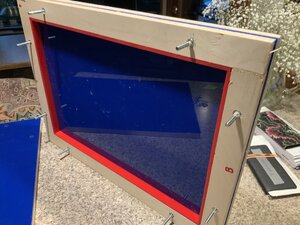 Side view of bottom
 Looking down at bottom of press
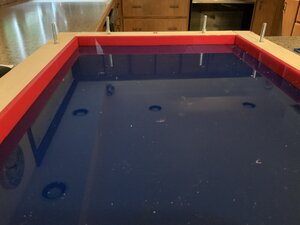 Looking within bottom from one end to another.
SmokingMeatForums.com is reader supported and as an Amazon Associate, we may earn commissions from qualifying purchases.
Similar threads
- Replies
- 32
- Views
- 3K
- Replies
- 20
- Views
- 1K
- Replies
- 14
- Views
- 2K
- Replies
- 45
- Views
- 19K
Hot Threads
-
Featured 2025 Christmas Gift Exchange
- Started by bmudd14474
- Replies: 26
- General Discussion
-
The Best Egg Salad - Enabler Version
- Started by Chris_in_SoCal
- Replies: 22
- ABT's and all things Appetizers
-
Too Cold For Me
- Started by BGKYSmoker
- Replies: 21
- General Discussion
-
Racoon in liquor store
- Started by normanaj
- Replies: 18
- Blowing Smoke Around the Smoker.
-
Well. Look what Santa dropped off early!
- Started by Steve H
- Replies: 16
- Blowing Smoke Around the Smoker.


