Fired up for a Mini build

  • Some of the links on this forum allow SMF, at no cost to you, to earn a small commission when you click through and make a purchase. Let me know if you have any questions about this.
SMF is reader-supported. When you buy through links on our site, we may earn an affiliate commission.

jsclow

Fire Starter
Original poster
Jan 19, 2014
54
11
La Ceiba, Honduras
Been on a mission for several weeks now.  Quick background...I've lived in Honduras over 3 years and counting. Most things here run 1-1/2 to 2 times the cost as compared to the US. Was in the US recently on a 6 month furlough and a friend of mine who smokes (fellow displaced Texan) got me got my mouth watering for some good Texas Beef Brisket.  He has got it to an art. It is some good eatin'.  I started my search for a good buy on a good all around combo setup and was leaning towards a Char Griller Trio...found on online for about $535 with a cover.  When we got back home here, I drove by an import store and saw a Smoke Hollow 4 in 1 for L11,500 hnd (about $575 usd).  I think the cost under $400 in the States, but that is still cheaper than buying the CG Trio and paying about $200 shipping ($1/lb, $25 minimum from Miami).  Got into conversation with Hambone1950 on another thread I started and he kept me thinking cheap, and build my own. Then came up on this Mini-WSM thread and found my solution. No brainer...already have the base Smokey Joe grill, the rest is just time, research, seek advice, and some ingenuity to some for sure challenges.

I won't be able to easily find some of what I need but I think I can find some compromises to modify to work.  Got the tools and a place here to get help.

Ok. maybe that wasn't quick, but if your still with me you know what I have to deal with...Another thing is I don't have normal access to the types of wood that I am accustomed to(3 hr drive to San Pedro Sula and a grocery store where I found bags Hickory and Mesquite chips). I need to experiment with some different type of fruit trees and I think this mod will be perfect for that. 

I know from previous advice that the Maverick Digital Thermometer (ET732 or ET 733) is the way to go for temp monitoring.

I have seen plenty of Tamale pots in the local market, I just have to take the SJ down there and find the right fit.

Couple of questions though:

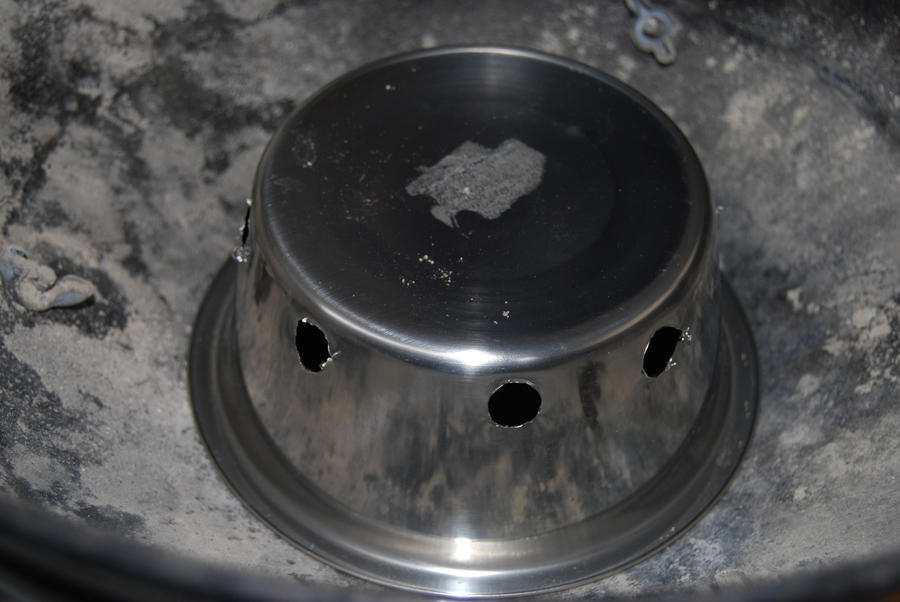
1. I have seen a couple of different mods to the pot and I know its all about heat/smoke control.  Which works best... drilling holes or cutting a large hole in the bottom of the pot/lid?

2. I found a Charbroil smoke box that I have been putting wet wood chips in to get smoke on the SJ when I grill. Is this the way y'all do it or is there another/better way?

I am sure I will have more questions as I go and I welcome any comments/advice.  I will post progress as it comes although it may be slow as I search or wait for materials.

Thanks to all here who have given me a mission.
 
Told y'all I was fired up. Woke up with this build on my mind.

Just put a few items I am sure I will have trouble on my amazon wish list.... thermometers, cooking grates, starter chimney(made this before out of a large coffee can, but just not the same). I bought the grill used a couple years ago off a gringo returning to the States and it did not have the charcoal grate so I may just make one out of exp metal and include a basket.

I know this is a lot of useless ramblings but it helps me process.

JckDanls 07...if you read this... how do you use your Maverick thermometer? Did you just drill close tolerance holes to accommodate the probes?

I don't know anything about cold smoking, but I'm gonna go with a double stack from the get go and try it out.
 
JS,

Good morning and welcome to the start of your build. Interesting story. I had a buddy down your way many years ago.  He loved it.

To answer some of your question  I'll start by saying that we are all learning as we go.  We think we've got a certain subject nailed, then someone comes up with a better mouse trap.  I'll answer your question on what I believe to be the best methods we have today.  I'll also preface this by saying these answers are my opinion and full expect my passionate mini friends to chime in!

1. The standard now is to cut the bottom out of the pot leaving about an inch and a half lip. Also cut the lid out and attach it to the bottom with pop rivets or small nuts and bolts. Cutting the bottom out and attaching the lid will raise the pot an inch or two allowing for more charcoal. A good thing for a long brisket cook. 


2. I simply toss the chips on top of the charcoal.   


Use these for you probe access hole. Use the short nipple with two backing nuts.


Hope that helps!

Brian

 
Last edited:
WooHoo another Mini is born!!

Brian has you pointed in the right direction with what to do for your build. You didn't mention if you have the Smokey Joe Gold or Silver. If you have the Silver you'll want to add side vents. If you have the gold then you are ready to smoke, but may want to add a bottom vent for high temp grilling.

Cutting out the bottom of the pot is the best method. My first Mini I just drilled holes. It worked but if you overload the charcoal basket you run into issues with the pot not being able to seat on the Smokey Joe base. I ended up cutting out the bottom of that pot and did the same on my second.

Good luck with your build and post some photos!
 
I know it is hard to see in my avatar photo but I have a Silver.  Beggars can't be choosers, and honestly when I got it I was not as educated on the subject of different levels of Weber grills. When we lived Stateside I had a 22" Weber and fell in love with it. Everything I have grilled on since has been compared to it. So I will research and figure out the side venting. From what I've read so far it seems easy.

Brian... just left your neck of the woods a month ago. My parents live south of you in Fairfield off I45 just south of Corsicana.

Clarification... since a temp gauge is mounted to monitor the smoke temp, is the access hole to check the internal meat temp an is it easy to do?  I know it is not ideal, but I assumed I would have to take the lid off to check it. 

Also, how long can you go without adding charcoal to maintain the smoking temp? How often do you have to add wood chips? The only way I see to accomplish this is taking the mod pot off and adding it.

I know these are questions that I will find in y'alls posts but they are all running through my head right now.
Heck man… Dont apologize for "just having a silver"  They make every bit as good of a smoker as the gold. And my good friend Case will tell you a silver can do things a gold can't! I know Fairfield Been years since i've been down that way. ...Wonder if Sam's Restaurant is still open. 

The Mav has 2 probes and will monitor both the meat and smoker temp and both probes will slide through the bushing I illustrated above.  I put a big dial thermometer on mine just as a whim.  Looks cool right? 

You are correct. You take the pot off to add more chips.  But a little wood chip goes a long way in a mini.

To give you an idea about how much charcoal to use and how long it lasts go to the mini test data that we did. That will give you a good idea on the performance of these lil fellers.  I think you will be impressed.  Here is the link. 

http://www.smokingmeatforums.com/t/155368/mini-weber-smokey-mountain-test-run-data

Brian
 
Last edited:
Thanks Brian. It is open, I ate breakfast there while at my parents.

We have a group coming down in a few weeks so I gotta get on the stick and figure out what I need them to bring. For sure the thermometers and maybe the cooking grates. I noticed that some grates are checkerboard and some are the unidirectional that would come stud with the grill. Is one better than the other?
 
I think I have most of the stuff I need to get started soon (well, when it arrives in country in a few weeks anyway). My mind has turned towards the side vent mods for my Silver.

I have read through what info I've found and have some questions. Maybe my searching skills are lacking and all this is in there somewhere.

Size? What I've read is 3/4. Is bigger better?

Location? Height mainly. The mods I've looked at seem to have the side vent above where the charcoal grate sits.

Maybe I need a lesson on air flow through a smoker and if there is such a forum for this please share. My uneducated common sense does not seem mesh with why I am seeing and reading.

Thanks, John.
All you need to get good airflow are two 3/4" vents>. You want them yo be up as high as you can get them.There is a lip on the interior of the Silver that the cooking grate sites on. In both of my mini's the side vents are just below that lip. You will also want to make an ash deflector for the lower vent. That can be as simple as using a tin can with holes punched in it.


This is perfect.  I saw these on your build thread but these photos clear it all up for me.

So with the ash guard do you leave the bottom vent wide open and control your heat with the added side vents?
 
 
This is perfect.  I saw these on your build thread but these photos clear it all up for me.

So with the ash guard do you leave the bottom vent wide open and control your heat with the added side vents?
Well that kind of depends. When I first start up I have all the vents open. I begin closing down the lower vent, then the side vents depending on the temps I am looking for. When I am cooking chicken I quite often don't close any of the vents or just the lower one a bit (high temp smoke). For the lower temp smokes I have had the lower closed, one of the side vents closed and the other just barely open. Some of iut depends on the wind and weather too. I like to reverse sear so having the ash cover is a must. It allows me to run the smoker low and slow for smoking, then open all vents wide open, remove the pot and sear on the coals.

 
Well I exhausted all my resources today for the tamale steamer.  I looked in every little hole in the wall tiendra (and there are a bunch) in the market.  most were too big or small. 40 qt or bigger, 30 or smaller and the one that was the closest to being right, was still too big in diameter. 

So, a good friend who is coming down in a few weeks has already bought me the grates and thermometers I need and he will get the right steamer too.  Just delays everything a bit. I will go ahead and get the side vents installed and the ash guard made though.

Thanks to all for all the help so far.

John
 
Well I exhausted all my resources today for the tamale steamer.  I looked in every little hole in the wall tiendra (and there are a bunch) in the market.  most were too big or small. 40 qt or bigger, 30 or smaller and the one that was the closest to being right, was still too big in diameter. 

So, a good friend who is coming down in a few weeks has already bought me the grates and thermometers I need and he will get the right steamer too.  Just delays everything a bit. I will go ahead and get the side vents installed and the ash guard made though.

Thanks to all for all the help so far.
John

We didn't have any here until a year ago. I had to order my first one. The second I bought at one of our local stores.

Once you get those side vents installed make a charcoal basket and practice your searing skills until the other parts show up! The smokey joe makes a great seared steak, pork chop, or chicken!!!
 
OK.. This is the way I did mine.... I have the silver as well... I didn't do the air vent mods on the side as it really isn't needed.... just the ash pan over the lower vent works just fine.... as for the grates that are 1 inch squared... I made those with some stainless steel screen (used for screening water softener salt) that we have at work.... as for my probes for the Mav... I just cut a little notch in the smokey joe lid so the wires come threw there.... really no need to search for and buy unnecessary parts... for my heat sync/difuser... I made a grate a little smaller so it will go past the rib down towards the bottom of the pot and sit on the lip left from cutting the bottom out of the pot.... I then cut a piece of 1/4" steel plate about 1"- 1 1/2" smaller than the hole cut in the bottom of the pot.... so now when I set that plate in the bottom of the pot there is about a 3/4" gap to let heat and smoke come up threw... I then set a 12" cast iron skillet (with handle cut off and wrapped in foil for easy clean up) on top of the 1/4" plate.. it acts as catch pan and heat sync all in one.... mine has three racks to cook on but am thinking of adding the fourth at the top of the pot.... any other questions.. just ask....
 
OK.. This is the way I did mine.... I have the silver as well... I didn't do the air vent mods on the side as it really isn't needed.... just the ash pan over the lower vent works just fine.... as for the grates that are 1 inch squared... I made those with some stainless steel screen (used for screening water softener salt) that we have at work.... as for my probes for the Mav... I just cut a little notch in the smokey joe lid so the wires come threw there.... really no need to search for and buy unnecessary parts... for my heat sync/difuser... I made a grate a little smaller so it will go past the rib down towards the bottom of the pot and sit on the lip left from cutting the bottom out of the pot.... I then cut a piece of 1/4" steel plate about 1"- 1 1/2" smaller than the hole cut in the bottom of the pot.... so now when I set that plate in the bottom of the pot there is about a 3/4" gap to let heat and smoke come up threw... I then set a 12" cast iron skillet (with handle cut off and wrapped in foil for easy clean up) on top of the 1/4" plate.. it acts as catch pan and heat sync all in one.... mine has three racks to cook on but am thinking of adding
the fourth at the top of the pot.... any other questions.. just ask....

I was never able to get my silver to go anymore than 285* without the side vents, especially when it was cold or windy. When I added just one side vent I was able to achieve almost 300 on the cold days and about 315 on the hot days. After I added the second side vent I can max out the therm at 400 and have taken readings with my other non digital therm with temps hitting just below 500!!!! No need for that temp really, but I can get there. The mini on a silver base will work with no mods but it works even better with.
 
Case. Can you comment on the stability of the 3/4" vents?  looks like you drilled a hole just big enough to start the nipple and as it was screwed in it tightened up. is this flimsy to where a backup 'nut' would help make it more stable?

Also, would the depth of penetration into the grill be a big factor? i.e. if I did put a modified coupling on the inside, would that make the vent to deep inside the grill?
Yes I used a step bit to drill the holes just big enough to get the threads started. I did not install a backer nut or anything else, they are perfectly fine without. I assume if you drilled the hole to big, you would need a nut on the out side and the inside to hole it in place. The nipples on mine protrude inside about 1/2"-5/8" or so. That leaves a good 3/4"+ to the charcoal basket. That would be the only concern is being to far in that you wouldn't be able to get the basket in. Build you basket then see how much space you have. Honestly though its really not needed if you don't over drill the hole. I could stand on mine and they wouldn't go anywhere, the flimsy legs would buckle, but the valves would stay in place!
 
Here's a start on some wood I gonna try when I get the build done. In the box are Zapote(a native tropical fruit), Avocado, Guanabana, and Lemon (you see this size of the lemons, or limes as they call them here, that come from this tree. That is a 6" ruler above the lemon. Most of them are larger than a grapefruit).

 
SmokingMeatForums.com is reader supported and as an Amazon Associate, we may earn commissions from qualifying purchases.

Latest posts

Clicky