Been a while! New Electric Build!

  • Some of the links on this forum allow SMF, at no cost to you, to earn a small commission when you click through and make a purchase. Let me know if you have any questions about this.
SMF is reader-supported. When you buy through links on our site, we may earn an affiliate commission.
Have you considered using something like a cast iron griddle on the element, with wood chips for smoke generation? That would eliminate the condensation issue you have, and it could be removed as soon as the unit cools down.

Thank you for the kind words! There will still be a lot of tweaking as it's not 100% perfect. Such as still trying to get my magnets to stay on my wrap......

I have considered this, but.......... I originally went with the external smoke generation for the utmost control. Originally on my MES smoker, this setup worked perfectly with few issues, hence why I went this direction.

The reason for the external wood chips was due to the PID controller only fluttering the element, especially when all variables were minimal for heat loss. So happened was that the original chip pan wouldn't get hot enough to start the burning process in the chips. Basically was left with almost charcoal with no smoke to speak of.

I prefer the external also as I can start/stop the chips on the fly without having to open up the unit.

Now, will this happen on this setup? Not sure. I could try and and mod my element support in order to hold a chip tray to take the weight. As it stands, it's just enough to hold it up.

The position of my smoke generator I believe is part of the problem too. I mounted it at the end of the element and there is a gap from the end of the element to the edge of the cabinet. My thinking is that I am getting a down draft in this spot causing a backdraft of air and moisture into the smoke generator. The last build, it was under a hotter spot and my thinking is this also helped get more natural updraft through the generator to sustain smoking and keep moisture from getting into the generator.

So, my first goal is to MOD the generator....

1.) Going to add more lower holes to help aid in air flow through it.

2.) Originally used the same soldering iron as the last on, which is 45 watts and 750* max temp. To overcome the new found humidity levels with this unit, I am going to try and us a higher wattage, 900* soldering iron, or....I think as it will be cheaper, I am going to find a larger wattage cartridge heater to overcome my problems to get a better burn. The one I listed is 100 watts. But I need to look at max temps, etc... before deciding on trying one.

 
Another option for smoke generation, would be one of those tubes or trays for pellets. A lot of guys on here report excellent success using one in an electric smokers.
 
  • Like
Reactions: whitegardens
Going to be modifying the smoke generator over the next few days.

I was able to play with it some while cold smoking salt and roasting smoked nuts for Christmas presents.

I realize that with the 45 watt soldering iron, I'm not building enough heat to overcome the moisture issues, for a few reasons...

1.) I need better airflow and more holes.

2.) Need to modify the "grate" on the inside where the pellets/chips actually rest.

3.) I need more heat to overcome the moisture issue.

So I've ordered 130 watt cartridge heaters to play with. Not getting into the weeds of thermal density and power input, but it should get pretty hot. It's amazing the wattage ratings on some of these.

Picked this one specifically for the diameter. Basically the size is perfect for my existing hole.
20211231_083137.jpg


So we will see how it goes... If welI, I might end up doing another pid controller for the smoke generator. So basically when I have good ignition on the wood, it will shut it off automatically...

But for now, I'll wire it to a plug and manually turn it on/off.
 
Ya...

The cartridge heater looks to be the way to go. Needless to say, it appears that it's going to be more than enough heat to overcome any moisture issues and make sure there is plenty of upward air convection.

Took the time to drill more vent holes for air flow, cut out a new grate and installed a retainer pin to hold it, and the cartridge heater in position.

Going to be doing jerky tomorrow, so I will be able to test it right away. Pretty confident though that it will work great.

20220101_174512.jpg
20220101_172526.jpg
20220101_172853.jpg
20220101_175212.jpg
20220101_174501.jpg
 
Maybe I'm just a coward but I've been hesitant to use those cartridge heaters at full power with their only heat sink being loosely touching pellets which have their own energy source (ie they're burning themselves!) After all they're intended to slide in a thick piece of metal and transfer their heat well into a large surface area. I'd be afraid the lifetime would be pretty short in hot pellets.
However I've had good luck with just putting a diode in one of the leads to block half of the 60Hz sine wave going to the filaments at full wallplug voltage. These work fine:
 
Maybe I'm just a coward but I've been hesitant to use those cartridge heaters at full power with their only heat sink being loosely touching pellets.

I have actually thought about this scenario and don't disagree.... I too am curious as to the longevity of the cartridge heater in this environment.

Around 6 bucks for two, I decided to take the plung with it. Even if I'm in the middle of cooking, I can still revert back to the soldering iron.

But even if it does work, I agree that without a heat sink, the potential for burnout is large.

The diode idea is great! I'll think about using in the future if I consider going this route after testing... I'm also considering either some sort of simple thermostat or even another PID controller in order to cycle the cartridge heater. Once the pellets or wood start to burn on their own, then I should have the heater turn off as it will be ineffective at that point.

As of now, my hope is that using a lower wattage cartridge heater will give me some longevity over extreme high wattage offerings. The one I chose is 130 watts, and actually would have preferred to be closer to 100...i choose this one being close to the dimensions of my current hole in the smoke tube.

In the end, I'll manually control it for test runs today. The main objective is just proof of concept and I'll post results if course.

And luckily, being how I've configured my setup and my smoke generator being isolated, I have little fear of the ramifications of burning out the cartridge and feel comfortable testing.

Thanks for the input!
 
Maybe I'm just a coward but I've been hesitant to use those cartridge heaters at full power with their only heat sink being loosely touching pellets...

Doing more research...

It appears cartridge heaters can be used in open air applications as long as it is a medium to low density unit.

I have not done the hard calculation on the ones I purchased, but at first glance, it's no more than a medium density cartridge heater..

https://www.tri-volt.com/industrial/cartridge-heater/

We will see as there is other variables that will affect its lifespan also.
 
First impression of the cartridge...

Pretty awesome. Smoke in 30 seconds... Rolling smoke in less than a minute.

Turned it off and it still burning.
 
  • Like
Reactions: chopsaw
A controller on your smoke generator and a small fan and you have a mini pellet pooper

So what I've found so far is that all I need is ignition in the smoke generator and that's it. Ultimately I have let it run for a minute with fresh pellets, then turn it off.

Between a better grate and air flow, it has kept itself ignited and burned itself out without having to turn the cartridge burner back on.

If I did a controller, it would probably be a timed shutoff after 1 minute or so.
 
  • Like
Reactions: chopsaw
...Once the pellets or wood start to burn on their own, then I should have the heater turn off as it will be ineffective at that point.

As of now, my hope is that using a lower wattage cartridge heater will give me some longevity over extreme high wattage offerings. The one I chose is 130 watts...
I was thinking a $1 Schottky diode and a $1 switch that shorts it out so you have a low and hi power setting. But at just 130W, a normal light dimmer switch (~$15) gives you variable control from full to off. Something else to consider.

And I agree once you get your pellets smoking you'll soon learn when you can cut the power completely to prolong heater life.

I too have seen higher power cartridge heaters, but they tend to be bigger diameter and longer. And it's the power density (power divided by heated area) that determines how much you're stressing the innards each time you thermally cycle them. Make sure you're correcting for area (pi*radius-squared*length) when comparing different wattages.

Final suggestion: a tube of pellets tends to burn up better than down or sideways so how you orient the pipe can make a difference. Just make sure the pipe has a good draft path to "breathe" in O2. Once your tube is lit and smoking, throttling this air flow is probably a better "smoke control" than to fiddle again with the cartridge "pellet igniter".
 
Just make sure the pipe has a good draft path to "breathe" in O2. Once your tube is lit and smoking, throttling this air flow is probably a better "smoke control" than to fiddle again with the cartridge "pellet igniter".

This is the other variable that has been I hindrance.

Too many pellets, and it chokes out the updraft for sure.

So now that I have great ignition, I'll now take a measuring device to get a more precise amount of pellets in the tube each time to avoid this issue.

I'll mess with wood chips also and see if there is a volume threshold also, but my initial guess is that I can add more just because of how they loosely lay compared to pellets.

Thank you for your input, especially with the watt density equation. Luckily for now, I'm only needing to run the cartridge heater for 30-60 seconds, and as long as I have proper updraft, it doesn't need to be reignited.

But, I do like the idea of a voltage control switch or standard dimmer to control the heater precisily if/when needed.
 
  • Like
Reactions: bill1
Holy cow! That is a great thread of a build. Like others have said....Little lost on the technical aspects but in awe of the build.
Jim
 
  • Like
Reactions: whitegardens
Holy cow! That is a great thread of a build. Like others have said....Little lost

on the technical aspects but in awe of the build.
Jim

Much appreciated!

As for the technical aspects of this build, it really isn't more than just understanding the basics....

Just have to pay attention to your electrical ratings for each part in the system and double check and confirm your work. Ultimately, I'm on a 220, 30amp circuit. All parts on the unit are rated at 30amps and all draw calculations of the until is well under 30amps. This actually allows me to install a bigger element or add a smaller one if I like to do a two stage system if I felt neccisary....


Luckily, I have a friend from grade school who is an electrical engineer, master distiller, etc.... whom I have been able to consult and confirm things with.

It definitely gave me more confidence in my work.
 
  • Like
Reactions: JLeonard
Little maintenance update...

So my burner utilizes a spade type connection, which isn't neccisarily bad, but my amp draw, and any imperfections in the connection caused an arc and burned out the connection.

Luckily, I was at the end of a cold smoking run of cheese, so nothing was lost.

1.) I found a replacement burner with screw type connectors and have since installed. This should help eliminate any possible bad connections.

2.) noticed my lightweight, dirt cheap ssr's were melting...... Upgraded those along with a low resistance, braided 10 gauge wire with high temp insulation.

If I still have problems with my relays, I'll have to install a fan to help disipate the heat from heat sinks. Personally though, these inkbird relays are heavier than the knockoffs I used, so their quality seems better and similar to the fotek relay I used on my mes smoker that never caused me any issues.

Going to hopefully get 5-6 various runs out of it again, before I break it down this summer and touch up the paint.

Also went ahead and bought some expanded metal to make a tray to hold my ceramic briquettes.. My make shift one didn't cover the bottom completely and I think I was getting a hot side from the upward convection of the heat.
20220206_123935.jpg
20220206_125336.jpg
20220206_125537.jpg
20220209_165714.jpg
20220209_165723.jpg
20220211_173300.jpg
20220211_173522.jpg
 
Happy 4th!

Thought I'd share an update for anyone that might have wondered what came of the smoker.

We'll, for the most part it's still working great!

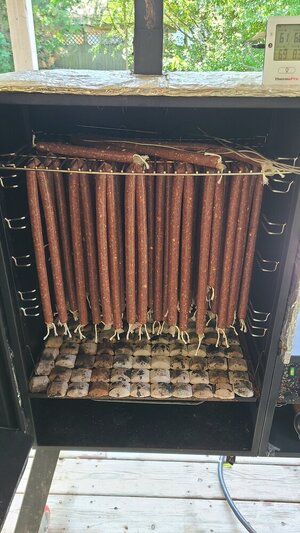
Love the control for my low temp processes. Taking today to do another 25lbs of venison snack sticks!

Jalapeño cheese...

Love how I can slowly ramp up to the desired temps and slowly raise the internal temps.

Control was what I was after and succeeded!
 

Attachments

  • 20230704_121309.jpg
    20230704_121309.jpg
    147.7 KB · Views: 3
SmokingMeatForums.com is reader supported and as an Amazon Associate, we may earn commissions from qualifying purchases.

Latest posts

Hot Threads

Clicky