Navigation
Install the app
How to install the app on iOS
Follow along with the video below to see how to install our site as a web app on your home screen.
Note: This feature may not be available in some browsers.
More options
Style variation
-
Some of the links on this forum allow SMF, at no cost to you, to earn a small commission when you click through and make a purchase. Let me know if you have any questions about this.
You are using an out of date browser. It may not display this or other websites correctly.
You should upgrade or use an alternative browser.
You should upgrade or use an alternative browser.
Bad luck on Amazin pellets again.
- Thread starter dave17a
- Start date
SmokingMeatForums.com is reader supported and as an Amazon Associate, we may earn commissions from qualifying purchases.

russell page
Fire Starter
- Jun 24, 2016
- 31
- 10
If
THE PELLETS ARE DRY AND
THERE IS AIRFLOW AND
ONE GETS THE PELLETS BURNING GOOD
IT WORKS EVERY TIME ALL THE TIME
THE PELLETS ARE DRY AND
THERE IS AIRFLOW AND
ONE GETS THE PELLETS BURNING GOOD
IT WORKS EVERY TIME ALL THE TIME
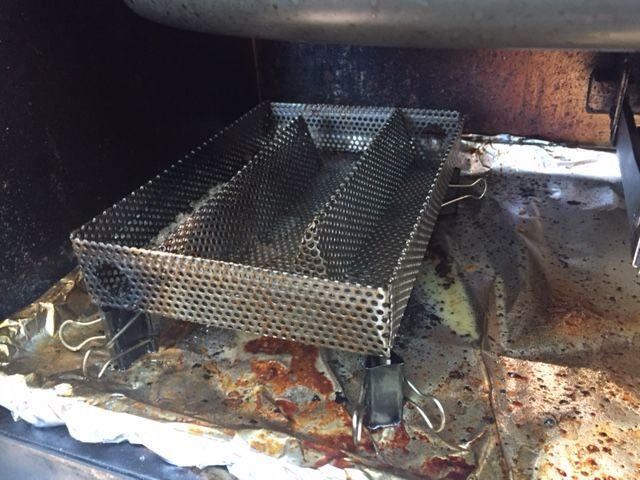
Dave, morning...... Listen... I just took Mr T's advice... elevated the AMNPS.... put NON dried pellets.... I was trying to do the least possible to see if this idea worked , under the most adverse conditions.... My results are in pictures....Setting up on an iron box for putting wood to smoke in.Bout 4x6x2. Maybe not enough flow, but who knows, like I said never a problem before. Thanks Mr. T. Its smoking like a banchi at this moment
I'll throw my 2 cents in. I found that my AMNPS works much better if raised two or three inches above any flat surface. This allows good airflow beneath the tray. I use an aluminum soap drain but, anything with holes in it will work. You could also put small 2 or 3 inch long bolts in the corners also.
You also want good airflow through the smoker.
T
http://www.smokingmeatforums.com/t/...ox-modification-no-more-drying-pellets-for-me
People started raising the AMNPS 4 years ago, because until then all the MES units were Gen #1, and everybody was putting the AMNS and the AMNPS on the support rods to the left of the chip burner assembly, and plenty of air comes through that area.
With the Gen #2 they work better with the AMNPS straddling the water pan hole, or set on a wire cage on the floor, or running small bolts in the corners, like Dave said.
With my Generation #2.5, I just put the bottom rack in, and set my AMNPS right on that, so plenty of air goes through it.
I have never had to Nuke or oven my Pellets.
Bear
Could be the altitude:
I never had to Nuke, or oven any Pellets.
Also No Mail Box.
No pulling the dumper out, or the Chip drawer.
I'm at low altitude (about 400'), and all I do is keep my pellets dry, by putting them in air tight Jugs.
Then I take my time getting it lit properly, and that's it.
Once I quit & separate the unburned Pellets from the burning, it takes about a half hour for the burning ones to stop smoking!!
The Biggest thing is getting it lit properly to begin with. (Wish I had a Nickel for every time I said that)
Bear
I have an MES 40 2.5 and had the same problem. I called Todd. He suggested opening the chip tube and twisting it half-way (handle in 12 o'clock/6 o'clock position)...that worked and I have not noticed any different temperature swings in my smoker. Todd also suggested elevating the AMNPS...I did so using using 4 spring clips. Problem solved.
In my #2.5, I put the bottom rack in, and set the AMNPS on the right side of that.
I have an MES 40 2.5 and had the same problem. I called Todd. He suggested opening the chip tube and twisting it half-way (handle in 12 o'clock/6 o'clock position)...that worked and I have not noticed any different temperature swings in my smoker. Todd also suggested elevating the AMNPS...I did so using using 4 spring clips. Problem solved.
Just today, about 5 hours ago, I tried that. I pulled the Dumper out about 2", but I didn't turn it.
About a half hour later I had to push it back in, because the smoke was getting too heavy.
Pushing it back in simmered it down just right again.
It's good to know because with the AMNPS right above the inside of the Dumper Tube, pulling it out some helps the air flow, but then I can control it by pushing it back in. I figured if the smoke got real light, I could pull it out again, but it stayed Perfect with it pushed in.
Bear

mummel
Master of the Pit
Im 6/6 successful smokes this year. You can go back to my old posts from last year and read about the trouble I had. I dont really know whats going on and why, but I switched to Pitboss pellets and they burn fine. I do miss the smell though of the hickory and the other Todd's pellets. They were great. Also, I wonder if my shed is helping someone with air flow?? As I said, Im not sure, but its working perfectly now and Im so happy.
Here is the simple set-up that worked - complete with coon tracks on the side of the smoker
I have an MES 40 2.5 and had the same problem. I called Todd. He suggested opening the chip tube and twisting it half-way (handle in 12 o'clock/6 o'clock position)...that worked and I have not noticed any different temperature swings in my smoker. Todd also suggested elevating the AMNPS...I did so using using 4 spring clips. Problem solved.

Yup---That works! Handy little clips!!
Here is the simple set-up that worked - complete with coon tracks on the side of the smoker
I've seen Coon tracks just like that on my front porch too.
One got up inside my Weber "Q", and ate the whole center out of my Foil Drip Pan. It was time I changed it anyway.
Bear
I know this is an old thread, but I will say that one thing that seems to help give me reliable pellet burns is to pile the pellets in deep, especially in the turns.
Putting the pellets in too shallow gives me unreliable burns. I don't want them to bridge across between rows, but I want them in as deep as possible just short of that.
It really helps. I think the reason the tubes work better at high elevations is the thicker cross section of pellets. I simulate that larger cross section by piling them in deeper in my AMNPS.
I use all of the other tricks, too. Dried pellets, good airflow, proper lighting. But without piling the pellets nice and deep, it's all for naught.
Sometimes I think this may account for some of the differences we see from person to person.
Tabbed in.
scooby
Fire Starter
- Oct 24, 2012
- 57
- 17
I dry mine out in the microwave by doing 20 second intervals on high and stirring between each. About 2 minutes is all it takes then I overfill the whole tray and level them off with my hand, slightly tamping them below the dividers so the flame doesn't jump rows. Works every time.
I often forget to mention that when I'm helping somebody with their AMNPS, but You're right----I try to keep my pellets 1/4" to 3/8" from the top, and I usually tap the whole tray to get them to settle in more tightly. At that height, it won't jump rows, but will keep burning, if everything else is done properly.I know this is an old thread, but I will say that one thing that seems to help give me reliable pellet burns is to pile the pellets in deep, especially in the turns.
Putting the pellets in too shallow gives me unreliable burns. I don't want them to bridge across between rows, but I want them in as deep as possible just short of that.
It really helps. I think the reason the tubes work better at high elevations is the thicker cross section of pellets. I simulate that larger cross section by piling them in deeper in my AMNPS.
I use all of the other tricks, too. Dried pellets, good airflow, proper lighting. But without piling the pellets nice and deep, it's all for naught.
Sometimes I think this may account for some of the differences we see from person to person.
Tabbed in.
Bear
When I dry them in the microwave oven, I do the same thing. I go for 30 seconds max, take them out and stir, then go for another 30 seconds. I can feel and see the moisture coming out of them as I stir them each time, and once I stop feeling/seeing the steam coming out of them, I know they're ready to go.I dry mine out in the microwave by doing 20 second intervals on high and stirring between each. About 2 minutes is all it takes then I overfill the whole tray and level them off with my hand, slightly tamping them below the dividers so the flame doesn't jump rows. Works every time.
Alternately, I put a bunch of them in a thin layer in a large pan and cook them in a convection oven for a few hours at 225° to 275°F. Then I put them in a jar with a good seal and they stay very dry until the next time I need some.
I've found that the pellets absorb moisture if they're just stored in the baggies in which they arrive. For them to burn well at my elevation, in the AMNPS, I need them to be bone dry and have everything else just right. Technically, the elevation here is too high. But with improved airflow (which I now have due to some modifications to the MES), getting and keeping the pellets very dry, and making sure they're lit well at the start, I've been having 100% success with them.
Something people need to realize is that thin polyethylene (as in ziplock bags) is not moisture proof. It's waterproof, but doesn't stop the individual water molecules of water vapor. This is also true for a lot of flavor compounds. Just put a sliced onion in a ziplock bag and then smell it. You can smell it easily through the walls of the baggie. So many molecules are able to go through a thin layer of polyethylene. Thicker layers may block moisture, but thin layers really don't.
It's kind of like Gore-Tex. It stops liquid water, but allows water vapor to pass. It's not as porous as Gore-Tex, but you get the idea.
So the point is, that to keep something dry, you can't just use a baggie for long-term storage. This is also the reason that the vacuum-sealing bags are made of a multi-layer arrangement. We hope the vacuum bags do a better job of blocking water vapor and flavor molecules. They'd probably work OK for storing dried pellets, too. But I just use old pickle jars with the rubber seals in their lids or mason jars, etc. Thick plastic jugs can work well, too. Just not thin ziplock bags.
Further, when the pellets are shipped in a thin bag, small holes likely get punched in the baggie as they're jostled around. So even if the baggies did block water vapor, you'd still need to dry them to get them to work at this elevation. Folks who live at lower elevations have enough oxygen in their air that small concentrations of moisture in the wood probably don't affect the burning very much. But up here, you really need every advantage you can get!
I've been using a small computer fan, held in my hand, to blow on the pellets when lighting them. That steady air blowing gets them going so well that they burst into flames and I have a hard time getting them to go out again (going back to just the smoldering mode). I have to close the door on the smoker and let the flame deplete the oxygen somewhat, and then I can open it and quickly blow out the flames. After that, they're really glowing well, and I've had no problems, even with some recent cold smoking where there's not much draft through the MES.
Up here, I need to go even higher. I let them sit at least level, and often humped up slightly above the top of the AMNPS, but I just clear a little path at the peaks of the separators so they can't quite touch to prevent short-circuiting of the fire. There's not much chance of the cherry jumping even a tiny gap at this elevation.
I often forget to mention that when I'm helping somebody with their AMNPS, but You're right----I try to keep my pellets 1/4" to 3/8" from the top, and I usually tap the whole tray to get them to settle in more tightly. At that height, it won't jump rows, but will keep burning, if everything else is done properly.
Bear
At a lower elevation, I might be having short-circuiting, but up here, doing it this way works great.
So maybe people who are having problems need to go higher, and those who are getting good burning can go with (or even require) a lower fill.
This is how I keep my Pellets & Dust dry for years & years:
When I dry them in the microwave oven, I do the same thing. I go for 30 seconds max, take them out and stir, then go for another 30 seconds. I can feel and see the moisture coming out of them as I stir them each time, and once I stop feeling/seeing the steam coming out of them, I know they're ready to go.
Alternately, I put a bunch of them in a thin layer in a large pan and cook them in a convection oven for a few hours at 225° to 275°F. Then I put them in a jar with a good seal and they stay very dry until the next time I need some.
I've found that the pellets absorb moisture if they're just stored in the baggies in which they arrive. For them to burn well at my elevation, in the AMNPS, I need them to be bone dry and have everything else just right. Technically, the elevation here is too high. But with improved airflow (which I now have due to some modifications to the MES), getting and keeping the pellets very dry, and making sure they're lit well at the start, I've been having 100% success with them.
Something people need to realize is that thin polyethylene (as in ziplock bags) is not moisture proof. It's waterproof, but doesn't stop the individual water molecules of water vapor. This is also true for a lot of flavor compounds. Just put a sliced onion in a ziplock bag and then smell it. You can smell it easily through the walls of the baggie. So many molecules are able to go through a thin layer of polyethylene. Thicker layers may block moisture, but thin layers really don't.
It's kind of like Gore-Tex. It stops liquid water, but allows water vapor to pass. It's not as porous as Gore-Tex, but you get the idea.
So the point is, that to keep something dry, you can't just use a baggie for long-term storage. This is also the reason that the vacuum-sealing bags are made of a multi-layer arrangement. We hope the vacuum bags do a better job of blocking water vapor and flavor molecules. They'd probably work OK for storing dried pellets, too. But I just use old pickle jars with the rubber seals in their lids or mason jars, etc. Thick plastic jugs can work well, too. Just not thin ziplock bags.
http://www.smokingmeatforums.com/t/249237/keeping-your-pellets-dry-pellets-dust
I never had to Nuke or Heat any pellets.
Bear
Right on!
This is how I keep my Pellets & Dust dry for years & years:
http://www.smokingmeatforums.com/t/249237/keeping-your-pellets-dry-pellets-dust
I never had to Nuke or Heat any pellets.
Bear
Once they're dry, putting them into containers that really can block water vapor will keep them dry. Those jugs probably make it easy to dispense the stuff into the tray or tube, too!
You're at a fairly low elevation where you're at, aren't you?
I think that with the higher air pressure and greater oxygen availability, you get reliable pellet burning despite higher moisture content. At 5300' here, I'm probably a bit beyond the recommended maximum elevation for using the AMNPS, and moisture content becomes more critical.
I know that for construction lumber, they use gadgets to measure conductivity or radio wave "impedance". That is then read on a meter as a percent moisture reading. There's some sweet spot for where you want the lumber's moisture to be for various construction purposes. I often see "kiln dried" lumber being sold. They must try to get the moisture level into some ideal range before shipping it out.
But depending on the humidity later, the lumber can absorb or lose moisture, and it will vary somewhat.
It's usually pretty dry around here. But even so, the pellets right out of the bag here lose moisture when I force dry them. At one point, I weighed a jar of pellets, then dried them, then weighed them again. The jar full of un-dried pellets weighed 990 grams. The jar full of dried pellets weighed 955 grams. And the empty jar weighed 430 grams.
So subtracting the jar's mass, we have a wet pellet weight of 560 grams, and a dry pellet weight of 525 grams.
So my drying (in the convection oven in this case) drove out 35 grams of moisture.
That would be 6.7% moisture by weight in the wet pellets. That's not very wet! It would be considered very dry for lumber, I think. But for me trying to burn them at this elevation, that amount of moisture seems to make a big difference. As they point out in this article, moisture that is in wood when burning requires extra energy to vaporize. That bit of extra energy seems to be enough, at my location, to snuff out the pellets.
This was interesting:
https://en.wikipedia.org/wiki/Wood_drying
Did you ever do anything special to control the drying of the wood you used for your bear carvings? That article was interesting talking about stresses building up in lumber if dried too rapidly. It's probably been an issue for you when preparing the logs for your carvings.
Anyhow, I think where I'm at, I need the pellets to be drier than what they need to be where you're at. So I end up "kiln drying" mine and then using them immediately after dispensing from the jar or immediately after doing the drying. If I let them sit around, exposed to the air, they'll absorb enough moisture to potentially be a problem, especially for cold smoking where I have even less air movement through the area where the pellets are trying to burn.
Sigmo,
Exactly---Moisture can be a problem with all types of wood (Boards, logs, dust, pellets).
I believe a good log for heat (Firewood) should be between 15% and 20%, which you can get by air drying.
I'm not sure, but I think construction lumber is usually in the 18% to 20%, which can also be obtained through Air Drying or Kiln Drying.
I worked with wood all my life, including my own Cabinet shop for about 12 years, and the wood I used was Kilned Dried down to 6% moisture content, and then steamed back up to 8%.
Some people make Cabinets with Air Dried wood, but if you're going to manufacture & sell Kitchen Cabinets, entertainment centers, and other cabinets, you wouldn't want to take the chance of using unstable Air Dried wood.
Yes---I did do something about my Bears drying.
The cut I made from top to bottom in the back of my Bears is a stress relief, much like the stress reliefs we put in concrete floors.
When the log expands & contracts, all of the stress goes to that cut, which is all the way into the heartwood of the log.
Without that big cut, the Bear would have cracks all over it.
I make that cut with a chainsaw, and it starts out about 1/4" to 1/2", wide, and depending on the time of year, I've seen that crack as wide as 2 1/2".
Last edited:
That's pretty amazing!
Sigmo,
Exactly---Moisture can be a problem with all types of wood (Boards, logs, dust, pellets).
I believe a good log for heat (Firewood) should be between 15% and 20%, which you can get by air drying.
I'm not sure, but I think construction lumber is usually in the 18% to 20%, which can also be obtained through Air Drying or Kiln Drying.
I worked with wood all my life, including my own Cabinet shop for about 12 years, and the wood I used was Kilned Dried down to 6% moisture content, and then steamed back up to 8%.
Some people make Cabinets with Air Dried wood, but if you're going to manufacture & sell Kitchen Cabinets, entertainment centers, and other cabinets, you wouldn't want to take the chance of using unstable Air Dried wood.
Yes---I did do something about my Bears drying.
The cut I made from top to bottom in the back of my Bears is a stress relief, much like the stress reliefs we put in concrete floors.
When the log expands & contracts, all of the stress goes to that cut, which is all the way into the heartwood of the log.
Without that big cut, the Bear would have cracks all over it.
I make that cut with a chainsaw, and it starts out about 1/4" to 1/2", wide, and depending on the time of year, I've seen that crack as wide as 2 1/2".
I don't think people realize how much wood expands and contracts as it absorbs or releases moisture. I know that wooden musical instruments change quite a bit, and go out of tune as they're exposed to different levels of humidity. They can even crack if allowed to dry out too much with respect to how they were when made.
It's usually really dry here. Musicians coming in from elsewhere often have to keep re-tuning during the course of a performance because their instruments are drying out throughout the whole time! And I know people who have to keep guitars, violins, etc., in humidified rooms, and use humidifiers in the instrument cases to keep them from cracking.
There's another thread on here right now asking about finding a good humidity instrument. I may add my two cents worth to that thread because there are ways to test calibration of hygrometers, and the old "sling pshychrometer" is still one of the best ways to accurately measure humidity. But your bear carving makes me wonder if you couldn't come up with an amusing (and perhaps even somewhat accurate) hygrometer simply by cutting a section out of a log, making a slot in it like what you put in your bears, and then having a scale to read the width of the crack!
A friend of mine was in the Navy, on nuclear submarines in the 1970s, and he said the instrument they used to measure humidity levels in the boats employed a strand of blonde hair that had to come from a Norwegian girl. That hair would expand and contract as it absorbed or released moisture, and the length of that hair, kept tensioned by a weight or spring, moved the indicator needle of the instrument. He claimed this was fast to respond and extremely accurate!

SmokingMeatForums.com is reader supported and as an Amazon Associate, we may earn commissions from qualifying purchases.
SmokingMeatForums.com is reader supported and as an Amazon Associate, we may earn commissions from qualifying purchases.

SmokingMeatForums.com is a community of barbecue and outdoor cooking enthusiasts dedicated to smoking meat.
© 2004-2026 SmokingMeatForums.com