Auber dual PID Smoking System completed

  • Some of the links on this forum allow SMF, at no cost to you, to earn a small commission when you click through and make a purchase. Let me know if you have any questions about this.
SmokingMeatForums.com is reader supported and as an Amazon Associate, we may earn commissions from qualifying purchases.
That is good advice.  I will try that next time.  It really is a timing thing on most of these smoking projects.

Joe
 
Another update:

I have now smoked ribs and made jerky,  I have also made Canadian Bacon and cold smoked cheese.  I can really say that there is nothing I would have done differently regarding the smoker build.  I have since found aluminum cones that I will use in the holes at the bottom of the smoker during storage, (keep pests out) and also to control the amount of air entering during the smoke. I could have one or two holes plugged during a smoke.  I have had one hole completely closed during the Canadian bacon smoke, and the AMAZEN smoker still performed fine.  I am not sure if it would continue to burn with 2 holes closed, but time will tell.  Here are my notes for the smokes:

Smoked ribs - Turned out very good. They were a little dark in color, so I will try 220 instead of 225 next time.

Jerky - I used my new Chef's choice 615 slicer, (really like this slicer) and cut the strips 1/4" thick.  Smoked for 3 hours at 155, then removed the AMAZEN, turned the temp down to 125, and used the homemade jerky dryer.  It worked fine, and the Auber was able to hold the temp right at 125 even with that much air moving through the smoker.  I did use a 6 volt supply on the 12 volt fan, so it wasn't a hurricane, but there was a nice flow of air going through the smoker.  It took about another 4 hours to get the 1/4" slices dry enough.  Next time I will go a little thinner.

Cold smoked cheese - I smoked with an outside ambient air temp of 72 degrees.  The smoker's internal temp. hit 82 at one point in time, so some of the 2 yr cheddar did sweat just a little.  It is also somewhat difficult to get smoke flowing nicely through the smoker when the heating element is turned off.  Next time I will smoke cheese when the outside temp is 45 degrees.  That should solve the sweat problem.  Also, I am wondering if the Auber could maintain a 45 degrees smoker temp. if the out side air temp is below 35 degrees.  The Auber instructions the probe must see at least 32 for it to work, and will maintain control 9 degrees above ambient.  I am just wondering if I could get good smoke flow through the smoker by smoking when it is say 25 degrees outside, and set the Auber to say 45 - 50 degrees.  I need about a month before that can be tested. Regardless, for those of us that live where it gets cold, smoking cheese should be done in chilly weather.

Canadian Bacon - This stuff is really good!  I followed the directions, and this went without a hitch.  I used my Maverick in a thinner piece of loin, and cooked it to 150.  The food probe from the Auber was in the thickest piece of loin.  It went to 150 degrees, sounded a buzzer and turned the heating element off.  That is one of the reasons why I am really glad I went with the dual probe Auber.

I also recently acquired a Chef's Choice slicer.  This is my first slicer, so I have nothing to compare, but I think this is a really nice slicer, seems to have more than enough power, and cleans up in under 5 minutes.  Very happy with the purchase.

Another recent purchase is a Foodsaver, model 3820 (?) from Sam's club. It does the job fine, although I was not aware of the duty cycle on this machine prior to the purchase.  Some have said the duty cycle is around 20 - 30%.  This means that you are sealing for 3 minutes, and waiting for it to cool for 7 minutes out of a 10 minute chunk of time.  Nothing against the foodsaver, as further research shows most of the brands around this price point (~$150) are similar. When you are trying to seal 20 bags of Canadian bacon, it can be a little frustrating.  Just be aware if you are looking for a vacuum sealer.  It appears that you need to spend about $350 if you want a significantly higher duty cycle. I. E. Weston or VacUpac

All for now,

Smokinjoe52
 
First less than satisfactory smoke:

I made a 5lb batch of unstuffed beef sticks a couple of days ago.  I had 2 racks of beef sticks that were very full, although there was about 1/8" of space between each stick.  The problem I had was VERY uneven doneness on the sticks.  I did not take pics, but the left side beef sticks on BOTH racks were significantly more cooked than the ones on the right. So, there was a fairly significant temperature gradient between the right side and the left side, but not so much top to bottom.  I have not had this issue before, and I think I know why.  It was a VERY windy day during this smoke.  The smoker is on a well protected patio, but there were winds currents whipping around.  I believe that I needed to plug 1 or 2 of the holes in the bottom of the smoker.  I have not done this on any of the other smokes, and results have been terrific, although it has not been windy for any of the other smokes. These smokers are designed with one small hole, and there must be a good reason for that.  I really need to play around to see how many holes I can plug, and still keep the AMAZEN burning. 

If there are any other members with larger holes drilled in the bottom, please chime in regarding wind and uneven internal smoker temps.

BTW - I already had the meat grinder for my Kitchenaid mixer.  I purchased the stuffing tubes for 5 or 6 bucks and they worked really well.  I used the largest diameter tube, and ran all 5 lbs through in under 10 minutes.  The density was good, as they stayed together and never broke apart once, although I did support them well as they came out.  I tried the small tube first, but the product was too small diameter, and did not stay together well.  The small produced a product that was quite a bit smaller in diameter than say a Slim Jim.  The large is a LITTLE too big, but still works fine for a snacking stick.

Thanks for reading.

Smokinjoe52
 
Great posts Joe! 
usa.gif
 
Great second batch of Canadian Bacon! The first batch of CB was gone in about 2 weeks.

I wanted to try plugging 2 of the holes in the bottom of the smoker to see if the AMAZEN would stay lit.  I also expected a more uniform internal smoker temperature as this was a BIG problem during my beef stick smoke.  I also bought a THERMAPEN so I could take many temps quickly around various portions of each of the 4 pieces of loin.

There was about a 5-8 MPH breeze on the protected patio. Two holes were not "unplugged" in the bottom simply by not puncturing the aluminum foil covering the bottom of the smoker. I use an aluminum 3/4" diameter spike for this, so it punctures the foil and sorta binds or locks the foil to the side of the hole.  Works really well, and any juices flow out just fine.

Results:

The AMAZEN burned nicely and did no go out once. Might not be the case on a perfectly still day.

The Thermapen is an awesome tool!  If you don't have a "pen", ask Santa for one.  It allowed me to ensure that all spots on each piece were up to the recommended temp of 150.  It would read just about as soon as the probe was inserted. I believe it prevented overcooking to "make sure" it is done.

So here's what I think:

The reduction in air flow by not opening up 2 of the holes allowed the AMAZEN to still work properly, and created a much more consistent temp throughout the smoker.  I say this because all the probing on each of the 4 loins were all very close in temperature.  Actually, much more than I had anticipated. This was NOT the case when I made the beef sticks. (Had all 3 holes wide open)

Also, I believe that the reduction in airflow resulted in a noticeably more moist end product.

What would I do different next time:

These were good size loins, but they came up to 150 in about 3 hours.  I had the smoker operating at 220.  I would like a little more smoke flavor, so I will try a 200 degree smoker temp next time to lengthen the time to 150.

Now, I need to retry the beef sticks using what I have learned during this smoke.

All for now,

Smokinjoe
 
PID Controller used for a cold smoke worked great.  The outdoor air temperature was 39F this morning. I wanted to smoke several pounds of cheese, so I set the Auber PID controller to 65F. I let the smoker come up to temperature, then placed the AMAZEN smoker inside, and smoked the cheese for 2.5 hours. This really seemed to work well. 

Since there was a differential of 25 degrees between outside air temperature and the inside of the smoker, the air flowed up through the smoker nicely, and kept the AMAZEN smoking nicely. The cheese was evenly smoked. The temperature did rise to 70 degrees for about the last hour.  I think once the smoker was warmed by the heating element, the heat from the AMAZEN could maintain it, and even move it up 5 degrees.

The problem I had on my first cold smoke, was that I could not get air flow moving through the smoker since there was no "warm air rises" going on inside the smoker.

So from now on I will:

1. Only cold smoke when it is below 45 degrees outside.

2. Bring the smoker up to temp. (65) before putting the AMAZEN inside.

All for now,

Smokinjoe
 
Final thoughts

I have used this set-up extensively to smoke ribs, Boston butts, cold smoked cheese, jerky, beef sticks, baked beans, pepper stout beef, and spiced nuts. For the most part, I was successful beyond my expectations for first time smokes with a new set-up.  No brisket or salmon yet.

The Auber dual probe PID works great.  The only minor issue was that it would overshoot during recovery by about 5 degrees after the door was opened.  A quick email to Auber, and their suggestion to change a couple of the factory defaults now results in an overshoot of MAYBE 3 degrees, and usually 2.  So, the PID is very useful to program temp/time/internal temp smoking steps, and maintains the set temp. to within 1-2 degrees. 

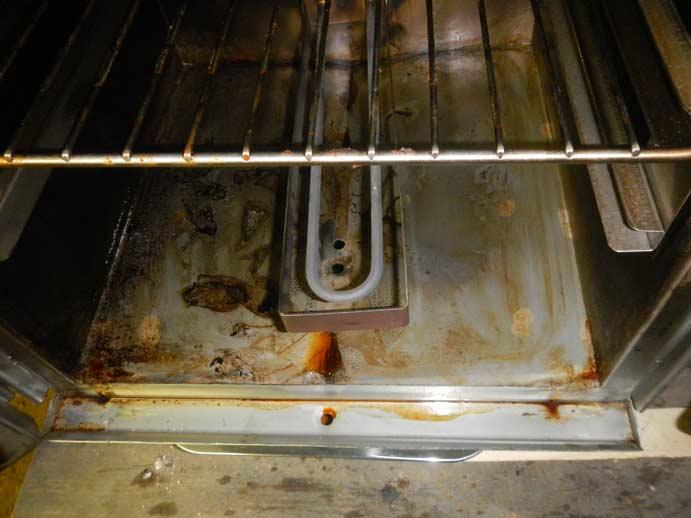
During the build, I drilled three ~3/4" holes in the bottom of the smoker to ensure the AMAZEN did not go out.  If I left all three of them wide open, I would get uneven chamber temperatures and had a batch of beef sticks that looked VERY uneven.  Having the holes there is not a problem though because after I cover the bottom with Alum. foil, I use an aluminum spike to puncture the foil and open them as much or as little as I want.  Today I opened 2 holes less than a 1/2 inch and the AMAZEN did not go out.  In fact, the AMAZEN has never gone out during a smoke, but I have always had at least 2 holes open at least 1/2" during each smoke. So, I think two 3/4' holes would be plenty.  That is really the only thing I would do different, but again, easier to drill 3 and not punch through the aluminum foil than to tear the smoker apart and drill another hole. (Paragraph seems too wordy, but I'm not going to re-write it)

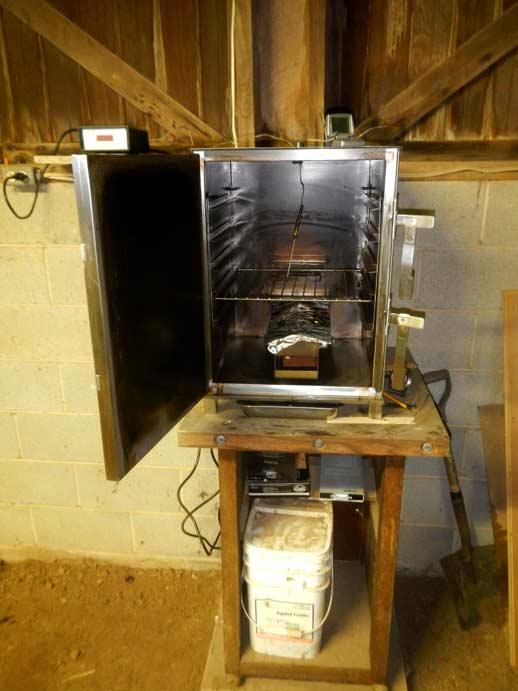
The "through the wall" temperature probe is great. It was worth the hassle to install. It is nice that you don't have to clean the probe wire each time you smoke.  Wipe off the probe in the smoker, and you are done. Plus, it makes for a cleaner looking set-up.

I also like the idea of being able to take the PID indoors during the winter.  Or during any season for that matter. 

The Craftsman tool stand proved to be the ideal height.  Obviously it doesn't need to be a Craftsman!

The Auber can be set 15 degrees (or more) above ambient for a cold smoke.  I have done this twice now, and it really helps to get the airflow (smoke) flowing out the top.  The heat from the AMAZEN provides enough heat that the heating element doesn't kick on after about 45 minutes. Outside air temp was 40 degrees, and I set the Auber temp to 60 degrees.  When I put the AMAZEN in the smoker, it immediately started smoking through the top hole like a normal smoke.  This was difficult to achieve when I did my first cold smoke without it.  Sounds weird to use a PID for a cold smoke, but hey...it seems to work.

Last but certainly not least, and I don't think I have mentioned this before, but this is a VERY serviceable set-up.  If the heating element fails, it is easy to replace.  If the Auber fails, it is easy to unplug and send in to Auber.  Remember, I bypassed the original thermostat, so it is not a concern.

Well, that's about it. Thanks for reading, and I hope somebody duplicates this set-up.  I'm confident you will pleased if you do.

-Smokinjoe
 
Last edited:
Joe, morning.... Great explanation on what it takes and how it works for cold smoking.....  Folks that read this will have a very good starting point when cold smoking....  Dave
 
Just a note on what I did with my Smokin-It #2 for increased heating capacity.  I ordered a replacement #1 350W heating element from Smokin-It ($20), drilled two holes in the housing below the exsisting element, mounted the new element along side the exsisting element, and wired it in parallel.  A slight modification was necessary on the firebox to allow both elements to slide in to it.

BTW, I also run a PID with a 25A SSR, so supply the additional power was not an issue.

I know can fully load the smoker, and in cold weather the temparature still comes up pretty quickly, and recovers much faster.

Kevin
 
Kevin,

I had thought about increasing the wattage on the element before I even started using the smoker.  It still would be nice to do something like you did, although it seems to heat up and recover fast enough for me. Since I am now retired, I really don't care how long each smoke takes.

I had thought about putting this Cookshack element in my smoker, but was not sure if the firebox would fit over it.  I too have the higher wattage Auber, so this would not be a problem.  For me it would be easier than trying to drill that &*&^%$ stainless again! Besides, I found this after I had put everything back together, and had just started using the smoker.

Take a look:

http://www.cookshack.com/store/Resi...Element-1200W-120V-old-style-Models-SM050-055

Wish I had the dimension on the element.  I admit this would come in handy when the temperature is 10* F.

Smokinjoe
 
Joe,

The only problem I see with that element is there is no mounting hardware provided, and electrically isolating these elements from the chamber is tricky.  The Smokin-It element comes with the mounting isolators.  Just a thought.
 
I think maybe it was this one I was originally looking at, but now noticed the price diff.  This one is $99 and the first one is $36.  Seems like a lot for a couple isolation washers. I don't recall exactly how the element looked when I removed it to drill the bottom.  Perhaps the $36 one could be made to work.

Somebody give it a try and let me know! 
biggrin.gif


Smokinjoe

http://www.cookshack.com/store/Resi...00W-120VIQ-Models-SM075-076-new-style-050-055
 
I believe the caution not to pre-Heat is because with wood in the firebox when you open the door a gush of air can ignite the gasses from the smoldering wood.  If you pre-Heat without wood in the fire box there should be no problems.  I have a Smokin-It#2 which looks identical to your smoker only a little bigger and the Auber Bradley smoker model of PID with only 1 probe.  I'm not sure where the optimal placement is yet but it does seem to make a difference where the probe is placed.  I'm leaning toward the center of the smoker.  I hang mine through the vent hole in the top.  I only have two 1/2" holes in bottom and the AMNPS ran 4+ hours yesterday with one row.  I did not disconnect the original thermostat just turned it to max and plugged the smoker into the Auber.  I let the Auber perform it's auto tune function to set the PID parameters and have found out that it behaves differently depending upon where you put the probe.  As I said before I'm not sure where the best place would be.  If only one rack was being used, that would be the obvious place to put it next to the food.  With multiple racks the temp definitely varies from top to bottom.  I tried smoking one time with the probe way up at the top on the first shelf and the temperature there was only 180 while at the bottom it was above 250 near the element.  At that point the built in thermostat kicked in and limited heating.   I'm not sure if I will drill a hole for the probe because I'm thinking there is some advantage to being able to move it.  I have on order a K-type probe from Thermoworks which has an alligator clip to attach to a rack which I'm going to try also for controlling the temp with the PID.  I'm fortunate enough to have a barn where I set up the smoker for draftless and rainproof smokin.


Moxaman,

Looks like your 2 holes and the size they are is about right.  My three 5/8" holes are probably a little overkill.  You are right in that temperatures fluctuate throughout the smoker.  More so the more you have holes open in the bottom.  The reason I mounted mine, well at least one of the reasons is at least it would be in the same place each time.  I could get used to the characteristics and not have them change from smoke to smoke because the probe is not in the same place. I do try to stay away from putting food on the bottom shelf.  I usually install the bottom shelf just to put a strip of aluminum foil on the right hand side to shield the AMAZEN  from drips.  The AMAZEN is on the floor of the smoker.

Let me know how that Thermoworks probe works.

Smokinjoe
 
You may have figured it out already but it is easy to adjust your holes simply by the foil you put on the bottom.  You can punch through as much or as little as you like.  I went ahead and disabled the built in thermostat because with my probe in the middle of the smoker and temp set to 250 the built in would kick off before the probe got to 250.  I think it may be because the built in is placed so close to the bottom.  I went back and looked at the Auber controls and realized that I have the thermocouple model with the K type probes.  All the others they offer are RTD probes I think.  I'm not sure what difference it makes other than my setup can go up to 750F I think which wouldn't ever be needed in the smoker.  Their site says the K type thermocouples are a little sturdier whatever that means.  I'll let you know how the Thermoworks does as well as the alligator clip on probe I ordered from Auber.  In the end all we can do is turn the heating element on and off and try to maintain a steady temperature somewhere in the smoker.  I do like using the AMNPS over putting wood in the built in box.  I got a variety of pellets and it's fun playing around with them.

Moxaman
 
I do the same thing with the aluminum foil and use an aluminum cone to punch out as much hole as I want open.  Also use the cones to plug the holes when not in use.

Smokinjoe
 
I was busy putting a smoking system together today. A Cookshack clone, Auber dual PID (P&P) controller, with the smoker mounted on a Craftsman Bench Top Tool Stand. I essentially wanted a stainless box with a heating element, so purchased the lowest price one I could find. I am removing the thermostat, and certainly didn't want to pay for digital controls if I was going with the PID. So far, I am really happy with smoker, although I just turned it on for a few minutes to make sure the heating element works. I also made a jerky dryer with $8 of PVC fittings/pipe and a 12 volt 3" fan I had laying around.

I ordered the THRU WALL probe from Auber, so will need to drill a hole in the back of the smoker. Actually, make that the 'inner' back as this smoker has about 3 (guessing) inches between the outer back and the inner wall. I also want to use an AMAZN smoker, so may have to drill a couple holes right next to small drain hole. Should be ready to go in a few days.

I suspect I will have a few questions for the Auber PID guys before this is running smoothly.

Joe

HI Joe i have a question for you ..maybe you can ansawer or not
i have or just bought 3
Dual-Probe PID Controller for Bradley Smoker
and yea i have 3 bradley smokers also... but i am wondering what size of breaker do you think i need .. i mean i have been running it off of a 15 amp with no problems ... however i think i probably need something like say 40 plus amps. now my smokers are the 4 rack manual type with no extra heating elements at all ..

i thank you in advance Dan
 
SmokingMeatForums.com is reader supported and as an Amazon Associate, we may earn commissions from qualifying purchases.

Latest posts

Hot Threads

Clicky