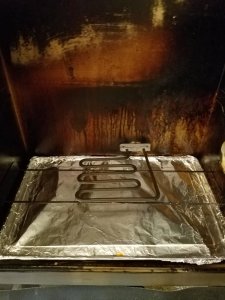
Auber controller added to my MES 30

  • Some of the links on this forum allow SMF, at no cost to you, to earn a small commission when you click through and make a purchase. Let me know if you have any questions about this.
SMF is reader-supported. When you buy through links on our site, we may earn an affiliate commission.
Chopsaw, you're going to love that PID!!! Ever since I rewired my MES 30 and bought an Auber PID, its like I just got a brand new, upgraded smoker.
POINT for the beautiful job on the wiring and the way you ran the sensor probe. I really like that.
Gary
 
Thank you Gary . I do love it . The ramp and soak is so nice for sausage and ham .
 
What is the Auder controllers ability to withstand weather? Or should I plan on bringing it insode each time after using the smoker? Mine should be here on tuesday.

I'm planning to build a hutch of sorts for my smoker today to give the unit a little more protection form the elements. I plan on it being enclosed on 3 sides, plus a roof. I just don't want my $150 investment in the auber to go to waste if it starts raining during one of my smokes.
I Believe when the Auber is operating/warm there's no condesation issues. More of a problem when off and stays outside. I posted this thread and this is what Kane from Auber Instruments mentioned: https://www.smokingmeatforums.com/t...-pid-controllers-for-electric-smokers.285721/
 
Well , she's dead . LOL . Did an eye round today . After I pulled it off , I stepped the temp up to 260 to let it run an hour or 2 . I came out to shut it down , temp read out on the Auber was 65 . Checked my setting , 260 . So I plugged it in direct , nothing . Happy about that , worried it was the controller . So I like to start simple . Going to re check the work I did first . Second I guess ohm meter the element . Third cut the back at the limit switch look for burnt wires .
She's not done 'til I say so . BTW the eye round was fantastic .

Don't worry it happens to the best of us!
The most common culprit would be one of the connectors going bad.
You have the right idea and know where to check.

You have to check everything just like you mentioned but just for fun I'm going to guess that the safety rollout limit switch is the problem. I'm thinking either the connector went bad or got loose and melted down the switch. When this happens it will turn on but the switch itself overheats making it think the smoker is over heating and then you run into a situation where the switch keeps heating up quickly and showing everything down repeatedly until it burns up completely... I know this first hand... and more than once lol.
 
You may have an idea about the limit switch . Plugged in direct I did feel some heat at the element , but then nothing . I'll keep that in mind when testing thanks .
 
Well , she's dead . LOL . Did an eye round today . After I pulled it off , I stepped the temp up to 260 to let it run an hour or 2 . I came out to shut it down , temp read out on the Auber was 65 . Checked my setting , 260 . So I plugged it in direct , nothing . Happy about that , worried it was the controller . So I like to start simple . Going to re check the work I did first . Second I guess ohm meter the element . Third cut the back at the limit switch look for burnt wires .
She's not done 'til I say so . BTW the eye round was fantastic .
I think the ohms will read correctly even if grease or what ever can short the element to ground. I'd make sure with the wires disconnected and one probe on the element spade and the other on the back panel that there's no continuity. I made an access cut out for the roll out switch in case it fails I can bypass with a wire nut to see if the element heats up.
 
  • Like
Reactions: chopsaw
Thanks Kurt . I have an amp probe from my HVAC days . If needed I'll be sure to check back to the case , or just remove the element to make sure . That way I can flip it over too .
 
My element bracket has the legs on the bottom half of the bracket so I cut it in half lengthwise with a dremel cut off wheel so I could flip it and screw the top half back on without messing with cutting a different hole in the smoker. I put in a longer grounding bolt and used the washers from the oem bolt. So the longer bolt has a nut to secure the ground wire and another nut on the inside of the element access area to secure the element. I covered the excess bolt in the access area with shrink tubing to insulate it and keep the nut from backing off. You'll have to bend the element tabs 180* before installing to connect the wires.
20181026_121853.jpg
 
  • Like
Reactions: chopsaw
OK , she lives again . Pulled the back access and everything was tight and looked good . I tried to probe thru the heat shrink , no luck . So I cut it open .The connectors I used had a plastic shield over them . One connection looked brand new . The other one had the plastic melted off , still tight and looked good . Ohm test on the element was good . Checked back to the case ,, good ( open ) . So I'm thinking limit switch . Before I got into that I figured I would clean the connections and re try . Looked like the plastic melted and got between the male / female keeping it from heating . Cleaned and back together , took right off .
I caused this myself when I did the repair 6 months ago . The heat shrink for that side was to big . I used to much heat trying to get it tight .

Anyway , this is why I suggest to others to pull the insulation off the connection , even if it looks good .
 
  • Like
Reactions: tallbm and dr k
Thanks Dave . If we were neighbors I would . My new goal life is to make sure this smoker outlast me .
 
OK , she lives again . Pulled the back access and everything was tight and looked good . I tried to probe thru the heat shrink , no luck . So I cut it open .The connectors I used had a plastic shield over them . One connection looked brand new . The other one had the plastic melted off , still tight and looked good . Ohm test on the element was good . Checked back to the case ,, good ( open ) . So I'm thinking limit switch . Before I got into that I figured I would clean the connections and re try . Looked like the plastic melted and got between the male / female keeping it from heating . Cleaned and back together , took right off .
I caused this myself when I did the repair 6 months ago . The heat shrink for that side was to big . I used to much heat trying to get it tight .

Anyway , this is why I suggest to others to pull the insulation off the connection , even if it looks good .

I knew finding the issue wouldn't be too hard, now you know as well. You should be able to keep that thing running for a loooooong time now that you know the troubleshooting and repairing is that simple :)
 
What is the bypass on a ms 40 bypassing? Mine keeps blowing the rollout switch, three of them. so I’m wondering if this is bypassed too? I want to install an Auberdin. Thanks any help.
 
What is the bypass on a ms 40 bypassing? Mine keeps blowing the rollout switch, three of them. so I’m wondering if this is bypassed too? I want to install an Auberdin. Thanks any help.
In the bottom access with the black hot power cord terminated to it's closest braided heating element wire and the white neutral power cord wire terminated to the other braided heating element wire its closest to, you've bypassed the circuit board. Plugged in is heating, unplugged is off but your using the wires with the limit switch in the circuit. You can disconnect the limit switch and wire nut/butt splice the wires together to bypass the limit switch but it's a nice safety feature to have. Auber's fix was to get a 14 or 12 gauge extension cord and put female spade lugs on the hot and neutral wires and a loop lug on the ground. Connect the spades to the heating element and the ground to one of the screws holding on the plate to the heating element access, making sure you have good contact to the back of the smoker. I had to make an access to the limit switch in the back of my Gen 1 40 since there isn't one. The switch will fail so when it does I want to continue smoking by bypassing the switch with a wire nut in five minutes and not making an access when it fails.
 
This is the first time I'm seeing this Thread, but Excellent Job, Chopsaw!!!

I read the whole Thread, and this Thread confirms my reasoning for sending so many people to "tallbm" for MES Repairs.

Bear
 
In the bottom access with the black hot power cord terminated to it's closest braided heating element wire and the white neutral power cord wire terminated to the other braided heating element wire its closest to, you've bypassed the circuit board. Plugged in is heating, unplugged is off but your using the wires with the limit switch in the circuit. You can disconnect the limit switch and wire nut/butt splice the wires together to bypass the limit switch but it's a nice safety feature to have. Auber's fix was to get a 14 or 12 gauge extension cord and put female spade lugs on the hot and neutral wires and a loop lug on the ground. Connect the spades to the heating element and the ground to one of the screws holding on the plate to the heating element access, making sure you have good contact to the back of the smoker. I had to make an access to the limit switch in the back of my Gen 1 40 since there isn't one. The switch will fail so when it does I want to continue smoking by bypassing the switch with a wire nut in five minutes and not making an access when it fails.
Thanks! So basically it’s cutting the cord and looping it with the element and limiter. If I solder the wires, any idea what type of solder?
 
it’s cutting the cord
No don't actually cut it . Dis connect the power in from the board , and re connect with the correct wires . That will by pass the stock controller , and the stock therm , but leave the limit switch in the loop .

This is the first time I'm seeing this Thread, but Excellent Job, Chopsaw!!!

I read the whole Thread, and this Thread confirms my reasoning for sending so many people to "tallbm" for MES Repairs.
Thanks Bear . It's amazing how well this thing cooks now . You're correct . tallbm tallbm drives the bus on this stuff .
 
No don't actually cut it . Dis connect the power in from the board , and re connect with the correct wires . That will by pass the stock controller , and the stock therm , but leave the limit switch in the loop .


Thanks Bear . It's amazing how well this thing cooks now . You're correct . tallbm tallbm drives the bus on this stuff .
Got it. I just want to make sure what ever is shorting out the limiter is not in the loop and if the board is bypassed this should solve my issue.
 
Got it. I just want to make sure what ever is shorting out the limiter is not in the loop and if the board is bypassed this should solve my issue.

Hi there and welcome!

I have a detailed post about how to rewire the MES so it can work with a PID controller:
https://www.smokingmeatforums.com/threads/mes-rewire-simple-guide-no-back-removal-needed.267069/

The rewire we are talking of is to simply bypass the circuit board (and MES controller) so that when the MES plug is plugged in it just simply feeds power to the heating element. This is good if you have a PID controller since the PID controller would now be the thing feeding the power off/on to the plug.

A rewired MES using a PID controller works like this.
  • Plug the rewired MES into a PID controller
  • Plug the PID controller into the wall outlet
  • Drop the PID temp probe into the MES vent hole and clip to a rack
  • Turn on the PID controller and punch in a set temp
  • The PID Controller will feed power off/on to the rewired MES until the PID hits the set temp
  • The PID controller will then continue to feed power off/on to tightly hold near the set temp (provided the PID is tuned properly)
With the rewire we are suggesting it would KEEP the safety rollout limit switch in the wiring circuit to help with any safety issues should say a kid plug the MES directly into the wall or the PID somehow gets stuck in ON mode.

If you want to eliminate the safety rollout limit switch you would simply disconnect it then connect together the two wire ends that were left behind when you removed the switch. I personally would suggest just replacing the switch.

I have burned up a few of them myself. I learned that the issue was that the switches are a little delicate. While attaching the electrical spade connectors to them I found it was MANDATORY to not cause ANY wiggle in the tabs that connect to the back of the switch. If I did then the switch would overheat and melt down on me after some time.

The way I resolved this was to get a new switch, add the connectors to the switch BEFORE I installed it on the MES.
I took a the switch and put connectors on both tabs and then stood it up where the bottom connector/tab was on a piece of wood. I would then gently tap downwards on the top connector/tab to get it onto the tab without bending or wiggling the tab. I often found that the bottom connector was the one that actually would push on the tab first.
At that point I would just rotate so the top tab/connector was now on the bottom and continue gently tapping until the tabs were ALL the way on and no wiggling of the tabs was caused.
At this point I then crimped the wires to the connectors and THEN fastened the switch back in place. Don't fasten first and then try to crimp, you will just wiggle the tabs. If soldering just replace the word "crimp" with solder and follow the same order :)

This fixed my burning up rollout limit switch issues :D

Anyhow, if you want just bypass the rollout safety limit switch you don't need to rewire for a PID, you just need to remove the switch and wire nut those to ends together.... though I wouldn't suggest removing a safety measure from the smoke :)

If you want to rewire for a PID then my rewire post should help you out greatly.
I hope all of this info has helped more than confused things hahaha :)
 
Last edited:
SmokingMeatForums.com is reader supported and as an Amazon Associate, we may earn commissions from qualifying purchases.

Hot Threads

Clicky