Air Flow Question

  • Some of the links on this forum allow SMF, at no cost to you, to earn a small commission when you click through and make a purchase. Let me know if you have any questions about this.
SMF is reader-supported. When you buy through links on our site, we may earn an affiliate commission.

kevin james

Smoking Fanatic
Original poster
Jul 30, 2012
484
384
Sacramento, CA
Ok, so this isn't really about a smoker build, but more so about a mod trying to fix a couple issues with an existing reverse flow offset smoker. If this is not the right area I apologize and please feel free to move where most appropriate.

I have a 24x48 reverse flow smoker that I was very happy with, until I started trying to cook chicken and found it was putting soot on my food. While it didn't give an off-puting taste, the skin had a greyish color that just looked gross. I have now finally solved that problem, but in the process of sorting that out I realized there were a couple other problems. The soot on the food ended up being caused by too big a fire, which was needed to get the temp up in the 300 degree range that I like to cook chicken at. The solution was start with 1 and ONLY 1 chimney of lump, and use thinner splits, adding a new split more often. This kept the fire to a smaller, slower fire which gave me the nice golden brown skin color I was after.

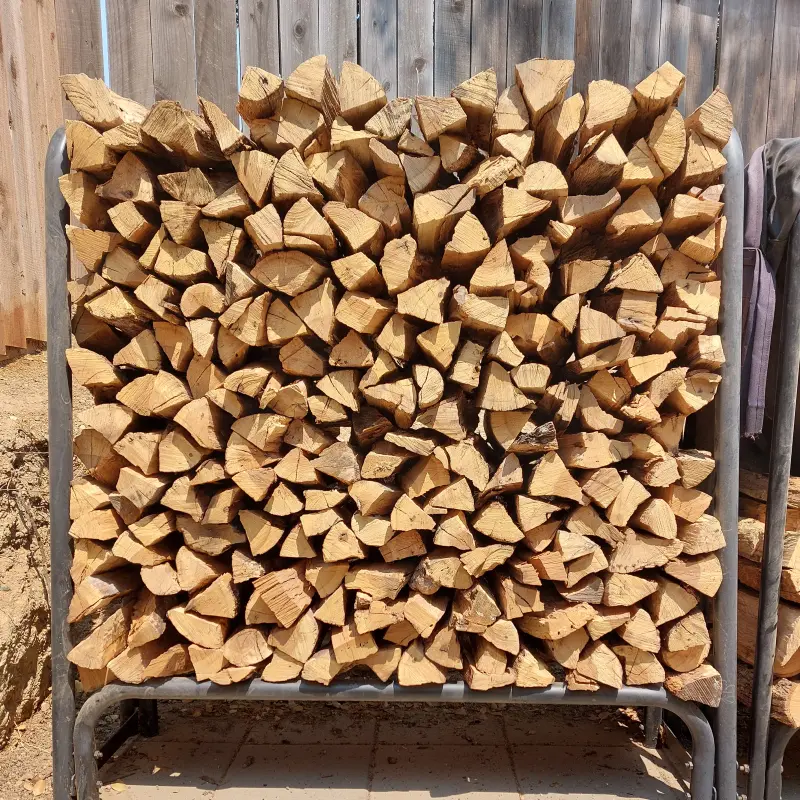
Now that the soot on food issue is solved, the remaining issues are that it is VERY difficult to get and maintain temps in the 300 - 325 range, and I am having to add a new split every 15 minutes which doesn't seem right. Splits are white oak, and generally 16" length and between 2"-4" diameter. I also have issues sometimes with splits that are a little more dense (but still seasoned) not wanting to burn and I'm thinking better airflow would also solve this problem potentially as I already preheat my splits.

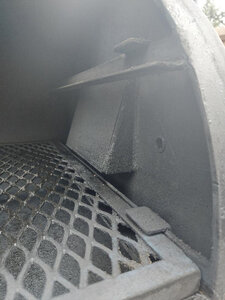
In another thread I posted that inside the cook chamber, there is a "hood" over the entrance to the smoke stack (picture below). I have become convinced this is my problem, but I am no expert, so I turn to you guys who know more than I do for help.

The builder said the cooker is not designed to cook with the stack full open etc. and is designed to cook with more convective heat. But to me, it seems he has designed it in a way to FORCE you to limit the stack opening by shutting it down at the stack entrance, when the same thing could be accomplished by shutting down the stack damper at the other end. The builder has agreed to cut the hood off, but before I go and have him do that I want to make sure my thinking is correct, so I have the following questions.

1. If the stack is fully opened up which I would think should increase air flow, will that help to get the higher temps I'm after?
2. Will that have any effect on efficiency, as far as how often I need to add a split? I feel like the current 15 minute intervals are because it is working really hard to overcome the airflow issue, resulting in needing to feed it more often. Am I wrong on this?

I'm hoping this is the answer to my problems as I'm so frustrated that I'm ready to get rid of this pit and buy a traditional flow offset, like the Workhorse 1975, although I don't want to do that if I don't have to.

Pic of hood over stack entrance:

Smoker-Exaust.jpg

Pic of wood rack so you can see diameter of splits:
 

Attachments

  • Smoker-Exaust.jpg
    Smoker-Exaust.jpg
    114.6 KB · Views: 30
So the hood over the exhaust is only open on the bottom ?? What diameter is the exhaust stack ?? can you post a picture of the exhaust stack ?? and also a picture of the intake vents ??
 
kevin james kevin james as was suggested on your other post asking a similar question about the smoker. I would suggest you review the reverse flow tutorial (sticky in the build page) and measure the air intake opening area in the fire box. Next measure the area (opening) under the reverse flow plate, then measure the area (opening) from under the reverse flow plate into the cooking chamber. Next measure the inside diameter of the exhaust as well as the length in height. Measure the length and diameter of the cooking chamber so you can get the volume and finally, measure the size of the fire box so you can get the volume.

Once you have all these areas/volumes you can run them through the calculator to see if they are off. 100% guaranteed the exhaust hood is a HUGE problem in the smoker performance and your desire to reach higher temps. The hard 90 in the smoke stack is also performance issue but if your stack diameter and length is "over" the tutorial (about double the area and at least 36" in height above the top of the cooking chamber) it might be ok to leave. So all this said, I would run all the calculations in the tutorial and then have the builder fix anything (since the builder offered) that isn't in line with the calculations results as they should be. If it were my smoker I would also replace the hard 90 smoke stack with a plenum shown in the tutorial

Making the changes on the smoker will make it work better, however, it will burn more fuel at higher temps but it won't limit cooking at a low temp at all with the wide open stack, as you simply control the air flow at the intake to control the heat.........ie none of my smokers have a stack exhaust control

Since your splits are already to size and stored outside, I would always split them one more time to open up the center, they will burn better, but this won't help till you fix the geometry of the smoker......
 
The stack is 6" Wide. I also measured the opening of the hood inside the chamber, which is 2" deep but 9" long.

Requested pictures:
Stack.jpg

Intake-Vents.jpg

Picture of the whole smoker for scale reference:
6.jpg
 
kevin james kevin james as was suggested on your other post asking a similar question about the smoker. I would suggest you review the reverse flow tutorial (sticky in the build page) and measure the air intake opening area in the fire box. Next measure the area (opening) under the reverse flow plate, then measure the area (opening) from under the reverse flow plate into the cooking chamber. Next measure the inside diameter of the exhaust as well as the length in height. Measure the length and diameter of the cooking chamber so you can get the volume and finally, measure the size of the fire box so you can get the volume.

Once you have all these areas/volumes you can run them through the calculator to see if they are off. 100% guaranteed the exhaust hood is a HUGE problem in the smoker performance and your desire to reach higher temps. The hard 90 in the smoke stack is also performance issue but if your stack diameter and length is "over" the tutorial (about double the area and at least 36" in height above the top of the cooking chamber) it might be ok to leave. So all this said, I would run all the calculations in the tutorial and then have the builder fix anything (since the builder offered) that isn't in line with the calculations results as they should be. If it were my smoker I would also replace the hard 90 smoke stack with a plenum shown in the tutorial

Making the changes on the smoker will make it work better, however, it will burn more fuel at higher temps but it won't limit cooking at a low temp at all with the wide open stack, as you simply control the air flow at the intake to control the heat.........ie none of my smokers have a stack exhaust control

Since your splits are already to size and stored outside, I would always split them one more time to open up the center, they will burn better, but this won't help till you fix the geometry of the smoker......

I did take a look at the reverse flow tutorial, and honestly, I was lost. I did not see an actual "calculator" like Feldon's where you input the info and it tells you what yours is and what it should be. I'm not great at this type of stuff if it requires a lot of manual calculations etc. (which is why I had a pit built instead of building one).

On the bigger splits in the pile that are more dense I do usually split them a second time before I burn them, using either a kindling cracker or my electric splitter.

At this point, I'm really just trying to figure out if removing the hood is going to fix my problems, or if I should just get rid of this pit and get something else. If removing the hood is going to fix the problem or at least yield a big improvement then great, but If I need to have the stack completely cut off rebuilt with a plenium and make other changes, then to me it is getting to far away from what the builder intended, and it's just not worth it to me. I'd rather start fresh with something like a Workhorse 1975 that has gotten nothing but solid reviews.
 
Last edited:
Hood is there to keep draw at grate level. If bottom of your stack opening close to bottom of hood then remove hood

also stack is roughly 28sq” and hood opening is only 18”. Bigger hood opening may help
 
I did take a look at the reverse flow tutorial, and honestly, I was lost. I did not see an actual "calculator" like Feldon's where you input the info and it tells you what yours is and what it should be. I'm not great at this type of stuff if it requires a lot of manual calculations etc. (which is why I had a pit built instead of building one).

On the bigger splits in the pile that are more dense I do usually split them a second time before I burn them, using either a kindling cracker or my electric splitter.

At this point, I'm really just trying to figure out if removing the hood is going to fix my problems, or if I should just get rid of this pit and get something else. If removing the hood is going to fix the problem or at least yield a big improvement then great, but If I need to have the stack completely cut off rebuilt with a plenium and make other changes, then to me it is getting to far away from what the builder intended, and it's just not worth it to me. I'd rather start fresh with something like a Workhorse 1975 that has gotten nothing but solid reviews.
The simple solution is have the builder cut off the hood and then run it. If it runs as you like, no more issues. The hood is causing back pressure burning on a hotter fire and thereby incomplete burning.

The tutorial is a hand calculation, Feldon's is limited on smaller smokers. If you post pics and dimensions of the above its pretty easy to go from there if you want to run through them. I believe 90% of the issue is the hood! At a min, take a pic of the opening on the left of the reverse flow plate for me as I have seen most the others...
 
Hood is there to keep draw at grate level. If bottom of your stack opening close to bottom of hood then remove hood

also stack is roughly 28sq” and hood opening is only 18”. Bigger hood opening may help
Just my opinion but the actual location of the open is "way way less" important than the flow properties through the smoker. IE many Shirley smokers stacks are on the back corner only 1 or so inch down from the top of the CC....
 
KJ, can you take a pic from the inside looking at the open next to the reverse flow plate (how big is the opening left of the plate)? 6 inch is good on the stack, that will help overcome the height.
aa bbq.PNG
 
Last edited:
Thanks guys. I really appreciate all your help. Also, regarding stack location, the bottom of the opening to the stack is an inch or less from grate level, which I would think is close enough.

Regarding the dimensions you asked for:
The cook Chamber is 24"x48".
The Firebox internally is 20.5" tall, but there is a removable plate at the top that can be slid out which he said is for semi insulation purposes. With the plate in the firebox is 19.5" tall. Width is 20.5" wide, and 18" deep.
The opening between the firebox and cook chamber (exchange?) is 5.5" deep at it's lowest point (it's rounded obviously, pic attached).
The opening where the heat and smoke enter the cook chamber on the opposite side is 3.5" x 22".
There are three door damper openings which are each 2.75" wide x 5" tall, but they are not square or rectangular shaped (picture attached).
The internal on the stack is 5.5" (6" external, 1/4" material), and 27.5" tall

Pictures:
Plate-in-Firebox.jpg

Exchange.jpg

Opening-to-Ckk-Chamber.jpg

Intake-Vents.jpg

Thanks.
 
Last edited:
The simple solution is have the builder cut off the hood and then run it. If it runs as you like, no more issues. The hood is causing back pressure burning on a hotter fire and thereby incomplete burning.

I can't add much here but soot on your chicken is caused by incomplete wood combustion. When you run it normally what does the smoke look like, and how was.it.different from when you got soot from the chicken. You need to get better air flow and my bet is the cause is the 90 degree turn in the stack.
 
I can't add much here but soot on your chicken is caused by incomplete wood combustion. When you run it normally what does the smoke look like, and how was.it.different from when you got soot from the chicken. You need to get better air flow and my bet is the cause is the 90 degree turn in the stack.

The funny thing is that regardless of the temperature, it appeared to be running clean, as there was only clear heat coming from the stack 98% of the time, with only the thinnest of smoke the other 2% of the time. But it clearly wasn't burning as clean as I thought it was.

As I said in my original post I believe I have solved the soot on the chicken problem now, by running a smaller fire. It took a while to figure out how to accomplish that, but now that I have, the soot issue appears to be gone. Now the problem is just that with the smaller fire, the pit just does NOT want to run above 250-275 (at grate level measured by my Fireboard 2.0), and I feel that it should be able to get to 325 fairly easily, if not 350.

I guess I am confused by the 90 degree angle being an issue as there is a ton of pits out there that have a 90 degree angle on the stack, including some very highly rated pits by Lone Star Grills, and even the ones with the Franklin style collector still have a hard 90 degree angle.

Here are a couple pics of some chicken I cooked this weekend. My GF who is EXTREMELY picky even said this looked perfect, and if there is even the slightest hint of greyish color she will tell me it's still not right.

Chicken-Halves.jpg

Leh-Quarter-and-Breast.jpg
 
[QUOTE="kevin james, post: 2279693, member: 58503"
I guess I am confused by the 90 degree angle being an issue as there is a ton of pits out there that have a 90 degree angle on the stack, including some very highly rated pits by Lone Star Grills, and even the ones with the Franklin style collector still have a hard 90 degree angle.
[/QUOTE]
Sorry for my response, i went too far and should not have said anything about the 90 degree angle. I helped another person the other day with his stack and the problem was he was choking his air flow with a 90° turn in his stack. I should not have said that.

The fact that you made your smoker be able to burn at a higher temp by using smaller wood is not a solution to the problem, it is a work around.

Soot is caused by incomplete combustion, so there seems to be some issue with the thermodynamic flow through your smoker. I would do it except I dont have a reverse flow smoker so its unlikely I would finish it, but someone could build a spreadsheet a person could download that would do the calculations for you. I would help.
 
I guess I am confused by the 90 degree angle being an issue as there is a ton of pits out there that have a 90 degree angle on the stack, including some very highly rated pits by Lone Star Grills, and even the ones with the Franklin style collector still have a hard 90 degree angle.
Sorry for my response, i went too far and should not have said anything about the 90 degree angle. I helped another person the other day with his stack and the problem was he was choking his air flow with a 90° turn in his stack. I should not have said that.

The fact that you made your smoker be able to burn at a higher temp by using smaller wood is not a solution to the problem, it is a work around.

Soot is caused by incomplete combustion, so there seems to be some issue with the thermodynamic flow through your smoker. I would do it except I dont have a reverse flow smoker so its unlikely I would finish it, but someone could build a spreadsheet a person could download that would do the calculations for you. I would help.

Thanks. To be clear though, I think you may have misunderstood a few things. Smaller splits did not make the smoker run at a higher temp. Using only one chimney of lump to start and feeding thinner splits more often resulted in a smaller, slower fire, which fixed the soot on the food and grey chicken skin problem. But it also made it harder to get the temp up to 300. Only a big raging fire will get the temp to 300 and above, which does not seem right.

Also, I'm not in any way saying you are wrong about the 90 degree angle on the stack being part of the problem, I'm more so saying I'm surprised about it since there are a ton of pits that have a hard 90 degree angle onthe stack, some with the Franklin style collector and many without just like mine.
 
Last edited:
I ran things through the tutorial....
aabb-calc.PNG

Based on the tutorial (this is just a guide many DYI builders have used to build very good functional RF Smokers, it is not the only source that has been used to build a good smoker....) the hood over the exhaust is a restriction, the FB to CC and RF Plate Area are both a bit restricted and for a smaller smoker moderately restricted.

Simple fix:
The hood can be removed and it will help with functionality.

This is just my opinion, but if it were my smoker, I would first cut off the hood and test it. If further functionality was desired, I would cut off a section of RF Plate to open up that area to improve flow (improve losses due to the shelf rack). Your smoked chicken looks pretty good. Since you have learned how to do that, I believe opening up the good area will give you a noticeable improvement. However, I don't think it will run cleanly at a super high temp unless it has major changes happen, ie increasing the area under the RF plate and FB/CC opening...again this is just my opinion....
 
  • Like
Reactions: Nefarious
I ran things through the tutorial....
View attachment 518451
Based on the tutorial (this is just a guide many DYI builders have used to build very good functional RF Smokers, it is not the only source that has been used to build a good smoker....) the hood over the exhaust is a restriction, the FB to CC and RF Plate Area are both a bit restricted and for a smaller smoker moderately restricted.

Simple fix:
The hood can be removed and it will help with functionality.

This is just my opinion, but if it were my smoker, I would first cut off the hood and test it. If further functionality was desired, I would cut off a section of RF Plate to open up that area to improve flow (improve losses due to the shelf rack). Your smoked chicken looks pretty good. Since you have learned how to do that, I believe opening up the good area will give you a noticeable improvement. However, I don't think it will run cleanly at a super high temp unless it has major changes happen, ie increasing the area under the RF plate and FB/CC opening...again this is just my opinion....

Ok, thanks. I guess I have a lot of thinking and soul searching to do. The builder is willing to cut the hood off, but I don't think there is anything that can be done about the entrance from the fire box to the cook chamber, and I don't know about enlarging the opening from the reverse flow plate in to the cook chamber.

My concern is that If I were to sell it, I would want it to be 100% stock, and If I have him cut the hood off then I would have to sell it as modified and I don't know if that would go over so well.

It is seeming more and more that I just need to get rid of this thing and get a better pit, which is not what I was hoping for.
One thing you can do is ask the builder if you can talk to someone else who has the same smoker. If so, ask them if they have the same problem. If they do then it is a builder problem, and if not then yours is just defective and a builder.problem.
 
One thing you can do is ask the builder if you can talk to someone else who has the same smoker. If so, ask them if they have the same problem. If they do then it is a builder problem, and if not then yours is just defective and a builder.problem.

He has told me several times he has never had any complaints from anyone else, I am the only one. I do know of one other person that reached out to me over a year ago who ended up buying the same smoker, and I have sent a message to him to see if he would be available for a quick chat to see if he has noticed anything on his end.
 
Last edited:
Another somewhat related question for you guys. How do you measure the area for the throat? I ask because I am looking at another smoker, a traditional flow offset and want to make sure everything is sufficient, with no restrictions. This is not to replace my current smoker which I still want to figure out, I just really want to also have a traditional flow.... best of both worlds.

This is a 24x48, made of 3/8" steel in the cook chamber and fire box. End caps and stack are 1/4".

The dimensdions are as follows:

Cook Chamber internals are 23.25 x 47.5
Fire box is 23.25 x 23.5 (round)
Stack is 6" internal and 40" tall (builder said it may be 48, he wasn't at his shop and cant remember off hand and said it was either 40" or 48" so I'm being conservative saying its 40")
The throat is football shaped and is 6" tall by 13" wide. I have no idea how to calculate area on this part though or if that is sufficient.
The firebox is designed to crack the door for air flow, so no door damper.

This is from a well respected commercial pit builder who has been building pits for years and is in several restaurants etc., although I don't want to mention names.


<Edit>

This pit builder just sent me measurements of the throat area which look like they are from some kind of file and it's bigger than he first told me. It is elipse shaped and is 15.093" wide by 7.458" Tall. It does have sharp rather than totally rounded ends so I don't know how much that throws the calculation off. By calculating as an elipse that looks like the area is 88.41 Square inches which if using the info above posted by civilsmoker for a 24x48 it should be ok, its 106.5% of the base calc of 83 SI from the tutorial and 97.2% of the desired calc.
 
Last edited:
SmokingMeatForums.com is reader supported and as an Amazon Associate, we may earn commissions from qualifying purchases.

Hot Threads

Clicky