*** UPDATED*** My "electric" fridge build...

  • Some of the links on this forum allow SMF, at no cost to you, to earn a small commission when you click through and make a purchase. Let me know if you have any questions about this.
SMF is reader-supported. When you buy through links on our site, we may earn an affiliate commission.

lfaulkner29

Newbie
Original poster
Jun 9, 2014
17
13
I've read a few of the propane builds here and this is "my plan"....

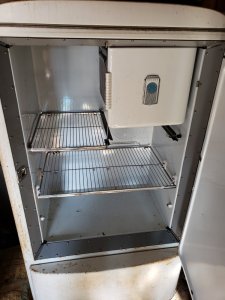
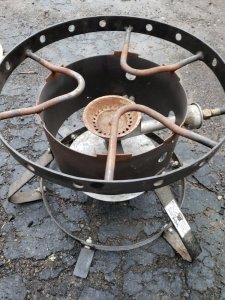
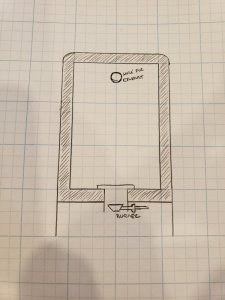
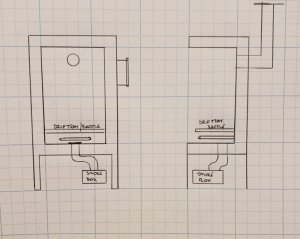
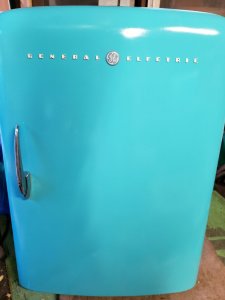
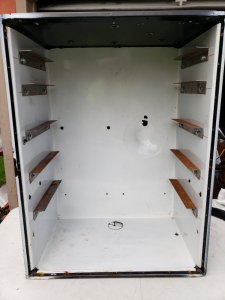
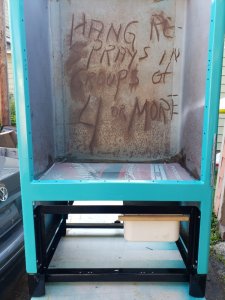
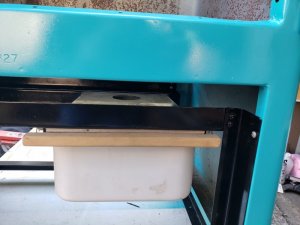
I have this old (50's maybe) GE fridge and the base to a propane turkey deep frying kit, so my thoughts are to cut a hole in the bottom of the fridge so the propane set-up is as low as possible leaving more room for drip tray/heat baffle and shelves. I'll put chunks/chips into a cast iron or steel pan on top of the burner for smoke. I also plan to run all plumbing and wiring in the bottom portion of the fridge where the condensing unit used to sit. See sketch.


I also plan to run a needle valve/solenoid set-up similar to what is shown in this thread to control internal temps. And yes, I will be running a safety shut off valve.

https://www.smokingmeatforums.com/threads/digital-temp-mod.232758/

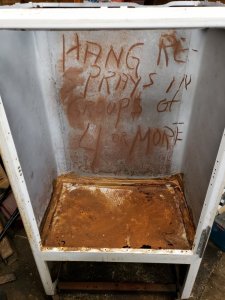
So far I have completely disassembled the unit and removed all the old insulation. I have seen varying opinions on whether or not to do this but for the minimal cost to put in the mineral wool I figured it was just as easy to change it now. Also as I was taking it apart I notice the bottom of the shell was rusted out any the insulation in that area needed to be removed regardless to make the repairs so it only made sense to remove it all.

So here are my list of questions at this point...

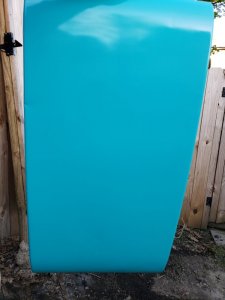
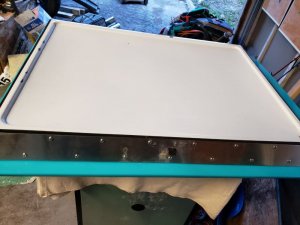
1. Can I use the leftover piece of enameled door skin to cut out parts for the replacement plastic pieces? I have no idea if cutting drilling enameled metal is good/bad/indifferent.

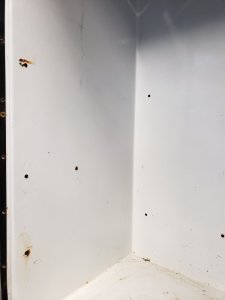
2. How do you guys recommend filling all the various holes in the enameled fridge liner?

3. The way I plan to set the propane burner into the bottom of the pan, the underside of the burner will be open to the air and I did not intend to restrict air flow into the smoker. My thoughts are if I baffle/damper/control the amount of exhaust from the smoke chamber I should not have to regulate the air intake. Is this a valid idea or should I reconsider this to limit the amount of air going into the unit and not the exhaust.

4. What type of sealant do you guys recommend for use inside the smoker?

Any and all help/suggestions are greatly appreciated.
 

Attachments

  • 20190320_171639.jpg
    20190320_171639.jpg
    122.9 KB · Views: 137
  • 20190505_191330.jpg
    20190505_191330.jpg
    150.8 KB · Views: 138
  • 20190505_193031.jpg
    20190505_193031.jpg
    200.6 KB · Views: 138
  • 20190505_191646.jpg
    20190505_191646.jpg
    37.4 KB · Views: 129
  • Resized_20190506_101336.jpeg
    Resized_20190506_101336.jpeg
    96.8 KB · Views: 126
  • Like
Reactions: Jonok
No building expert but i can provide some info on 2 of the questions.

1) my understanding of enamled pieces is that enamel tends to shatter so cutting parts would probably be a mess.
3) I would presume it'd be open as well based on how i've seen other smokers. The idea is to get chips on to of the propane for the smoke element, but the rest of it is heating evenly the internal air temp of the fridge. The way electric smokers work are that they're an oven that can burn chips, same concept here.
 
1) my understanding of enamled pieces is that enamel tends to shatter so cutting parts would probably be a mess.

This was kind of my thinking too and why I was asking the question. Thanks.

2) JB Weld or a similar product.

Thank you. Can I leave that "raw" on the smoke chamber side or do I need to apply some kind of finish?

Will you be able to throttle that burner back enough for smoking?

I am assuming so. With the solenoid bypass set-up I will be able to use the needle valve to turn the burner down as low as possible to stay lit and then when the temp control calls for more heat the solenoid opens and the burner is full on until temp is stable again then shuts off and it would be back to the needle valve controlling the level. Whether or not the amount of "on" heat is enough to create smoke is yet to be seen. My thought are if it doesn't create enough smoke I can always add in one of the A-MAZE-N pellet smoker trays to add smoke. I will probably get one of these for attempting cold smoking anyways.
 
Never thought of off gassing with a JB Weld type of product. There is a food grade silicone but that would look tacky. There must be a food grade product out that would work, perhaps other members will chine in.

My turkey fryer is a 75,000BTU unit, if memory serves, when it’s full on I can bring 10 gallons of water to a boil in 40 minutes. I’m no expert but I would think that you may have too much fire power. Won’t take long with some experimentation to figure out if you have too much heat.
 
  • Like
Reactions: Jonok
Yup, you need more like 5000 BTU (plus some smoke generating capacity) to be fully “over built”...

I’d lose the rusty stuff at the bottom, get some stainless sheet metal of a thickness suited to your needs (in terms of support) and fabrication capabilities (can you weld, [well?] Remember, you’ve gotta get air in and grease out...). Do you need to rivet or screw?....
Make it pretty and stout.
Repurpose an appropriate oven element, (with a much smaller element as a “parasite” smoke generator with a seperate rechargeable chamber) and enjoy the fruits of your labors...
 
I’d lose the rusty stuff at the bottom, get some stainless sheet metal of a thickness suited to your needs (in terms of support)

I am going to cut out the rusted metal in the bottom and put in a new piece of plain steel. The inside still needs to be lined with mineral wool insulation and then the fridge "liner" goes back in.
 
slight change of plans.... I am going electric instead of propane. I have a small charbroil electric smoker that I can cannibalize the element from so that will save me a couple bucks and it looks like that will be the easiest way to get up and running. I still plan to run it with an Auber PID. My questions now are air intake and exhaust.

1. Is there any recommendation for exhaust diameter size (3", 4", 6")?? And should it extend any specific height above the fridge?

2. Does anyone have a link to a cool air intake? I have seen people use floor heat duct vents which are cool but was looking for something different.

3. I have seen a couple builds where they put a drain plug in the exhaust so that any liquids that go into the exhaust don't run back into the smoker. Is this really a concern??

ohhhh…. and I have settle on a color. should give it that antique fridge look.
 

Attachments

  • Resized_20190508_185524.jpeg
    Resized_20190508_185524.jpeg
    80.1 KB · Views: 93
  • Like
Reactions: Jonok
Angle the floor so that the grease runs to a low point (and, optimally, put some sort of a pan in there to catch it so you don't make a mess) It would not be unreasonable to have a single valve that could serve double duty as a grease drain and air intake.

I am a big fan of full flow ball valves for air intakes, but regardless, you're likely not going to need very much as you aren't worried about supporting combustion so much as managing humidity and keeping enough airflow that you don't end up with "stale smoke". How are you intending to produce your smoke? If you intend to put a pellet tray or something in there, and have sufficient airflow to keep it burning, that changes the calculus considerably. I would suggest either an external generator (like a Mailbox mod (if you intend to burn pellets), in which case, you just solved your ventilation modulation question, or a separate electric element with its own chip box (many examples based on big soldering irons, electric hot-plates, or even charcoal starters are bouncing around on the internet)
If you want everything inside, you might consider something akin to my MES "destructive distillation" smoke generator mod, but regardless, it's a very important up-front decision
 
my original thought was just to have the A-maze-N tray in the smoke chamber, which was why I was asking about ventilation, but after Jonok's reply I did a little research on the mailbox mod and decided this is probably the better way to go about it especially if I want to cold smoke. So attached is an updated sketch of the "plan". I am going to angle the drip tray/smoke baffle to a corner, drill a whole in it and put a tin can under to catch all the drippings.

Ohhh and the door is now painted, full of mineral wool and looking sweet...
 

Attachments

  • Resized_20190517_132033.jpeg
    Resized_20190517_132033.jpeg
    93.2 KB · Views: 81
  • Resized_20190516_200525.jpeg
    Resized_20190516_200525.jpeg
    53 KB · Views: 84
I think that’s wise, but I also think you should fabricate a removable pan that sits on the floor of the smoker, and has its own drain tube that sticks down into the smoker bottom drain, so that you don’t spend more time than you have to with your head in the smoker cleaning rancid pig drippings off the floor.

That may also alter the placement of the smoke entry point from your mailbox.

By the way, your build, as well as a bunch of others on this site using the same general plan are just, well, cool!

You guys are doing phenomenal work.

Repurposing those old refrigerators to make a cabinet electric smoker which is far better built than anything commonly available is awesome.

I have my eye open for suitable grist, and hope to join your ranks...
 
Last edited:
my original thought was just to have the A-maze-N tray in the smoke chamber, which was why I was asking about ventilation, but after Jonok's reply I did a little research on the mailbox mod and decided this is probably the better way to go about it especially if I want to cold smoke. So attached is an updated sketch of the "plan". I am going to angle the drip tray/smoke baffle to a corner, drill a whole in it and put a tin can under to catch all the drippings.

Ohhh and the door is now painted, full of mineral wool and looking sweet...
I think putting the smoke box under the smoke chamber is the better way to go. But I would put some kind of an adjustable vent where the air intake is on the smoke box. That way you can adjust the amount of air your pellet tray gets. Too little air and the pellets burn out. Too much air and your pellets ignite into a fire ball. I did that with my smoker and it works great.
 
  • Like
Reactions: lfaulkner29
With an independant ignition source (like a small electric element), you have none of those issues, and have the added benefit of very complete combustion of anything that your meat is exposed to, as well as lots of NO production for a pretty cook...
 
With an independant ignition source (like a small electric element), you have none of those issues, and have the added benefit of very complete combustion of anything that your meat is exposed to, as well as lots of NO production for a pretty cook...
I could be wrong , but the heat source has nothing to do with it. What happens when heat rises to the exhaust stack? It will pull fresh air in wherever it can. It's just nice to be able to control the flow a bit.
 
Sorry, I was trying to indicate that a stoichiometric mix in the overall chamber isn't critical to keeping the wood pellets going, as, if it gets out a bit with an electric ignition source, it will burn as it can based on the O2 available, and make more NO and CO than a "balanced burn" would, which will contribute to a pretty smoke ring...
If you're running a tray and there's not enough combustion air, it goes out.
I don't know about those fancy smancy words and abbreviations you used. I just know what has worked for me and im just trying to pass that along to help the OP. Your results may be different.
 
  • Like
Reactions: lfaulkner29
First let me say that I don't fully understand the scientific terms Jonok was using above so I'll just take his word for it assuming he's right.

As for the build, I've been working on it whenever I get a few free minutes and things are starting to come along now. After the comments/suggestions from Jonok and DIYerDave I have decided that I am going to add an electric element into the "smoke box" to help with a burning the pellets or chips without having to make sure they stay lit. Also, because I plan to use the Auber WSD-1500H-W to control the smoker it has a control for "smoke generator" and I will wire the element into that plug for more system options.

I will eventually add "vent" holes into the front of the drawer and then use a fridge magnet to cover more or less of the holes to act as my air control. I plan to run 3" dia dryer vent tubing from the smoke drawer into the cooking chamber.

Next on the agenda is to insulate the tub and get the liner installed back in and work to get the main element mounted in the bottom.
 

Attachments

  • Resized_20190519_193851.jpeg
    Resized_20190519_193851.jpeg
    92.5 KB · Views: 66
  • Resized_20190516_200451.jpeg
    Resized_20190516_200451.jpeg
    99.6 KB · Views: 67
  • Resized_20190603_175935.jpeg
    Resized_20190603_175935.jpeg
    140.5 KB · Views: 69
  • Resized_20190603_175940.jpeg
    Resized_20190603_175940.jpeg
    96 KB · Views: 67
  • 1500h_front.jpg
    1500h_front.jpg
    118 KB · Views: 67
  • 1500h_back.jpg
    1500h_back.jpg
    114.2 KB · Views: 68
SmokingMeatForums.com is reader supported and as an Amazon Associate, we may earn commissions from qualifying purchases.

Hot Threads

Clicky