Rust on smoker

  • Some of the links on this forum allow SMF, at no cost to you, to earn a small commission when you click through and make a purchase. Let me know if you have any questions about this.
SMF is reader-supported. When you buy through links on our site, we may earn an affiliate commission.
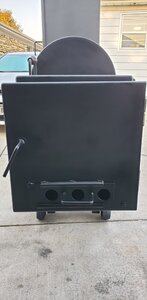
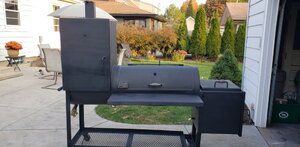
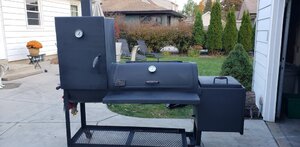
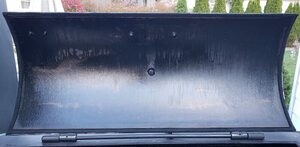
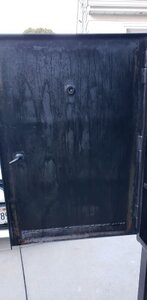
When you started by saying "take it down to the metal" my stomach dropped lol. This is me 100% being lazy, but I think im going to stick to just scraping it all and washing it well. But 100% should have done insides first, just wasnt thinking/was excited to fix the outside. The spraying it each time with canola i will be doing on the inside.

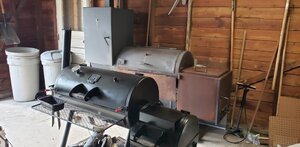
One thing Im not quite clear/sure on is the exterior with canola oil-coat the whole thing? Reason I ask is because the vertical end farthest from the box will likely not get hot enough to have it cure properly and will be "sticky" whereas the firebox will be burning up.

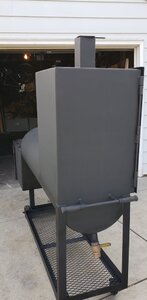
The gator wheel works pretty fast and won't get the metal hot enough to mess with the paint like a grinder or flap wheel. If you don't clean it down bare metal the seasoning will just stick to what is stuck to the metal and then stuff will build up and over time get a thick coating of yuck.....Sorry there isn't a way to properly season a dirty piece of metal. But like I said I'm pretty particular with the inside of my cookers....

Oh and you only have to do the inside (only) with oil once. When I say wipe down between uses its just with a damp rag (since its warm it dries any moisture right out). You don't need to do oil every time. Just when you re-season which should be for a long time if you keep it clean. The out side is paint and I only wipe down spots of rust with oil when they show up on the outside......

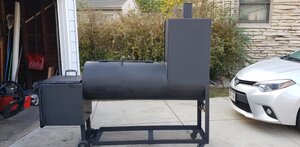
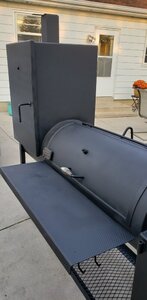
For the vertical just put a metal pan with some coals inside a few inched off the bottom (prop up with rocks or something) and that will get it hot enough.
 
  • Like
Reactions: Laxdfns
Ugh. Fine, you win lol.
I just applied the 3rd coat, Ill send photos probably tomorrow or Saturday as I get started on the interior then.
 
  • Like
Reactions: civilsmoker
Ugh. Fine, you win lol.
I just applied the 3rd coat, Ill send photos probably tomorrow or Saturday as I get started on the interior then.
Here it is after 3 coats. It's definitely a 10 footer, but even with all my shortcomings in skilled restoration, looks better than it did IMO.

Today I'll get after the inside.
 

Attachments

  • 20201010_080441.jpg
    20201010_080441.jpg
    83.9 KB · Views: 13
  • 20201010_080453.jpg
    20201010_080453.jpg
    76.5 KB · Views: 14
  • 20201010_080515.jpg
    20201010_080515.jpg
    119.4 KB · Views: 13
  • 20201010_080527.jpg
    20201010_080527.jpg
    68.7 KB · Views: 14
  • 20201010_080409.jpg
    20201010_080409.jpg
    116.5 KB · Views: 15
  • 20201010_080426.jpg
    20201010_080426.jpg
    82.6 KB · Views: 15
  • 20201010_080431.jpg
    20201010_080431.jpg
    127.7 KB · Views: 17
Looks pretty dang good to me...I would stand right next to it! It’s hard to use it from 10 feet away......
 
Looks pretty dang good to me...I would stand right next to it! It’s hard to use it from 10 feet away......
Final post unless you see more I should take care of! Added the replacement handles and did as you said with the inside and fired it up last night, keeping it between 200 and 300 in both chambers for 2.5 hours. Wondering if I needed to keep it hotter longer, especially in the vertical one, as I'm not sure the glazing baked on fully. But maybe you can tell better than I.

Also, added a before shot to see what we went from to here :)
 

Attachments

  • 20201016_081418.jpg
    20201016_081418.jpg
    110.3 KB · Views: 13
  • 20201016_081451.jpg
    20201016_081451.jpg
    100.3 KB · Views: 13
  • 20201016_081516.jpg
    20201016_081516.jpg
    54.9 KB · Views: 11
  • 20201016_081526.jpg
    20201016_081526.jpg
    99.8 KB · Views: 12
  • 20201016_081457.jpg
    20201016_081457.jpg
    143.3 KB · Views: 12
  • 20200828_164722.jpg
    20200828_164722.jpg
    97.3 KB · Views: 13
Final post unless you see more I should take care of! Added the replacement handles and did as you said with the inside and fired it up last night, keeping it between 200 and 300 in both chambers for 2.5 hours. Wondering if I needed to keep it hotter longer, especially in the vertical one, as I'm not sure the glazing baked on fully. But maybe you can tell better than I.

Also, added a before shot to see what we went from to here :)

Looks pretty dang good to me, I would start cooking in it and enjoy the fruits of the hard work! As an FYI that vertical can be used in many ways other than just smoking from the side box. In your seasoning process you can now see how easy it was to have some coals and splits in the bottom of the vertical..... It has awesome potential, here is one example of my vertical in action in another way other than smoking.
CP-NY.jpeg

You now have the ability to have an open flame cook with relative ease!

PS, Almost every piece of steel (except for the racks) on my copper pot build looked worse than your fire box....but that is what .18 cents a lb gets ya......
https://www.smokingmeatforums.com/t...h-vertical-cabinet-aka-the-copper-pot.268790/
 
Looks pretty dang good to me, I would start cooking in it and enjoy the fruits of the hard work! As an FYI that vertical can be used in many ways other than just smoking from the side box. In your seasoning process you can now see how easy it was to have some coals and splits in the bottom of the vertical..... It has awesome potential, here is one example of my vertical in action in another way other than smoking.
View attachment 466954
You know have the ability to have an open flame cook with relative ease!

PS, Almost every piece of steel (except for the racks) on my copper pot build looked worse than your fire box....but that is what .18 cents a lb gets ya......
https://www.smokingmeatforums.com/t...h-vertical-cabinet-aka-the-copper-pot.268790/
What are you using to hold those coals in the veritical?
 
What are you using to hold those coals in the veritical?
It is a 3/16' pan with 1 inch edges. It also doubles as the drip pan to catch juices when I use it, ie makes it easy to clean that wall. There are detailed pictures of it in the build post. I did a bunch of testing because I have a gate from the fire box below but you don't need that to cook open flame.

It would be easy to make a little fire box with legs and just set it in the bottom of the vertical.....
 
  • Like
Reactions: Laxdfns
It is a 3/16' pan with 1 inch edges. It also doubles as the drip pan to catch juices when I use it, ie makes it easy to clean that wall. There are detailed pictures of it in the build post. I did a bunch of testing because I have a gate from the fire box below but you don't need that to cook open flame.

It would be easy to make a little fire box with legs and just set it in the bottom of the vertical.....
Awesome, thanks! Bought my full brisket today, unfortunately my weekend is packed so I'm gonna shoot for Monday.

Also, went through your build. Impressive! I wish I had welding and fabricating ability like that.
 
Awesome, thanks! Bought my full brisket today, unfortunately my weekend is packed so I'm gonna shoot for Monday.

Also, went through your build. Impressive! I wish I had welding and fabricating ability like that.

good luck on the smoke Hope it turns out!

thanks on the build comments! It was a fun build for sure! But is have an addiction on building cookers...... If you have a month (Lol) to read the X-Fire build (built with my boy for a high school civil learning class) it shows another perspective on smokers/cooker.
https://www.smokingmeatforums.com/threads/the-x-fire-grill.284462/
The boy and me have a few honey do lists but will be finishing it up in the spring!
 
SmokingMeatForums.com is reader supported and as an Amazon Associate, we may earn commissions from qualifying purchases.

Hot Threads

Clicky