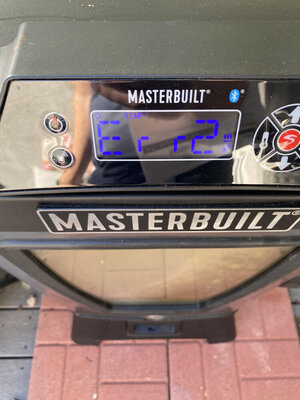
Hi there and welcome!
I think @dr k has good info for you. You will just need to figure out which wire ends belong to each other. This means finding where each wire end at a heating element runs to a wire end at the circuit board.
You'll want to unplug ALL the wire ends and then use a multimeter's continuity check function to find the matching ends and then label them with some masking tape and a marker.
If you don't unplug all the wire ends you may get some false positive readings and not know exactly which ends belong together because a number are hooked up in series. The main lower heating element HOT runs to the safety limit switch then to the circuit board, and is a good example of what I mean.
Once you know all the ends you can do the simple rewire so that the MES plug runs to the lower element and will be controlled by the PID controller.
The others will have their own plugs it seems and would be controlled individually with a simpler controller.
Dr k makes a good point that no oven runs both top and bottom element at the same time so I would follow that approach since it is pretty standard for ovens.
Hi there and welcome!
You can bypass the current issue with a simple rewire and use an Auber PID controller to control the heating element for sure.
You just have to do the proper rewiring so that the lower heating element can be controlled by the Auber PID.
@dr k has a good suggestion for @AbeFromanATL that I would suggest you follow.
It all comes down to identifying the wire ends and then doing simple rewires (cut ends off wires and splice with wirenuts or similar connectors).
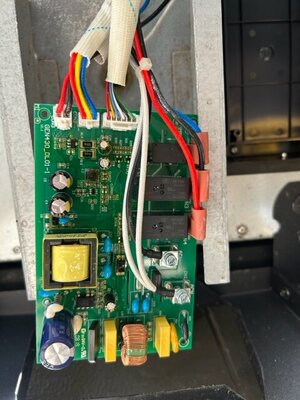
I took @AbeFromanATL 's circuit board picture to show which wires do and do not matter.
The ones in the green circles matter for the rewire.
The ones in the red rectangles do NOT matter for the rewire and will be useless after the rewire.
View attachment 661768
So once you find out where these ends connect to the elements and the safety switch as well as the MES power plug. You will be able to know which wires to connect together.
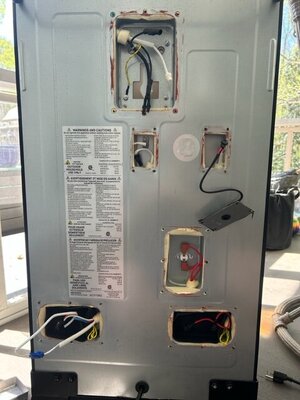
Abe posted the back image of his smoker for this setup. Simpler MES smokers have way less wires. This newer one has 3 elements instead of a single element so Abe's smoker is a little more complex:
View attachment 661769
The rewire makes it where the MES plug feeds power straight to the main heating element with no control at all. So it will heat up and go until it burns down.
This is why the Auber PID controller is needed.
Once rewired you plug the MES plug into the Auber PID controller.
Then you plug the Auber PID into your home electrical outlet and clip the Auber PID temperature probe/sensor to the bottom rack of the smoker.
You now enter the smoking temperature into the Auber PID and it will take power from the wall and feed it to the MES plug/heating element until it hits and holds that temperature for you to cook.
Simple!
All you have to do is identify the which wire ends belong to each other using the continuity setting on a Multimeter (a $7-$10 tool). Then connect the correct wire ends together and you are done :D
I hope this info helps :)