SmokinAintEasy
Fire Starter
- Dec 31, 2019
- 34
- 41
Back up a few months when I found a Traeger BBQ100 series OG pellet grill I picked up, I wanted to keep it original but it didn’t have the amount of room that I would like and needed a little TLC. I decided to hack it up and make a smoker that would suit me better. Got out the pen and paper and started with a few ideas.

Started as this!

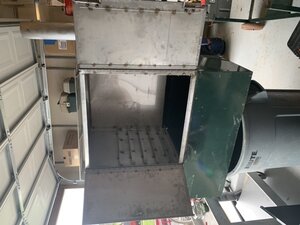
built the box to match the same size of the grill, made it from stainless steel.

Added piano hinges, doors, handles and locks. Once the box was built it was off to the polishing booth.


fit the two units together to make sure everything lined up the way I wanted and hope for.

cut and added the racks.

picked up a new control panel and I also left the original tag on there.

sanded the bottom half and threw on some high heat black.

with the new controller I needed to add the hot rod and new fire pot.

Threw on the original side shelves and dropped the original handle down so it wouldn’t cover the controller, makes for a nice utensil hanger.

had to keep the instruction on the hopper for sure.


due to the added weight of the top box, I used the roll up door slats and cut them to strengthen the legs up a bit.

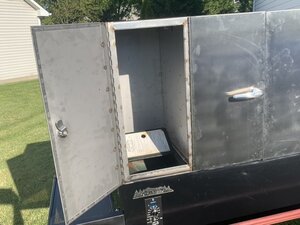
original plexiglass insets! Also had to keep those. The red plate is covering the original controller opening.


built some spring latches to keep the right side door closed, also added some high heat felt to hold the smoke in.

always have to add something awesome, being my own mechanic and working with tools is something I have done for a while so I added a wrench as a hanger for the power cord.
I am looking to season this thing on the upcoming weekend and hopefully get the first cook off on this bad boy. This has been a fun project and can’t wait for the next one.
Started as this!
built the box to match the same size of the grill, made it from stainless steel.
Added piano hinges, doors, handles and locks. Once the box was built it was off to the polishing booth.
fit the two units together to make sure everything lined up the way I wanted and hope for.
cut and added the racks.
picked up a new control panel and I also left the original tag on there.
sanded the bottom half and threw on some high heat black.
with the new controller I needed to add the hot rod and new fire pot.
Threw on the original side shelves and dropped the original handle down so it wouldn’t cover the controller, makes for a nice utensil hanger.
had to keep the instruction on the hopper for sure.
due to the added weight of the top box, I used the roll up door slats and cut them to strengthen the legs up a bit.
original plexiglass insets! Also had to keep those. The red plate is covering the original controller opening.
built some spring latches to keep the right side door closed, also added some high heat felt to hold the smoke in.
always have to add something awesome, being my own mechanic and working with tools is something I have done for a while so I added a wrench as a hanger for the power cord.
I am looking to season this thing on the upcoming weekend and hopefully get the first cook off on this bad boy. This has been a fun project and can’t wait for the next one.