Masterbuild XL Mods - Post your mods here!

  • Some of the links on this forum allow SMF, at no cost to you, to earn a small commission when you click through and make a purchase. Let me know if you have any questions about this.
SMF is reader-supported. When you buy through links on our site, we may earn an affiliate commission.
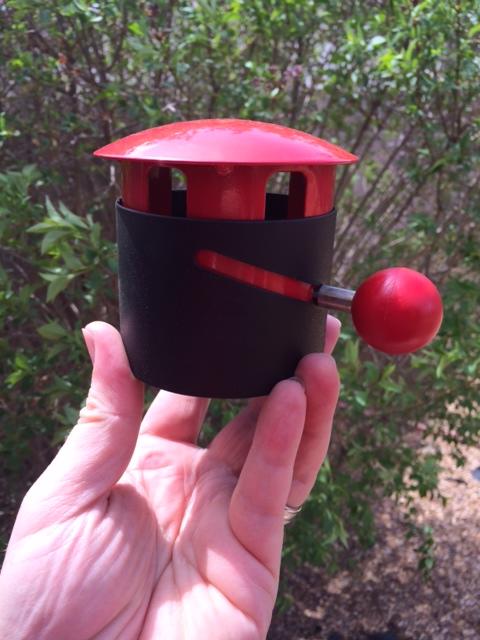
I too added a stack to mine but I went with the Landmann stack instead of the Masterforge.  I like the overall design for a couple of reasons.  As you can see in the picture below, the rain cap is domed instead of pointy.  I think that it will wear easier on my cover.  I also like the fact that it is short but almost 3" in diameter.  I also like the novelty of the design.   It's not something you see everyday. 


I used a 3" metal hole-saw on the top of the XL.  Like I said, the stack is a little larger than 3" so it sat very well on top of the smoker after cutting the hole in it.  I wasn't sure how the stack attached to the smoker before I received it and I wasn't able to figure it out from looking at the pictures.  I guessed that there would be tabs involved and I ended up being right...there's a first time for everything...


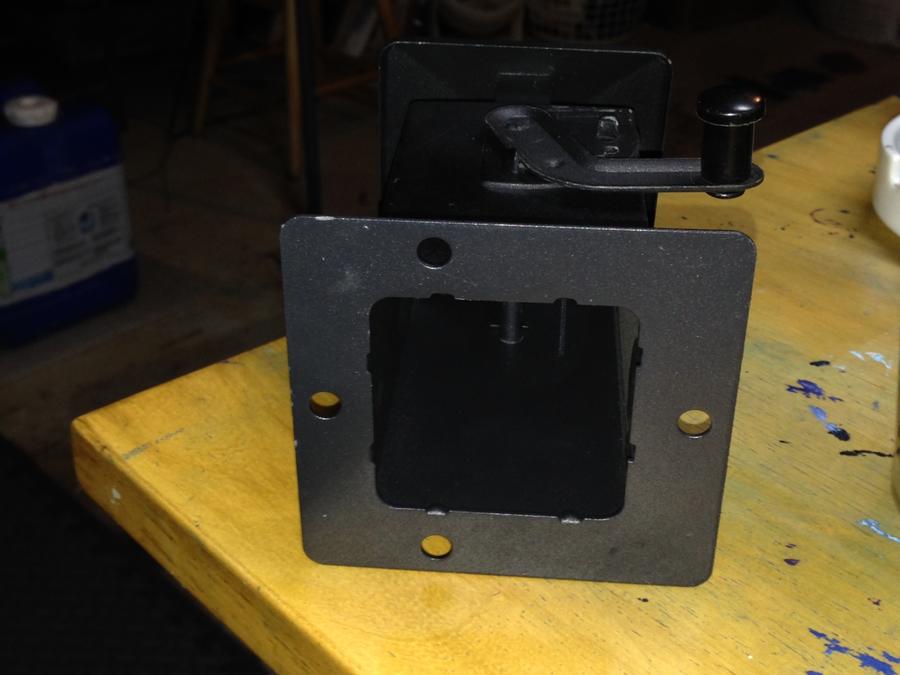
While I was waiting "patiently" for the stack, I thought it would be a good idea to reinforce the hole that I cut in the smoker with a plate of some sort and after seeing that it had tabs, it made it easy for me to go that route.  My father-in-law used a plasma cutter to cut an adapter/reinforcing plate out of 10 gauge steel.  I drilled 1/4' holes in the adapter to accommodate the fasteners. 


I shot the adapter with some high heat paint and went to putting it all together. 


I had considered mounting the adapter to the smoker with fasteners of some sort but didn't worry about it after seeing the fit and finish when I joined the stack to the adapter.  I was happy with how well it "sandwiched" the smoker between the adapter and stack.  Overall, I am very happy with the way it came out.  I haven't fired it up yet because I want to give the paint a chance to dry really well.   I may end up adding some high heat silicone to the base of the stack, but I'll make that decision when I am able to see how much, if any, smoke leaks around the base.  Hell, nothing else is sealed on it so I may not worry about.  The CharBroil cover still fits nicely over the entire unit. The stack was 6 bucks and it cost 9 to ship it. 

 
Holy hell their website is a disaster. How'd you order that stack? I'm having a hell of a time finding anything about it.
 
I just called their customer service department and asked them if I could order one. They were very helpful. The number is on the website.
 
Okay the Master Forge $15 smoker stack chimney I mentioned earlier arrived, but looks different than the pictures others have posted. This one is square. Opening is only about 2"x2" so I hope that has enough draw to pull the air through better than the stock rear sliding vent. I suppose it might be easier to cut a square opening if you don't want to purchase a large hole saw for the round ones? Personally I think I'm just going to use a big 1/2" titanium bit I have and drill several holes where I'm going to mount it through the top of the smoker within the 2"x2" chimney opening area. Will let you know how it works out...

 
This modification thread reminds me of a Billy Connolly video about house potential!!!


Why not just buy the smoker that is the smoker you're going to have when you're done? By the time ya invest the parts, shipping and your time, you could have already afforded the potential smoker!!
 

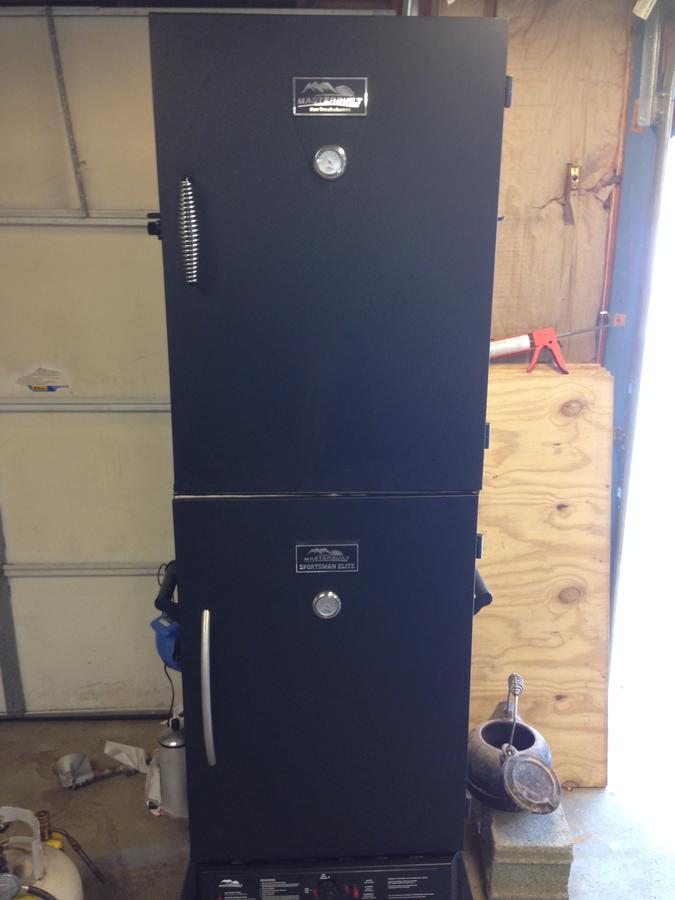
Heres my upgrade needed to be a little bigger so i stacked two and cut the top out of one and bottom out of the other. Also close the bottom vent off and added smoke daddy to the side which works great. I sealed all around the doors and inbetween the two boxes.

.
 
I use both pellet and chunk. Start with pellet at bottom and chunk on top of that. Yea i check it every hour or so seems needs to be bigger around maybe or longer. Seems like i need to poke at it the add pellets on top of chunks and i switch like that on and off. Whats your opion?
 
Last edited:
 
Okay the Master Forge $15 smoker stack chimney I mentioned earlier arrived, but looks different than the pictures others have posted. This one is square. Opening is only about 2"x2" so I hope that has enough draw to pull the air through better than the stock rear sliding vent. I suppose it might be easier to cut a square opening if you don't want to purchase a large hole saw for the round ones? Personally I think I'm just going to use a big 1/2" titanium bit I have and drill several holes where I'm going to mount it through the top of the smoker within the 2"x2" chimney opening area. Will let you know how it works out...

How did it end up working for you, Mikemav?
 
 
How did it end up working for you, Mikemav?
I just got around to installing it today. Have not had time to try it yet, but it looks like it'll do the trick. Not wanting to try to cut out a 2" square, I simply drilled nine holes in that opening space w/ my 1/2" titanium bit without issue. Seal w/ a little food-safe red RTV and bolt it through, simple.

I also had this idea to try to make a removable 4" aluminum flex duct which would at times connect to my Weber kettle grill's top vent and run over to the smoker adjacent to it. I noticed that my A-MAZ-N pellet AMNPS box burns perfectly in the Weber (I've used it in cool grill for cold-smoking, for example.) I noticed the XL smoker tended to stifle out the AMNPS when the door is closed (or catch it on fire when too close to the burner.) However, this was before I installed the top chimney today, so maybe that alone would increase airflow enough to work w/ the AMNPS?

Regardess, I had this idea to pipe the smoke over from the AMNPS in the Weber to the smoker. Kind of like the mailbox mod, except with the Weber kettle being "the mailbox", and it's stock vent being the exhaust outlet to the removable duct. I plan to use my new 4" Polar Array BBQ vent I also installed in the smoker today as the inlet to get more air (or smoke from the Weber via the duct) into the smoker towards.  

I am using small strong magnets on each end of the duct (cut and bent back to form a makeshift flange.) Used RTV to secure the magnets to the flange. Once it sets up, I will give it a try and take some more pics. Meanwhile here is the chimney (pre-install, after drilling) and the rotating BBQ vent installed on the bottom side. The 4" duct will attach here via magnets when needed if my idea works.  


Last edited:
It would be pretty easy to cut that square out now that you have those 1/2" holes in the top. Also, I have an AMTS and I've found that it's All about placement. I moved my water pan up a little bit and placed one of the racks as low as possible. I place the tube smoker on the left hand side on that bottom rack and it works like a champ. I didn't get good smoke above or next to the water pan but I do now. Good luck with the mods. Hope it works the way you want it to.
 
Last edited:
Sorry olebones i misread your question. It does put out enough smoke with chunks, but i do alot of kielbasa and bacon and that low of temp i cant get it hot enough to burn chunks right. I been keeping the door open and turning it up to get the chunks burning

but is a pain so i came up with this i set it on 110-130 on the dial and then let that smoke daddy eat for the smoke.Yum!
 
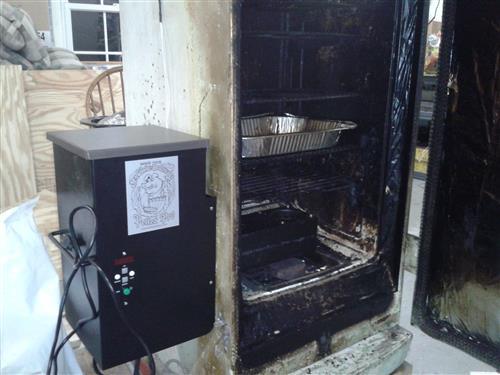
Now I've gone and done it, lol! Converting my 40" Masterbuilt into a true wood fired pellet burner with the Smoke Daddy Pellet Pro hopper assembly/burn pot, which is due to arrive later this week. Will be making a heat deflector and drip shield and basically just using this XL40 for a cabinet and slide-out racks at this point to make my poor-mans version of a Cookshack Fast Eddie FEC100. I may even upgrade the Pellet Pro electronic auger/burner/fan controller with a more sophisticated PID down the line.

If there is room I plan to leave the gas burner in the bottom. Will not be used with the pellet pro obviously, but I did try it out last week adapted to NG instead of propane, It would not go above around 210 degrees since I didn't drill out the propane burner orafice for NG, but I figure since at the low setting on NG it may hold steady at 130-160, this might come in handy one day if the pellets don't burn that low, for smoking sausages with the AMZNPS, etc... Anyway, also probably getting some ROXUL high temp insulation batts for the inside walls, and maybe Durock panels for the exterior to insulate the cabinet well also. Will be sure to post pics of the mods once I have them underway.

Now anyone have any ideas what to do about a cover once I frankenstein this hopper onto the side? I thought about covers made for the Bradley but none of their cabinets are big enough. Don't know of other off-the-shelf vertical cabinet smokers I could source a cover from with this "lump" off to one side (except the Fast Eddie, but their covers, though I'm sure awesome, cost almost as much as the pellet pro!) Should probably look similar to this general idea:

 
One other question, calling all those who know there way around a tool box: need to cut a rectangular hole in the side for the auger/burn pot, about 4"x 5". I have some titanium tipped hole saw blades that work well on this steel, so could cut out the corners to get a saw blade in there to cut along the template lines. Is my best bet a jigsaw with metal cutting blade (I only have an 18V cordless however), or cut a bit wider corner hole and fit a sawzall metal blade in there? (When plasma cutters and/or water jets are portable and $199 in the future, be sure to let me know, I'm SO IN on that lol!) 
 
Last edited:
 
This modification thread reminds me of a Billy Connolly video about house potential!!!


Why not just buy the smoker that is the smoker you're going to have when you're done? By the time ya invest the parts, shipping and your time, you could have already afforded the potential smoker!!

I see where you're coming from (says the guy who just spent $325 to convert a $199 smoker to an automated pellet burner, lol!) Still, from this relative newb's perspective, I think there is a big price cliff between really pro-sumer/semi-pro and "competition" or small restaurant/catering setups and something like the XL with great capacity and square-foot friendly design for the home smoker. For instance, my ideal setup (from what I know so far) were I to hit the lotto would be a Cookshack Fast Eddie's FEC100, which is a few inches larger than the XL, in a similar design of cabinet, size-wise. Then factor the auto-pellet auger/burner and real wood smoke/heat (and much better insulation) of course; I'm hoping to achieve an acceptable substitute of what they accomplish for north of $4k for much, much less.

I don't want a $500-$800 smoker from what I've seen. Personally, I won't buy my $4200 "dream" smoker, or a $1000-$1800 pellet grill (with less capacity than my Masterbuilt XL) for that matter, as nice as they look. I have a Weber performer charcoal kettle/cart I'm happy with for grilling hotter. I want a $199 smoker, which maybe I spend $500 more and some DIY time on, and hope to get 75% of the way to a $4k dream. I'm sure a Cookshack anything is WAY better build quality and probably in performance, but it's also likely overkill for this small family weekend chef... Plus I figure I'll try the stock Pellet Pro controller, and could always upgrade to one of the newer intelligent PID ones ($100-$200) with meat probe and grill probe that can automatically drop pellet consumption/fans, to get the smoker quickly to 160 to hold when done, etc... I have to admit that does sound like a very desirable feature on something which keep in mind is sourcing the heat and smoke from real wood pellets. It sure sounds like what I'm after, we'll see if all goes according to plan or what speed bumps I encounter. 
 
Quick question...

Hopefully I haven't missed this in the thread somewhere...

If given the choice between setting a cast iron skillet directly on the circular housing or setting it on top of the old flimsy wood tray, which is the better option?

Obviously, setting it directly over the flame gives it more direct fire, but it seems to me it would seal out the flame and oxygen getting to the flame.

I know the best option is to make a new stand for the skillet, but I only have the two options at this point.

Thanks in advance for your help.
 
Smokin Joker,

I, like most people, just put the skillet on top of the "old flimsy wood tray". Some people have said that putting it directly on top of the burner does snuff out the flame. I've got a 12" skillet and it covers the entire tray.  I really like what Grinder did for his skillet on post #70  and will be doing that soon.  He also explained what hardware he used in post #73.

Hope this helped.
What I did was take an old bowl from my dads unused smoker and set it on top of the wood tray. I tried it without the tray first, but it suppressed the fire. It works great now.
 
SmokingMeatForums.com is reader supported and as an Amazon Associate, we may earn commissions from qualifying purchases.

Latest posts

Hot Threads

Clicky