nikkidee
Newbie
- Jun 27, 2017
- 4
- 10
Hi All,
I've been trawling the forum for a while now gleaning ideas and inspiration from all these amazing builds. I think a build is a great opportunity to better understand the whole smoking process so I'm embarking on my own patio size build. Tanks with a good diameter have been extremely hard to find here but I finally came across a 19 inch diameter tank at 35 inches long giving me 42 Gal which is small for most but big enough to cut my teeth on for a first attempt. There are a few flanges/fittings to cut off/plug and a bit of rust to sand blast and fix but it's a good size and more importantly the right price.
So far I've plugged in the measurements to the RF calculator and got the following:
9703 cubic inches
39 square inches FB-CC opening, area under plate etc (segment is 15 inches wide by 4 inches high)
10 inches of inlet area
3202 square inches of fire box (I've gone a bit bigger at 15.7 x 15.7 x 15.7 for 3905)
I work with a switchboard manufacturer who knocked up the fire box for me in 3mm steel.
The stack I'm still working on but I'm thinking 3 inch pipe at roughly 30 inches long will suffice.
My spreadsheet is all over the place with mm-inches, litre-gallon-cubic inches conversions but I think I'm on the right track. Appreciate any feedback if something looks a bit off.
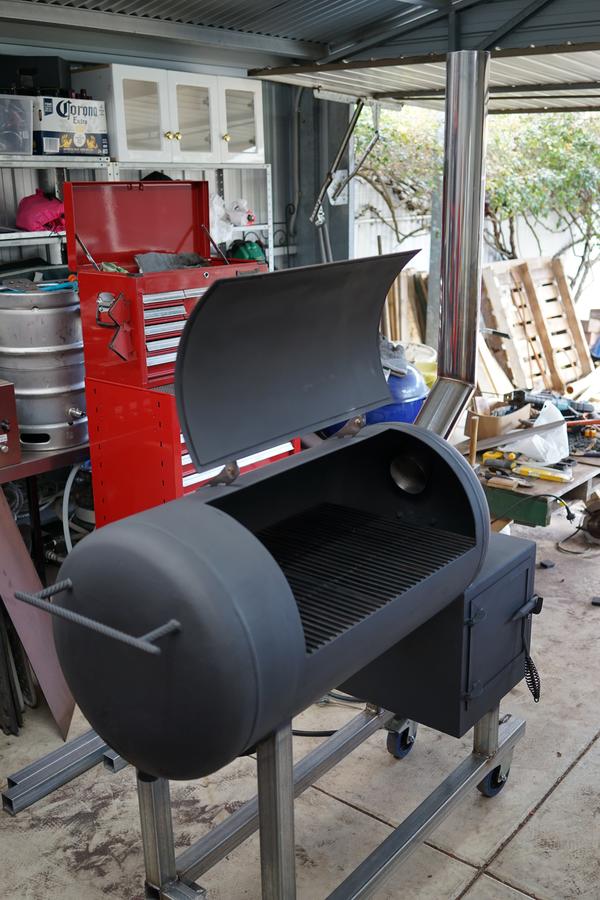
We've marked up the lid and plan to cut in 2 stages, first the two horizontal cuts before welding on the hinges, then cutting the vertical. By doing this at least I can ensure the hinges are in the right place and square, despite the inevitable 'spring' that will occur.
Below is a dummy up with the FB in place. exciting to see it start to take shape.
I've been trawling the forum for a while now gleaning ideas and inspiration from all these amazing builds. I think a build is a great opportunity to better understand the whole smoking process so I'm embarking on my own patio size build. Tanks with a good diameter have been extremely hard to find here but I finally came across a 19 inch diameter tank at 35 inches long giving me 42 Gal which is small for most but big enough to cut my teeth on for a first attempt. There are a few flanges/fittings to cut off/plug and a bit of rust to sand blast and fix but it's a good size and more importantly the right price.
So far I've plugged in the measurements to the RF calculator and got the following:
9703 cubic inches
39 square inches FB-CC opening, area under plate etc (segment is 15 inches wide by 4 inches high)
10 inches of inlet area
3202 square inches of fire box (I've gone a bit bigger at 15.7 x 15.7 x 15.7 for 3905)
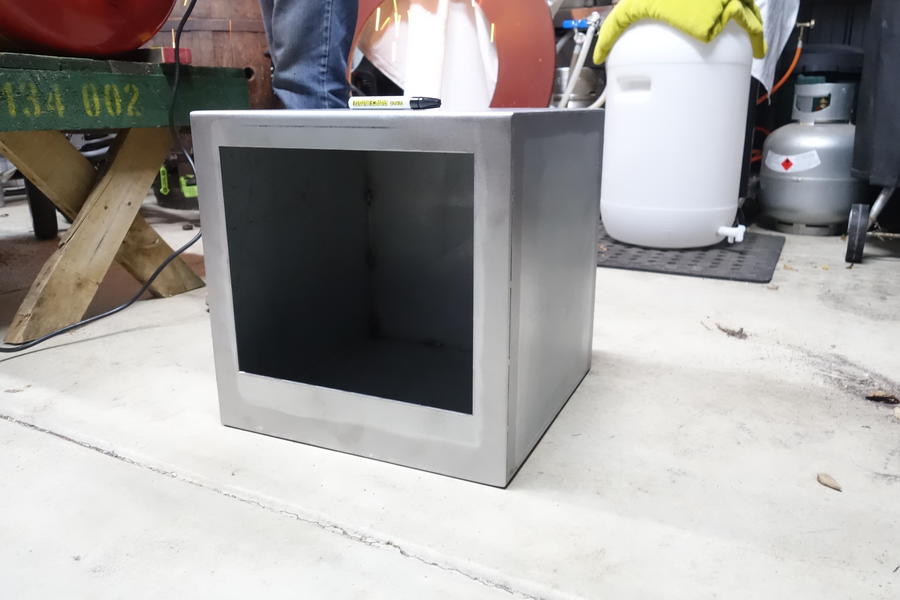
I work with a switchboard manufacturer who knocked up the fire box for me in 3mm steel.
The stack I'm still working on but I'm thinking 3 inch pipe at roughly 30 inches long will suffice.
My spreadsheet is all over the place with mm-inches, litre-gallon-cubic inches conversions but I think I'm on the right track. Appreciate any feedback if something looks a bit off.
We've marked up the lid and plan to cut in 2 stages, first the two horizontal cuts before welding on the hinges, then cutting the vertical. By doing this at least I can ensure the hinges are in the right place and square, despite the inevitable 'spring' that will occur.
Below is a dummy up with the FB in place. exciting to see it start to take shape.


![IMG_0509[1].JPG](/media/img_0509-1-jpg.548479/full?d=1507263420)
![IMG_0540[1].JPG](/media/img_0540-1-jpg.548478/full?d=1507263420)
![IMG_0543[1].JPG](/media/img_0543-1-jpg.548480/full?d=1507263420)
![IMG_0546[1].JPG](/media/img_0546-1-jpg.548481/full?d=1507263420)