Digital temp mod

  • Some of the links on this forum allow SMF, at no cost to you, to earn a small commission when you click through and make a purchase. Let me know if you have any questions about this.
SMF is reader-supported. When you buy through links on our site, we may earn an affiliate commission.
 
For anyone else who reads this later, you're asking about the safety valve, not the thermocouple. The thermocouple is the part that connects to the safety valve, and sits in the burner to detect the flame. 

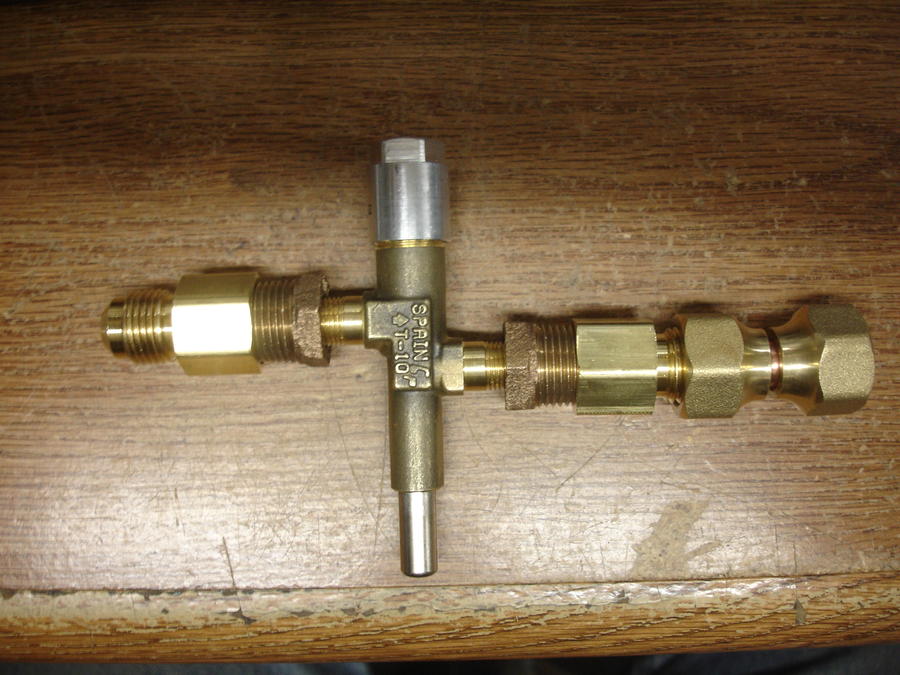
As best I recall, looking at the picture, here's the parts I used, from the supply hose to the smoker:

1) 3/8" Flare male x 3/8" NPT female
2) 3/8" NPT male x 1/4" NPT female
3) Safety Valve
4) 3/8" NPT male x 1/4" NPT female (Same as part 2)
5) 3/8" Flare male x 3/8" NPT female (Same as part 1)
6) 3/8" Flare female x 3/8" Flare female 

You basically need to go from 3/8" Flare on the hose to 1/4" NPT on the safety valve, and back to 3/8" Flare on the smoker.  In addition, I was worried that after tightening all the parts, the safety valve button might not be in a desirable position, so I added part 6 which is a rotating 3/8 Flare coupling. I was able to tighten everything starting at the hose end and get it locked down, and then screw the last flare fitting onto the smoker, keeping the push button pointing out while I tightened it. 

In addition, I couldn't find a single part (at my Home Depot) to go from 3/8 Flare male to 1/4" NPT female, so I had to use 2 parts.  If you can find a single part, 1 and 2 would become a single part, and 4 and 5 would become a single part. 

Truthfully, my fittings may not be the best or only way.  I went to HD with my safety valve, and knowing I needed to have a 3/8" flare male on one end of the final contraption, and a 3/8" flare female on the other end, with the ability to rotate it into alignment, and I played around with fittings until I found a combination that worked. If I had landed at a store with different stocked fittings, I might have ended up with a different approach. 

Glen
Glen,

I went to Menards last night with the safety valve in hand.  I looked for the parts you listed, and of course I couldn't find them.  I then asked a nice young girl to help me.  I showed her your picture and the list you sent and she couldn't find them either.  Looking at the safety valve, it is flare on both sides, but you list 1/4 NPT on both ends.  Could my valve be different?  It looks the same.


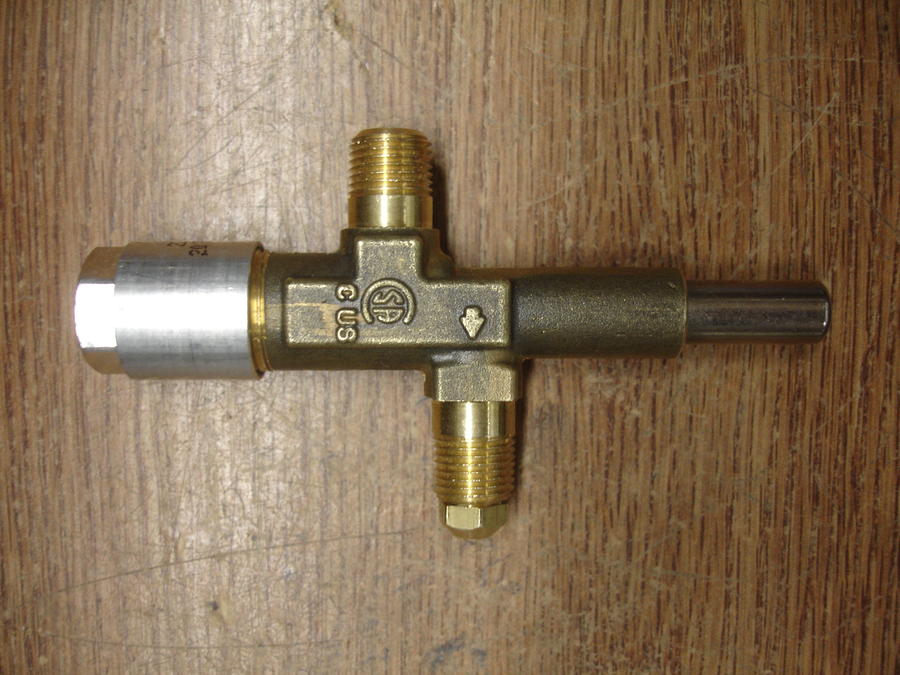
We tried the 1/4" and the 1/8" and the threads aren't the same.  It seems like the threads on the safety valve are finer than both the 1/4" and 1/8" couplers.  Was yours not a flare male end on your safety valve?  I am getting to the point of just sh*t canning the whole safety valve thing
 
You'll need to remove the orifice shown in the bottom fitting in the picture. 

It's possible that the safety valve is 1/8" and not 1/4", but you said you tried both, so I'm not sure why one of them wouldn't fit, unless you were trying to screw onto the end with the orifice still attached. (edited links below after Fuzzy0026 confirmed 1/8"

I looked at the HD website, and these look like my parts (1/8" confirmed):

#1 and 5: http://www.homedepot.com/p/Sioux-Ch...s-Flare-x-FIP-Coupling-975-44101001/203468375

#2 and 4: http://www.homedepot.com/p/Sioux-Ch...-MIP-x-FIP-Hex-Bushing-930-15160201/202254932

#6: http://www.homedepot.com/p/Sioux-Ch...x-Flare-Swivel-Adapter-975-46101001/202848142

All of these are in stock at HDs near me.

Glen
 
Last edited:
Also, to clarify, the orifice is the small brass plug screwed into the bottom part of the fitting in the picture.  It's only needed if you are using this in it's original configuration, where that orifice controls the flame directly.  In this setup, it has to be removed. It just unscrews.

Also, I looked at a picture of mine, and yours looks identical.  Same number of threads on the in and out ports, same markings on the body.

Hopefully you figure it out.  I wish I had documented the parts I bought at the time.  I do know for certain that Home Depot had fittings that fit the safety valve, I just don't know for sure which they are. 

If you use the HD links, and put in your store location, it will tell you if they are in stock, and where in the store you can find them.

Glen
 
 
You'll need to remove the orifice shown in the bottom fitting in the picture. 

It's possible that the safety valve is 1/8" and not 1/4", but you said you tried both, so I'm not sure why one of them wouldn't fit, unless you were trying to screw onto the end with the orifice still attached. 

I looked at the HD website, and these look like my parts (assuming the valve is 1/4"):

#1 and 5: http://www.homedepot.com/p/Sioux-Ch...s-Flare-x-FIP-Coupling-975-44101001/203468375

#2 and 4: http://www.homedepot.com/p/Sioux-Ch...PIPHorizontal1_rr-_-202254932-_-202254933-_-N

#6: http://www.homedepot.com/p/Sioux-Ch...x-Flare-Swivel-Adapter-975-46101001/202848142

If the safety valve is 1/8", then parts 2&4 would be: http://www.homedepot.com/p/Sioux-Ch...-MIP-x-FIP-Hex-Bushing-930-15160201/202254932

All of these are in stock at HDs near me.

Glen
Thanks Glen.  Once I knew what was needed, I only had to go to Home Depot once and than Menards once.  HD was out of stock on the 3/8 x 1/8 adapter.  But hopefully my burner will come in today so I can get it hooked up this weekend.
 
 
Thanks Glen.  Once I knew what was needed, I only had to go to Home Depot once and than Menards once.  HD was out of stock on the 3/8 x 1/8 adapter.  But hopefully my burner will come in today so I can get it hooked up this weekend.
Ok, glad to hear you got the right parts.  Just to be clear, you are confirming it was 1/8" and not 1/4", correct?  I'll amend the prior posts to avoid anyone else being mislead.
 
Yes, it was the 1/8".  I still have the packaging at home, I will try to get some part numbers listed this weekend.
 
 
Yes, it was the 1/8".  I still have the packaging at home, I will try to get some part numbers listed this weekend.
Ok, thanks.  I updated a few earlier posts to reflect the correct size and the HD parts link.
 
Thanks for all the details within this post.  I'm in the process of using the same general approach...you did a really nice job.

I did notice you are using pipe dope on the NPTs under the smoker.  Pipe Dope tends to break down at high heat....probably not a big issue with low and slow, but you may see some pipe dope breakdown occurring there over the years.  I ran into this with my grill fittings and then after looking at the Rectorseal specs, I knew why.  I've sense used the gas rated yellow teflon tape which has better temperature properties around the burner\grill.  Then the usual pipe dope everywhere else.  Also, just for anybody else following this, I'd recommend a ball valve for the service run and shut it off when not in use.  You just never know when a joint will fail or the solenoid seal fails.  With a ball valve, at least your risk window is reduced to the occasional day when you are smoking.  
 
Good catch on the pipe dope.  I'll keep an eye on it. 

Regarding the ball valve, my system is hooked up to a propane tank, and I just close the tank valve every time I am finished with it. 

Glen
 
I had good success generally replicating this setup.  I ended up putting a needle in the always on circuit as well as the solenoid controlled circuit.  I figured that might give me some better top end control for lower smokes.  I also went with a ASCO solenoid, Crydom SSR, and an Auber SMD-100 PID.  Not sure if it will buy me much reliability wise, but the budget allowed.

First run with the default PID parameters with a 10 second cycle went well.  No problems with my initial runs at 225, 250, 275, 300, 325, and 350.  I'll work on the lower end "sausage" settings at another time which I suspect will require some solenoid needle adjustment so the control is between low and slightly higher.

I plan to play with the PID settings a bit.  I find that the PID is a bit too conservative with minimizing overshoot so I get a slower ramp up.  But it's dead on with minimizing overshoot and maintaining.  I'd prefer to ramp up quicker with the tradeoff of 5-10 degrees of acceptable overshoot.  I think that would be a bit better on those long smokes with a every 30 minutes or so door opening.  

Glen, have you done any further tweaking to the Auber PID?  I'd be curious to hear if you've made any recent tweaks.  Really appreciate your documentation.
 
I'm glad it's worked well for you, and to hear that the post has been useful.

ASCO's solenoids look like the real deal.  If mine ever fails, I'd probably step up to something better like that.

I haven't noticed a slow ramp up.  I did the PID calibration routine to let it set the parameters, and haven't touched it since then.  I'm pretty happy with it at the low and high end, for what I do, but I don't do anything lower than 225.  I haven't checked how low I can set it and keep stable.  I'll have to try and see.

I would assume if you have a needle valve on the solenoid controlled side, and adjust it, the PID settings would need to be changed, wouldn't they?  I though the PID settings assume a certain heating rate, which would change if you adjust the needle valve. 

Good luck with it.

Glen
 
I'll have to give the PID auto tune a try since you had success with it and see if that improves the ramp and disturbance (door open) response.  Auber's instruction manual cautiously recommends trying to use the default settings and then manual before going to AT, but AT is definitely worth trying if you had success.

I'm no PID tuning expert by any means but when you have setpoints ranging from the lower temps up to 350, no one setting is perfect anyway.  The auto turne's outcome will not factor in disturbances or the full scale range.  It's going to give you a fairly rough estimate.  I'm just guessing here, but if you optimized using auto tune and had good performance at the high end, I'd suspect fairly poor overshoot and oscillation performance at the low end.  So scaling the high using a needle with the existing PID settings may actually work quite well for the low end.  I'll have to experiment quite a bit if the bottom end doesn't regulate all that well with the default\AT settings.
 
I would love to set mine up like yours. I have read the whole post but is there any way you can post all what I need to order. Links sure would be nice to use.
 
Unfortunately I'm home recovering from a concussion, so I can't do any detailed reading or writing. I'll try to remember to reread and reply in a week or so.
 
Glen, hope you are well.

Just ordered my smoke vault, and very excited to find your thread. I just wanted to say thanks for sharing! I am not good with this type of work, but will try to put it all together!
 
Hey Glen, just got a Smoke Vault 24 for Christmas and while I had my heart originally set on a pellet cooker or a BGE knockoff after some searching and finding this thread I'm excited to go collect the parts for this controller. It should combine the best parts of all the smokers I liked into one great package. One question, does your PID have a 'drift' setting? Some of the temp controllers I am familiar with don't have a 'minimum cycle time' but do have a drift setting so it would let the smoker get X degrees below target, then heat to target rinse repeat to avoid the short cycling. Combined with the minimum run time you could establish a sort of 5 degree swing (drops 2-3 degrees low, runs until 2-3 degrees high) etc.  Other thought was why not just put a needle valve on the "Full On" line and have it heat a little slower forcing a longer run time? Only downside is slower back to temp after door opening and possibly lowering the max temp achievable (though I question that). So instead of "super low" to "maximum" you go from "super low" to "medium high" or some such.

Again, thanks for the parts list and getting it put together, this is very useful!
 
I came across this post and am interested in copying this. Did I miss something with this though, how do you keep the burner lit when the solenoid is closed? I’ve also been looking at a gas control valve stolen off a water heater.
 
Last edited:
SmokingMeatForums.com is reader supported and as an Amazon Associate, we may earn commissions from qualifying purchases.

Hot Threads

Clicky