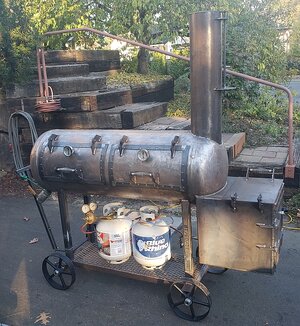
I have posted a few bits along the way but today I feel like I'm done enough to present my latest smoker build. By the way, I know you never know but for now I figure this is my last smoker build. Just had my 70th birthday party, and I expect this one to work for me for a long time. Here she is:

There isn't anything particularly novel or earth-shattering about my design. The only uncommon features are the propane burner in the firebox and the relatively enormous 8" diameter stack. The tank I started with is a beast. It was built as a vertical air tank by Westinghouse Air Brake in 1956, and the shell and headers are both 3/8" thick. There may be cooking advantages to a heavy wall tank like this, but it made things like drilling holes with hole saws into a misery. But the pain will soon recede. A good thing about it is the doors didn't move any when I completed the cuts. Not *any*. I didn't have to do any of the normal tweaking to get the doors to hang right after cutting them out.
Last time I built a smoker (blog is here: http://www.nwnative.us/Grant/shop articles/24x70).
This one shares many features and I built it using mostly the same techniques. So I'm not going to cover how I built things in detail in this post.
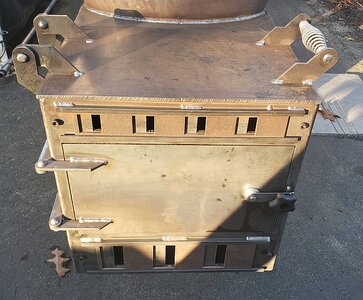
Let's start with the firebox. The tank is an 80 gallon tank, so I shot for a firebox about 1/3rd that volume. The ideal number is 6160 cubic inches. My design worked out to a volume of 6461. My firebox air inlet area according to the calculator I knew and trusted figures out to 19.38 square inches. My lower air inlet is 19.13 square inches. In compliance with current design practice, I added an upper row of air inlet holes which adds about another 7 square inches. Plenty of air inlet. The opening into the firebox calculates to 51.69 square inches; my actual cut opening is 54.61 square inches. Again, I used the calculations that were in common use back in 2010 when I built my previous smoker. That thing cooked awesome, so why mess with success? OK. This is what the firebox looks like:

It has both a front door and a top door. It's made from 1/4" plate, no insulation, single layer. I did the double-layer insulated firebox last time and although it was fun to design one that went together like a 3D puzzle, I don't think the result was worth the effort. I didn't reinforce the top door which I may have to do at some point in the future. I came up with a scheme to use rattail type insulation to seal the top door but in my first cook I didn't detect any smoke coming out so I didn't bother. The biggest unusual thing about my firebox is the 1/2" stainless Mikey burner installed in the back at the bottom. It is a very efficient forge burner which burns propane and is naturally aspirated. In use, I run the propane about 1/2 psi and the burner has a very pleasing deep roar, not very loud. At that input pressure I get reliable temps in the 225-250F range. It will easily go higher. Why use propane? Well, first of all I don't have to - my firebox will happily burn wood. I don't have a woodpile at present, and don't really have room for one. It's a lot easier to fill a propane bottle than to chop, haul, split, stack and store hardwood. For my first cook (a packer cut brisket and 3 racks of St. Louis cut ribs) I bought a 2 cubic foot bag of apple logs at the butcher shop and I still have some left over. Anyway, trust me, having propane is undoubtedly convenient. It lets me add more or less smoke while keeping the temperature where I want it. On the brisket cook I added wood the first few hours then let it cook overnight with propane. And I still got wonderful smoke ring, all that good stuff.
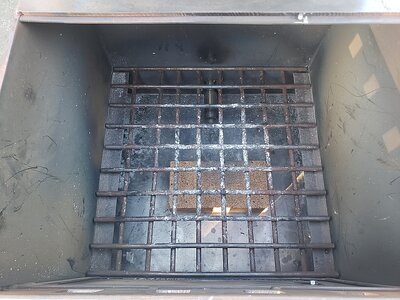
Here's another shot of the firebox:

You can see a firebrick set in front of the burner nozzle to spread the heat around.
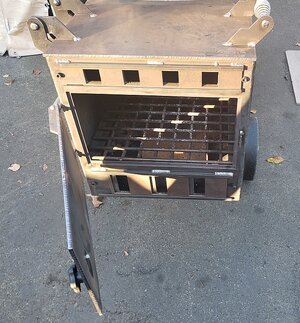
Here's one with the front door open:

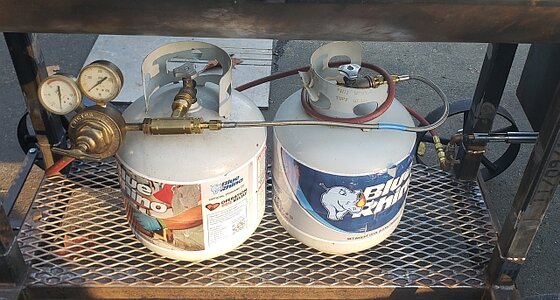
Moving on to the propane itself, here is my lower shelf with two BBQ bottles manifolded together to feed the burner, also visible.

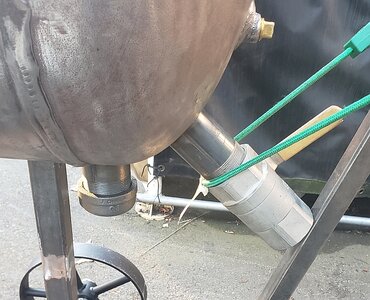
I once again made my reverse flow plate with 3 pieces. Two side plates lean down towards an angle iron grease trench that slopes down 1.5" over 50" and then empties into a 2" grease drain pipe. On my smoker, I have a 2" stainless ball valve which is open during cooking and not otherwise. Gotta keep the critters out. The other pipe I have on the bottom is for a washout drain. It's just a hole in the bottom right above a short 2" pipe nipple. When I'm pressure washing the inside of the cooker the effluent will run out that hole into a bucket set below. Here you can see those pipes:

Again I made my cooking grates so they are only 3/8" thick. There isn't as much room in a 20" diameter tank as there was in my previous 24" build, so I put one wide cooking grate right at centerline and put a slightly narrower one 3" below.

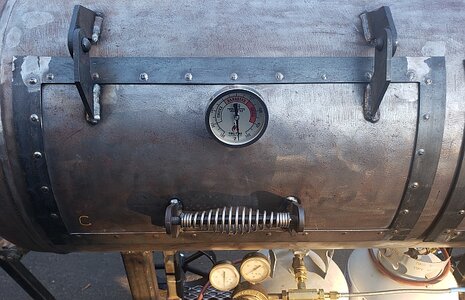
I didn't mention it, but (obviously) I haven't painted the smoker yet. Here is one of my cooker doors. You can see the strapping I put around the outside, the hinges and the 3" Tel-Tru BBQ thermometer.

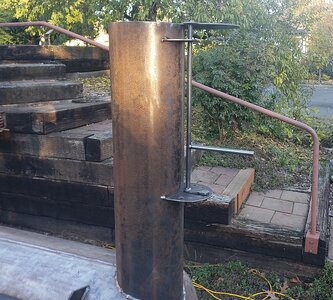
As I mentioned above, I built this cooker with a huge 8" diameter stack. When you are running propane, you always have your firebox vents wide open and you can control temps to some degree with the stack damper. Mine has 9 positions from full open to full closed. The stack is made from a 14 gauge tube. I used that because I had it. I saved it for years and when I built this I had forgotten it was 8" diameter. I thought it was 6" diameter. With the price of steel right now, even though a slightly smaller stack would look better I chose to use the big piece of tube just because I wouldn't have to buy a smaller one.

Anyway, for those who really like big stacks ("size matters!") they should really like mine.
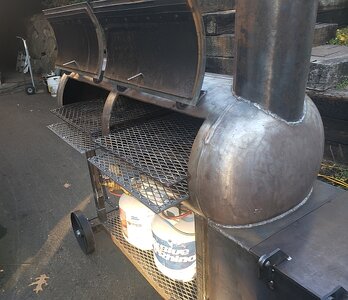
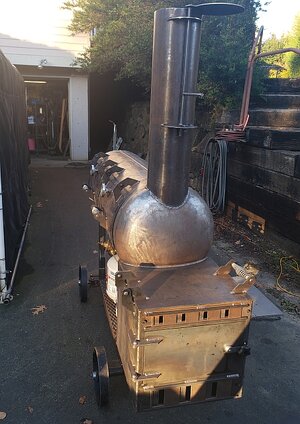
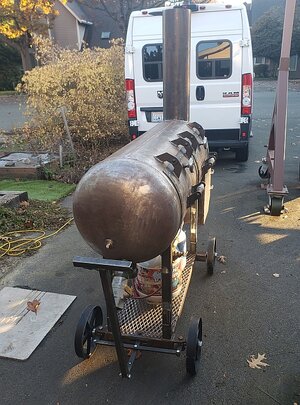
This is going on way too long. I'll leave you with a couple more pictures. This one is destined to be a backyard smoker. I like the way it looks, rolls and cooks. I'll probably paint it next summer and keep it inside until then. But we'll see.


Thanks for reading!
seattlepitboss
There isn't anything particularly novel or earth-shattering about my design. The only uncommon features are the propane burner in the firebox and the relatively enormous 8" diameter stack. The tank I started with is a beast. It was built as a vertical air tank by Westinghouse Air Brake in 1956, and the shell and headers are both 3/8" thick. There may be cooking advantages to a heavy wall tank like this, but it made things like drilling holes with hole saws into a misery. But the pain will soon recede. A good thing about it is the doors didn't move any when I completed the cuts. Not *any*. I didn't have to do any of the normal tweaking to get the doors to hang right after cutting them out.
Last time I built a smoker (blog is here: http://www.nwnative.us/Grant/shop articles/24x70).
This one shares many features and I built it using mostly the same techniques. So I'm not going to cover how I built things in detail in this post.
Let's start with the firebox. The tank is an 80 gallon tank, so I shot for a firebox about 1/3rd that volume. The ideal number is 6160 cubic inches. My design worked out to a volume of 6461. My firebox air inlet area according to the calculator I knew and trusted figures out to 19.38 square inches. My lower air inlet is 19.13 square inches. In compliance with current design practice, I added an upper row of air inlet holes which adds about another 7 square inches. Plenty of air inlet. The opening into the firebox calculates to 51.69 square inches; my actual cut opening is 54.61 square inches. Again, I used the calculations that were in common use back in 2010 when I built my previous smoker. That thing cooked awesome, so why mess with success? OK. This is what the firebox looks like:
It has both a front door and a top door. It's made from 1/4" plate, no insulation, single layer. I did the double-layer insulated firebox last time and although it was fun to design one that went together like a 3D puzzle, I don't think the result was worth the effort. I didn't reinforce the top door which I may have to do at some point in the future. I came up with a scheme to use rattail type insulation to seal the top door but in my first cook I didn't detect any smoke coming out so I didn't bother. The biggest unusual thing about my firebox is the 1/2" stainless Mikey burner installed in the back at the bottom. It is a very efficient forge burner which burns propane and is naturally aspirated. In use, I run the propane about 1/2 psi and the burner has a very pleasing deep roar, not very loud. At that input pressure I get reliable temps in the 225-250F range. It will easily go higher. Why use propane? Well, first of all I don't have to - my firebox will happily burn wood. I don't have a woodpile at present, and don't really have room for one. It's a lot easier to fill a propane bottle than to chop, haul, split, stack and store hardwood. For my first cook (a packer cut brisket and 3 racks of St. Louis cut ribs) I bought a 2 cubic foot bag of apple logs at the butcher shop and I still have some left over. Anyway, trust me, having propane is undoubtedly convenient. It lets me add more or less smoke while keeping the temperature where I want it. On the brisket cook I added wood the first few hours then let it cook overnight with propane. And I still got wonderful smoke ring, all that good stuff.
Here's another shot of the firebox:
You can see a firebrick set in front of the burner nozzle to spread the heat around.
Here's one with the front door open:
Moving on to the propane itself, here is my lower shelf with two BBQ bottles manifolded together to feed the burner, also visible.
I once again made my reverse flow plate with 3 pieces. Two side plates lean down towards an angle iron grease trench that slopes down 1.5" over 50" and then empties into a 2" grease drain pipe. On my smoker, I have a 2" stainless ball valve which is open during cooking and not otherwise. Gotta keep the critters out. The other pipe I have on the bottom is for a washout drain. It's just a hole in the bottom right above a short 2" pipe nipple. When I'm pressure washing the inside of the cooker the effluent will run out that hole into a bucket set below. Here you can see those pipes:
Again I made my cooking grates so they are only 3/8" thick. There isn't as much room in a 20" diameter tank as there was in my previous 24" build, so I put one wide cooking grate right at centerline and put a slightly narrower one 3" below.
I didn't mention it, but (obviously) I haven't painted the smoker yet. Here is one of my cooker doors. You can see the strapping I put around the outside, the hinges and the 3" Tel-Tru BBQ thermometer.
As I mentioned above, I built this cooker with a huge 8" diameter stack. When you are running propane, you always have your firebox vents wide open and you can control temps to some degree with the stack damper. Mine has 9 positions from full open to full closed. The stack is made from a 14 gauge tube. I used that because I had it. I saved it for years and when I built this I had forgotten it was 8" diameter. I thought it was 6" diameter. With the price of steel right now, even though a slightly smaller stack would look better I chose to use the big piece of tube just because I wouldn't have to buy a smaller one.
Anyway, for those who really like big stacks ("size matters!") they should really like mine.
This is going on way too long. I'll leave you with a couple more pictures. This one is destined to be a backyard smoker. I like the way it looks, rolls and cooks. I'll probably paint it next summer and keep it inside until then. But we'll see.
Thanks for reading!
seattlepitboss


