Masterbuilt 30" Smoker no longer heating.

  • Some of the links on this forum allow SMF, at no cost to you, to earn a small commission when you click through and make a purchase. Let me know if you have any questions about this.
SMF is reader-supported. When you buy through links on our site, we may earn an affiliate commission.
Thanks! I'm ok with tech and don't mind a project, and I have RaspberryPi 3 that is sitting unused currently. Plus the price on the HM is decent as well. I don't need the blower do i? Would I need the thermocouple parts? Is there any way to use the existing temp sensor mounted in the smoker that the original/stock controller used?

Also, what size screws do I need to replace the back panel after drilling out the rivets. The ones I just bought are a bit too large.

I got you covered with all the info you need:

  • #12 - 1" self tapping Sheet Metal Screws/Fastener to refasten circuit board panel back on after rivets are removed. 3/4" long may also be good for this one panel but MAY be a little short. I used 3/4" because that is what I used when pulled the back off my MES
Here is my post on my HM controller creation and all the parts and info u need. In the end u wont save any money over the Auber and if i were to do it all over again I would change a number of things like not going with any of the outlets or rocker switches and using a much different fuse holder, etc. etc. etc. Talk to me about lessons learned if u wanna take on the HM after reading this.
OH also use a 3amp plug or better as the ones listed in the HM specs are not capable of supplying enough power for the HM in the end... took me a while to figure that one out.

 
Just purchased the Auber controller!

Nice!!! If you still have everything pulled apart you may as well replace all the connectors with the hi temp stainless steel ones and get it over with. Will save you trouble later when the factory ones corrode away on u. At that point with rewire, Auber, and new connectors the only thing stopping your smoker from running is something like it getting hit by a car :P
 
Great! What rewiring should I do while I have it apart? Picking up some high heat connectors, screws, and some high heat gasket maker to help keep moisture out.
 
...replace all the connectors with the hi temp stainless steel ones...
Dunno. Stainless steel is a poor thermal and electrical conductor. A quality nickel- or silver-plated brass connector is pretty hard to beat. Stainless steel hardware can be used for clamping force alone, where this force is applied to tinned copper or Ni-plated brass connections, but even there I'd say chromate-over-zinc-coated steel is more common, even when "cost is no object".
 
  • Like
Reactions: dr k
Dunno. Stainless steel is a poor thermal and electrical conductor. A quality nickel- or silver-plated brass connector is pretty hard to beat. Stainless steel hardware can be used for clamping force alone, where this force is applied to tinned copper or Ni-plated brass connections, but even there I'd say chromate-over-zinc-coated steel is more common, even when "cost is no object".

Any quality connector that can withstand humidity and or potential moisture situations well will work. Stainless still just fits the bill there well so that is why I mention it.

I'm all for any quality connectors that will stand up to the conditions and do the job better than stainless steel :)
 
Dunno. Stainless steel is a poor thermal and electrical conductor. A quality nickel- or silver-plated brass connector is pretty hard to beat. Stainless steel hardware can be used for clamping force alone, where this force is applied to tinned copper or Ni-plated brass connections, but even there I'd say chromate-over-zinc-coated steel is more common, even when "cost is no object".
I believe supco lugs we have are nickle plated steel (I used T1113.) Mine aren't crimpable horizontal barrels so I used very old 50's or so 100% tin resin core solder. At least no aluminum oxide corrosion vs. the OEM lugs,
 
Ryan, thanks.

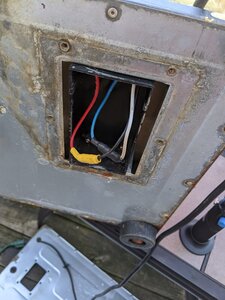
Placed it on a table and found that panel is actually screwed on on mine. Opened it up and came across this sight (note red was barely hanging on, it had corroded away. Black was still firmly attached. Unsure where to go from here besides clean the terminals, attach hi-temp spades and pray that works?

View attachment 453936View attachment 453937


Yup---That's usually what goes first, if anything goes on an MES.
I see you have some Great help already.

Bear
 
supco lugs...I used T1113
I checked 'em out. The product pdf's don't tell you much of anything technically, but the pictures are hi-rez and I was impressed with the metal thickness (for retention force and contact pressure) and general quality of all their connectors and terminals.

Of course without published specs, they could start selling the crummiest import parts under those same part numbers. With just 141 employees (per Dun & Bradstreet) it's not like Supco is making these themselves (but are distributing someone else's products).

I think the bottom line is water and electricity don't mix. Line voltage installations have to be well-sealed or clearly labeled as not for outdoor use. Most connectors show a good degree of metallurgical development. If you open something up and see rusted transformer plates and broken-off connectors, it's not the fault of the connectors but of the waterproofing of the panel. Be thankful you didn't get electrocuted. If you fix the waterproofing problem, most connectors you use as replacements will get the job done safely.
 
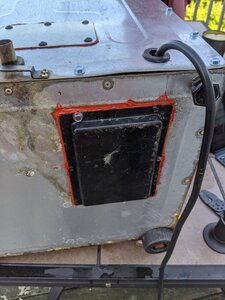
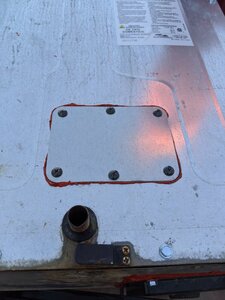
Rewired the smoker today and sealed the bottom panel as well as the heat element panel with high heat silicon gasket maker. Also got rid of the old circuit board and the extra wires since theyre about useless now. Used butt connectors and heat shrink tubing. Now I wait for the new PID controller!

IMG_20200719_170858.jpg IMG_20200719_173257.jpg IMG_20200719_173300.jpg
 
Last edited:
  • Like
Reactions: bill1
B9C6128D-5DD9-4246-9EFF-CB20EECF920F.jpeg
C5AF246C-BCF2-475E-9B8D-68728DE57366.jpeg

I’m currently trying out a prototype to fix your current problem(assuming your heating element still works). PM me and I’ll give you the guys info. His PID is an inexpensive way to fix your smoker if you’re interested.
 
Rewired the smoker today and sealed the bottom panel as well as the heat element panel with high heat silicon gasket maker. Also got rid of the old circuit board and the extra wires since theyre about useless now. Used butt connectors and heat shrink tubing. Now I wait for the new PID controller!

View attachment 454781View attachment 454780View attachment 454779

Nice! that's the rewire job that matters.
If you can replace the connectors at the safety rollout limit switch that will be good. If you can cut a panel for it that will also save you some pain later. I have a dremel and cut a square and then covered with a piece of scrap metal that I screwed on with the same sheet metal screws. I have had to open it numerious times as my replacement switches like to fail on me haha.
 
tallbm tallbm my Auber controller came in today. Any configuration I need to do to it? Like configuring the Proportional,Integral,Derivative,Control Cycle Time?
 
Like configuring the Proportional,Integral,Derivative,Control Cycle Time?
Hook it up and choose a set temp say 200 . See how it runs . How long it takes to get to temp , and at what point it starts " walking in " to that temp . You can run auto tune , but that was useless for me . Made it worse . Just see how it does out of the box , then we can adjust . I adjusted mine , but some guys run it as on / off , which works just fine also . In that case P would have a value , I would be 0 , D would be 0 . Take notes along the way .
 
  • Like
Reactions: tallbm
tallbm tallbm my Auber controller came in today. Any configuration I need to do to it? Like configuring the Proportional,Integral,Derivative,Control Cycle Time?

I think chopsaw chopsaw has u covered here.
I ran autotune with a bunch of foil pans and crap in mine and it did the trick for me but I'm sure we can help u along if it doesnt work well out of the box.
Write down the original numbres and then if it isn't doing so well we can help you play with it and no matter what it should be better than the stock MES anyow unless it is just way off hahahah.

Just know that randomly trying numbers is not going to help at all so some educated adjustments are best and we can help u with that haha.
 
  • Like
Reactions: chopsaw
tallbm tallbm my Auber controller came in today. Any configuration I need to do to it? Like configuring the Proportional,Integral,Derivative,Control Cycle Time?
I have the Auber WS1510ELPM. If P=0 regardless of the I and D values it's in on/off mode like the stock Mes controller. If I=0 and D=0 and P is 1 or higher, then your in P mode and that is how many degrees below your set temp when heating that the controller is in full output before it comes out of full power and starts flashing 120vac on and off. I do P mode but I have a Mes 40. I'm almost always at P=1, I=0 and D=0 cooking at 275° with ribs, butts and briskets. Sometimes I just change the P value to 2 or 3 for fish or sausaged starting at 150, then 160 etc but I seem to go back to P=1. I do single step mode so no minutes to enter.

In the instructions with P mode if P=7 then 7 degrees below set temp it's 7/7= 1=100% full power, then 6 degrees below set temp is 6/7 = flashing for 86% output, then 5/7=71% down to 1/7=14% ,then set temp is 0/7=0=off to come in for a landing at set temp. But when temp drops to one degree below set temp it's only flashing 1/7=14% which may not be enough output so it quickly drops another degree and another and another. That's why I do P=1. It appears to be on/off mode but even though the resolution is in 1° increments one degree below set point P=1 =1/1=full on power and then one half degree below set temp .5/1 flashes 50% output for the maximum output one half degree below set temp to drop only a couple degrees from set temp. So I'm at 100% output, 50% or off. On the way up to set temp you'll cruise past the set temp several degrees on preheating an empty smoker but not with food and cooking at 275°. It's the cooling below set temp that I want to eliminate by getting the fastest reaction with a low P value. If your in PID mode with value 1 or higher in the three areas and using out of the box settings or autotune and flashing 25 degrees below set temp It'l take forever to get there which was my problem with the out of the box setting and autotuning. The P mode is the fastest mode to cruise right up to your set point and settle in to a couple of degrees within set temp after a few cycles. This is based on an Mes 40 at higher temps and the rate at which hot air leaving the top vent is replaced with cool incoming air. A masterbuilt analog smoker with just a 3/4" vent hole like Smokin it smokers maybe best with full PID mode. To run analog rice cookers, slow cookers for Sous Vide or to make yogurt Auber sent me a chart to set in PD mode P=4, I=0 and D=40 for no over shoot and holds to the degree.
 
  • Like
Reactions: tallbm
dr k dr k thanks for clearing that up . Been awhile since I've looked at any of it . Its really pretty easy to set up once you understand what controls what .
 
SmokingMeatForums.com is reader supported and as an Amazon Associate, we may earn commissions from qualifying purchases.

Hot Threads

Clicky