Grilling Pizza

  • Some of the links on this forum allow SMF, at no cost to you, to earn a small commission when you click through and make a purchase. Let me know if you have any questions about this.
SMF is reader-supported. When you buy through links on our site, we may earn an affiliate commission.

bigwayne

Smoke Blower
Original poster
Jul 29, 2008
109
47
SF Bay area
Between deltadude posting about this and some info from a friend that has one of those wood fired pizza ovens, I had to give this a try. I thought about buying one of the kits for cooking pizza on a grill (http://2stonepizzagrill.com/) or making something out of a steel drum or something.

In any event, I knew I would need a stone of some kind, so I headed down to the local tile shop and got a 18" travertine tile as a sample.
After a few days mulling it over, I figured I would try to use cast iron pot lids for the top side of the oven.

Used an overnight rise method a friend of mine uses and had enough dough to do 8 little pizzas. Invited the neighbors over for experiment time.

Got a big travertine tile sample and set the grill up. Pot lid is from my big whopping cast iron dutch oven.

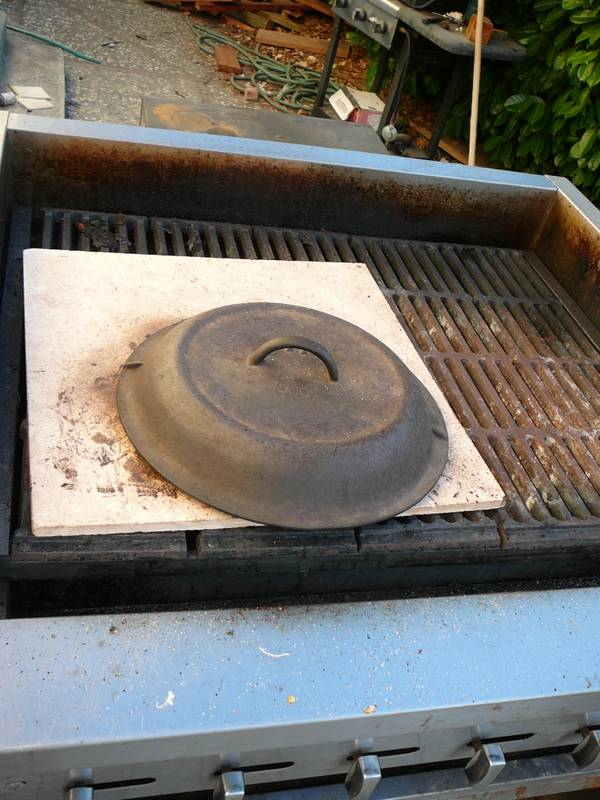
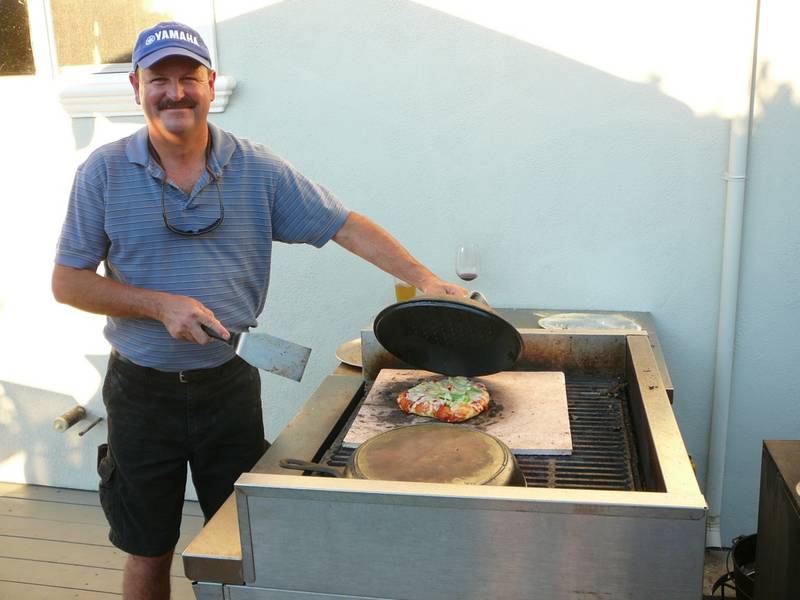
I set the tile on one side of the grill with the pot lid on the other. Grill is cranked up to full 120,000 BTU. I put a thermometer on this grill and it wrapped around the max dial of 550. Not sure how hot it is, but I'm guessing at least 700 degrees. This pic is after we did a couple already and the neighbor is taking over for a couple while I take pics.

setup.jpg


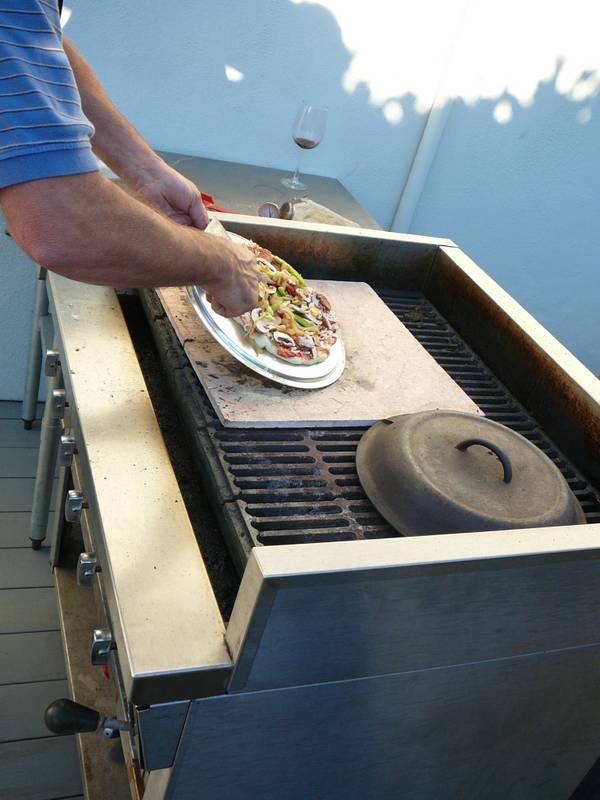
Don't have a fancy pizza peel so I got some el cheapo pizza pans at the dollar store. We put a bunch of cornmeal on the back of the pans and built the pizzas on them. Here is the neighbor loading another one on the "stone."

loading1.jpg


After we loaded the pizzas onto the stone tile, we slapped the prehated pot lid over the pizza to get heat onto it from above and below.

cooking.jpg


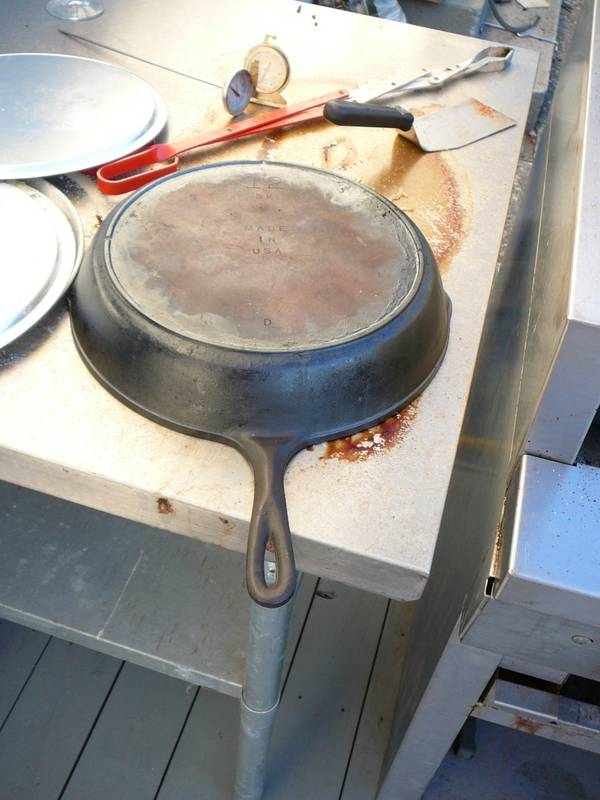
The crusts were cooking faster than the tops, so we added a finishing stage on the counter with a preheated cast iron skillet over the top to try to finish cooking the tops.

finishing.jpg


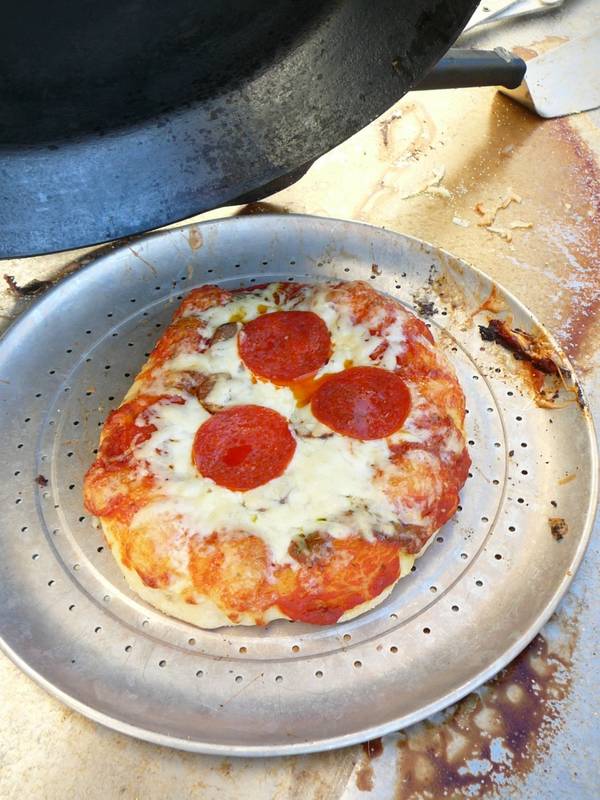
One of the finished products....
tada.jpg


And finally, the neighbor with the next round on the grill.

nextround.jpg


Some of the best pizza I have had and didn't heat up the house. The cooking process worked well. Figured out a little bit about how we should form the pizzas and what toppings work and which ones don't. Will be better next time.
 
I won't take the credit for this, because I picked it up from my younger brother (not Seboke, sorry Ken), then tried it myself.

If you have a grocery store that bakes their own pizzas, you should be able to get some pizza dough balls. Might as well get your toppings, whatever they may be, while you are there. I honestly can't remember, but I think the dough we got had to be divided in half to make a decent sized pizza.

Roll out the dough thin, then throw it right on the grates. It needs to be tended to constantly, because it will burn in no time. Cook it to a nice brown and remove it. Flip it cooked side up. The uncooked side will have dried enough that you don't have to worry about it sticking.

Now, brush on some olive oil to cover it, put toppings to your liking on it, then throw it back on the grill. Again, it must be tended constantly to avoid burning. While the whole process will only take 5-6 minutes per pizza, the heat will be more than enough to melt cheese and/or heat the toppings. It will not, unfortunately, actually cook any meat, so make sure you precook your meat before you start cooking the pizzas.

If you don't burn it to a shriveled black burned mass, you will have one of the best tasting, crispy, thin crust pizzas you have ever had.
 
Congrats bass3859 on the quest for great bbq pizza. The learning curve for great bbq pizza is as big as it is for great smoked bbq, but that is the fun and the challenge.

Thanks BigWayne for the mention!

Looking at your grill (no grill cover) you have a big challenge since all the generated heat is escaping. However the cast iron idea is sound.

I had a similar problem the crust cooking too fast, and had to go to a two stage solution. 1st I elevated the stone 2.5 inch above the grill with a old heavy duty aluminum wok ring. ( you may need less or more height.) Also I found I had to rotate the pizza every 1.5 to 2 minutes and that helped a lot to stop burning the bottom crust. The initial turn was at about 2 minutes. 2nd stage depends the amount of toppings and cheese. A pizza with less cheese and toppings, the top cooked almost at the same rate as the crust. A pizza loaded with cheese and toppings (the way our family likes) required me after crust almost cooked (about 4 or 5 minutes) to remove the pie to a tin pizza pan and return pan to stone on bbq and cook an additional 2 or 3 minutes.

Your pizza looks yum, especially the one on the stone with your neighbor.

How did it taste? I think you answered that.

How about the crust were you happy? Was the bottom crisp enough? How about the crust sides and top edge?

A couple of things you might try. Use the cast iron skillet as the cover, more radiant heat inside. 1st try it completely covering pizza. Then try it with one side propped up about 1/2" so you can get some hot convection air, which should help crisp both the toppings and the sides of the crust.

The challenge as you know is to get both bottom crust and toppings cooked at same rate if possible. I have read where others with a grill similar to yours, went to fireplace supply and bought fire brick and put the brick on 3 sides and covered with another pizza stone or tile.

Great Job though, and you are a lot braver than me, inviting neighbors to a trial run....
PDT_Armataz_01_06.gif
 
For bass3859
here are my earlier posts on pizza, sort of redundant reading.
post 1, post 2, post 3.

Last night I did a batch of 4 pizzas, no real changes from earlier procedures and setups. SORRY no pictures, the boys grabbed the first two pizzas and they were half consumed before I could even get a bite. The last two pizzas were cooked for eating tonight and later. However they were not a good representation of how good a job the Weber Kettle can cook pizza if setup correctly.

I used WinCo pre-made (not frozen) dough. The problem with elasticity and the Trader Joes dough, wasn't a problem with the WinCo dough. I had no problem shaping the dough this time.
Here is a good video on shaping pizza.

I will tell you that we had one of the pizzas warmed up tonight, Excellent, especially with an ice-cold Sangria! The pizza "already cooked on the Weber Sunday" was placed in non-preheated oven set to 500 deg for 5 minutes. I had used two large chunks of hickory in aluminum foil when I cooked the pizza on the kettle. The smoky flavor really came through.

...
 
Now that sounds interesting. Will have to get a real peel for that I think.

Even my mistakes are at least edible for people that have a good attitude. Besides, I like working under pressure.
 
deltadude;249737 said:
For bass3859

I used WinCo pre-made (not frozen) dough. The problem with elasticity and the Trader Joes dough, wasn't a problem with the WinCo dough. I had no problem shaping the dough this time.
Here is a good video on shaping pizza.

why pay 2.99 or more for something that takes .03 cents of ingredients. Thsi dough recipe has been perfected for 10 years.

2.5 C. high Glutin or bread flour
1 T active dry yeast
1 T . salt
1 T. sugar

1.25 C. hot tap water.

in the Kitchen aide:
mix flour yeast sugar and salt, all dry.

add water and mix on med-lo until a dough forms.

dunp out on floured surface and work into a ball, no kneading yet, put the kitchen aide bowl over it and let it rest 15 o 20 minutes.

next put it back in the bowl and mix at med-hi for 15 to 18 minutes, then dump it back onto the table, and form it into 2 balls. cover and let rise 10 minutes.

form a 12 pizza, and go to it. This is a quick dough, my slogan "from cold oven to hot pizza in less than a hour"

Enjoy!
 
Thanks for the pizza dough recipe "chef", I will be making my own dough soon.
The WinCo dough was $1.39, the Trader Joes dough is less money. I live almost across the street from a TJs so if I want to make 4 pizzas in less than 10 minutes I have 4 fully fermented balls of dough, ok it cost me almost $5.00. My wife happened to be at WinCo and asked me if I wanted to try their dough.

My focus right now is cooking the pizza to perfection on my kettle. I'm getting closer each cook. Then I will move my focus to preparing the dough. From my reading several factors in the dough recipe are influenced by the temperatures the pizza is cooked, thus the finished product. I'm trying to develop my kettle procedures to produce consistent temperatures, and achieve the desired product, where both the crust and toppings are cooked at same time, and the taste has the wood fired pizza oven taste.
 
All of the grilled piza discussion helped decide our dinner.

I slowed myself up and looked at my process closely so I can describe for the shared knowledge.

I bult a nice even red coal bed about 2" thick
I lowered the coal bed toit's lowest position, aprox 18" below my stones.
I use two stones stacked on each other to make it thicker so it stays hot more evenly when the cold (room temp) pizza fixins hit it.

use as little cornmeal as possible to move the pizza on the pizza peel.

This is the key part:

Leave the lid closed and let everytghing get hot for at least 30 minutes. you want every nut bolt and nook hot the whole way through. when I have the pizza ready I have the wife stand by to operate the lid.

Open - Pizza in - close the lid. I try to do it in less than two seconds. You need all of that good hot air to stay in the smoker. bake for 6 to 8 minutes.

when I worked in a woodfire pizza retuarant, it always amazed me on the extreme temps they used. and a coal fire oven is even hotter!

but last nights pizza was great. It was too dark for good outside pics, I will do a day time pizza and post those pics when I do.
cheers!
 
Around here they have Papa Murphy's take and bake pizza places. We picked up one the other night, told them we were going to grill it, so it came with an aluminum pizza pan in addition to their normal paper pizza pan. We have a larger sized square grill, so I put unlit coals all around the edge, heated some coals red hot in the charcoal chimney and sprinkled them all around on the unlit ones. Once the grill got up to 400*, we put the pizza on (with the lid closed). I turned it every 5 minutes until it was done (about 25 minutes) It was great. We plan on trying one soon using our pizza stone and homemade dough/pizza. I also plan to attempt some on the smoker, sans wood, just to see how they turn out. If can can cook a cherry pie in my offset, surely I can cook a pizza.
 
grilled pizza is one of my faves!
i do it the way steven raichlen recommends in one of his books...i usually get the dough from a local pizza place, stretch it out to the size/shape i want, brush one side with OO and grill till golden brown. flip it, oil it, and add toppings in reverse, cheese first, sauce/tomatoes, anything else...at this point the dough should be on a cooler part of the grill so the crust doesn't burn...then grill till done! it comes extra yummy over charcoal...don't forget fresh basil and parmesan cheese and lots of cold beer...mmmm! next time i grill one i'll q-view...

PS: that is a great source for a pizza stone! i never thought of using tile...
 
Great.... my wife is already convinved that she no longer needs an oven..and now I have to keeo the fact that I can now cook pizzas on the grill from her as well.... maybe I should surrender while I am ahead and just push for all the "Grillin" toys she will allow.
biggrin.gif
 
I've had my best luck using a perforated ceramic coated grill topper. Brown it some, add toppings, and then keep away from direct heat with the lid closed.
 
I've had great success smokin pizza on my gas grill. I bought a pizza pan from Lowes that is full of holes. Oil it up... put my dough and toppings on it and lay it on one side of the grill that is on the lowest temp. I fire up the other side of the grill on high and put my smokin box filled with chips in it. I get the smoke goin before I put the pizza on and close the lid. They turn out excellent like this using a mild wood for flavor. This one was smoked with apple wood. I had a thread on this pizza before the crash. One of my favorites.


n1046423994_30161896_6070.jpg
 
For grilled pizza I run the grill as hot as possible. This is a must, because every time you open the grill you're losing lots of heat.

I oil (EVOO) one side of the spread dough, and put it right on the grates. It cooks for a minute or so. I then oil the topside, and flip it onto the grates for another half-minute. This generates a crispy crust.

Then I put it on the pizza stone, and pile on the toppings. Cook until the cheese is at the proper consistency.
 
Great write up. I've been making home made pizza for years and one day w/ a good friend over (before i had found this site) we said why can't we put it on my smoker. The 1st attempt was still amazing b/c of the different flavors but wasn't the same as one I do in the oven.

Thank you chef_boy812 for the recipe. I've been making my own breads for years and away like to try new recipes.

I took photos of the last pizza i did in the oven. maybe i'll smoke one and do a qview and write up b/c i do things differently, not that there right but different.

The biggest thing that i have found in experimenting with smoking my pizzas is that the smoke box needs to be hot! the best pizza in NYC is cooked at 550 and up! i find that i get a good crust in my oven at 450 (mainly b/c i dont think it would be safer at a higher temp.) I try and keep my smoker at 350-400 by using a mix of wood logs for the smoke and hardlump charcoal.
 
SmokingMeatForums.com is reader supported and as an Amazon Associate, we may earn commissions from qualifying purchases.

Latest posts

Hot Threads

Clicky