Smoke Hollow PID mod

  • Some of the links on this forum allow SMF, at no cost to you, to earn a small commission when you click through and make a purchase. Let me know if you have any questions about this.
SMF is reader-supported. When you buy through links on our site, we may earn an affiliate commission.

BenCarlson

Smoke Blower
Original poster
Jan 27, 2019
78
100
Gentlemen,

I recently came into possession of a Smoke Hollow electric smoker for our favorite price of $Free.99. I know absolutely nothing about this unit as I've never used it or any other electric smoker but when given the opportunity at a free smoking rig, well, you don't leave the drugs near the junkies! Anyhow, before messing with it I figured I would stop in here and snoop around to see what the fashionable mods were with these type of units. I read through the long thread about the easy Auber PID mod for the MES and was curious if I could do the same to this unit, as I didn't see any mention of Smoke Hollow in that thread.

I didn't think about the smoker until I got to work so I don't have any pictures of said smoker on my phone at the moment but it appears that this is a pretty close replica:


Either way, I can use this unit as another cabinet for smoking cheese if the PID mod can't be done or isn't worth the hassle. Appreciate y'all taking the time to read this!
 
If it was a new to me smoker first thing I’d do is fire it up empty and see how it performs. Once it’s running and smoking you should have an idea what modifications you will need/want to do. Use a digital thermometer to verify your cabinet temperatures vs. with your set temperature. You mention a PID, definitely worth it if you need accurate temperature control or temperatures that are lower than the minimum factory setting. If you only plan on hot smoking food them IMHO you don’t need a PID, if you want to do sausage or cold smoke food in sub freezing temperatures than you will need a PID. As far as rewiring for a PID the theory behind the MES rewire should be the same or very similar as your Smoke Hollow, you’ll have to figure out which wires to tap into. If your not comfortable with electrical circuits you could always consult with an electrician.
 
  • Like
Reactions: bill1 and tallbm
So my use for this would be primarily sausages and cold smoking. I have an offset for hot smoking. I just didn't wanna order a $150 PID and start opening up the innards of the unit before i consulted folks who would know. I have my offset configured to do sausage but I'd like to have a backup rig in a pinch. If you guys say it can be done, I'll order a PID at work tonight!
 
Just to be clear, I said it could be done, I just don’t know how easily. Anything can be rewired if you have the knowledge. What I would suggest is you open all the inspection hatches and have a look, take pictures and post with questions if your not sure. I’m GUESSING you will be looking for two circuits, one will be a low voltage that the controller works on and the other circuit will be a 120 volt circuit that will be connected to the heating element. I would ASSUME that the 120 volt circuit will be 14 gauge wire and the low voltage circuit will be a thinner wire, perhaps a 16-18 gauge wire.
 
So my use for this would be primarily sausages and cold smoking. I have an offset for hot smoking. I just didn't wanna order a $150 PID and start opening up the innards of the unit before i consulted folks who would know. I have my offset configured to do sausage but I'd like to have a backup rig in a pinch. If you guys say it can be done, I'll order a PID at work tonight!

Hi there and welcome!

Murry has been giving your fantastic info.
You will be able to rewire that sucker to use with a PID controller, but as Murray stated its a matter of how much poking around you want to do in the unit.

The most brute force approach is to disconnect the plug of the unit.
Drill a new hole where the heating element is and put a reliefe grommet there.
Run the cable through the grommet and hole and tighten the grommet down on the cable.
Then reconnect the hot and neutral to the heating element and the ground to the ground wire (provided it was grounded there at the element).

A more elegent but more time consuming approach is to trace the wires from the plug as they run through the current wiring. Once you know what the wires are and where they run you simply cut out the controller board and splice the plug wires to the other wires that already run to the heating element (hot and neutral) and splice the ground wire if necessary.
This is what the simple MES rewire does.

Either way you can rewire this sucker so that it works with a PID controller :)

I hope this info helps! :)
 
I modified a Smoke hollow and am very please with it. I did a mailbox mod and that made a huge difference. The element/ power cord eventually burnt up. I put in a PID controller. Built a heater meter PID. This thing is rock solid temp wise. I mainly use it for sausage and jerky.

RG

 
  • Like
Reactions: tallbm
Thanks everyone! I definitely have to make this a priority. I already have A pellet tray. Just gotta figure out the wiring
 
Thanks everyone! I definitely have to make this a priority. I already have A pellet tray. Just gotta figure out the wiring

You can check my rewire thread here to get an idea of what you may encounter.
No matter the differences you basically will follow the cord's wires to a controller board. Cut them at the board.
Find the wires that go from the board to the heating element and cut them at the board.
Splice/wirenut the proper 4 ends to make 2 whole wires and the cord will then feed power to the heating element bypassing all of the smoker's electronics. Now it is ready to be plugged into a pid and the pid into the wall :)

See my rewire post here:
 
Alright so I am finally getting around to this project. Can't believe it's taken this long.

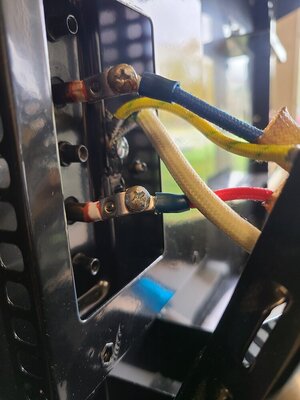
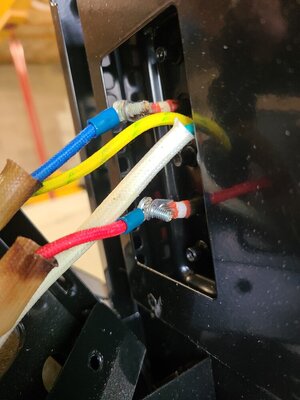
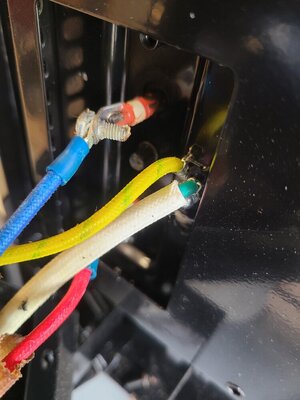
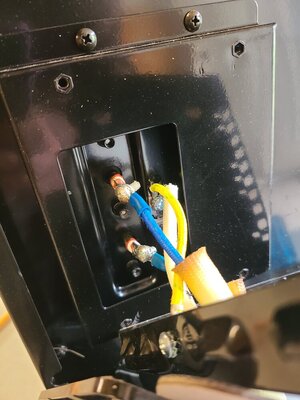
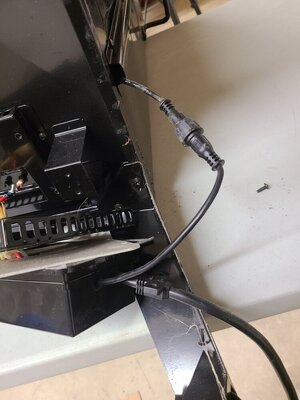
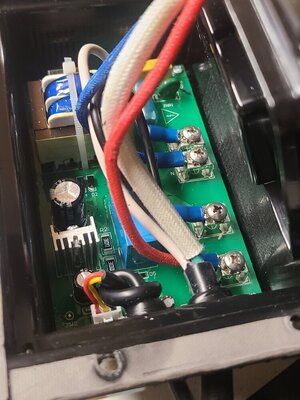
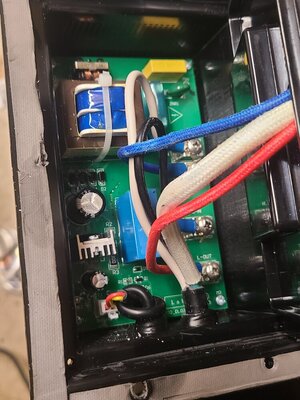
Anyhow, I took off the cover at the bottom and this is what I have. I was hoping It was just going to be similar to what Tallbm has in his very well done guide, but alas, it is not.

So if anyone could offer me a path forward, I'd be greatly appreciative. Thanks guys!
 

Attachments

  • 20221025_151255.jpg
    20221025_151255.jpg
    100 KB · Views: 20
  • 20221025_151236.jpg
    20221025_151236.jpg
    108.7 KB · Views: 18
  • 20221025_151232.jpg
    20221025_151232.jpg
    103.5 KB · Views: 18
  • 20221025_151219.jpg
    20221025_151219.jpg
    113 KB · Views: 18
Alright so I am finally getting around to this project. Can't believe it's taken this long.

Anyhow, I took off the cover at the bottom and this is what I have. I was hoping It was just going to be similar to what Tallbm has in his very well done guide, but alas, it is not.

So if anyone could offer me a path forward, I'd be greatly appreciative. Thanks guys!
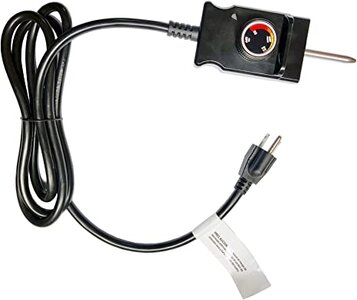
Is your Smoke Hollow an analog smoker?
The analog smokers have a cord that looks something like this:
61XSmZC4iJL._AC_SX466_.jpg

If so then you don't have to rewire at all. You simply turn the cord on full blast so it lets all the power straight through to the heating element and you plug the cord into the Auber PID. As long as the Auber PID is set below the max cord temp then you will have no interference by the cord trying to control temps when the Auber is doing it :)
 
  • Like
Reactions: clifish
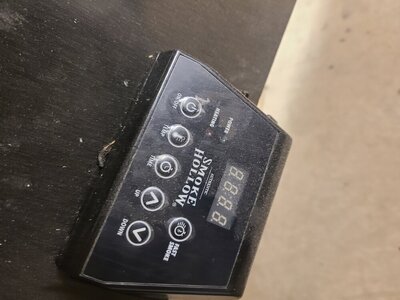
So it is a digital smoker. I took some additional photos to see if that would help give you more information. I honestly didn't think it would be different so I apologize for that
 

Attachments

  • 20221025_182738.jpg
    20221025_182738.jpg
    105.9 KB · Views: 27
  • 20221025_182837.jpg
    20221025_182837.jpg
    102.6 KB · Views: 27
So it is a digital smoker. I took some additional photos to see if that would help give you more information. I honestly didn't think it would be different so I apologize for that
That is starting to help a little.

The Red and Blue wires are going to the heating element.
If you follow the Red and Blue from the element where do they go next?

We are missing that picture (my guess is a circuit board). Can you follow the wire and take pics of it?

The yellow and green are ground. I bet the solid green goes to the power plug that plugs into the wall.
 
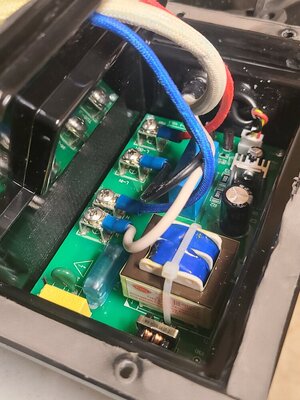
Looks like you were correct. There was a compound covering the small screws so I didn't see them initially. Nice call
 

Attachments

  • 20221025_185317.jpg
    20221025_185317.jpg
    140.2 KB · Views: 25
  • 20221025_185325.jpg
    20221025_185325.jpg
    129.9 KB · Views: 22
  • 20221025_185332.jpg
    20221025_185332.jpg
    142.9 KB · Views: 22
Alright so I am finally getting around to this project. Can't believe it's taken this long.

Anyhow, I took off the cover at the bottom and this is what I have. I was hoping It was just going to be similar to what Tallbm has in his very well done guide, but alas, it is not.

So if anyone could offer me a path forward, I'd be greatly appreciative. Thanks guys!
You need to replace/clean the bolt on blue wire and shine up the connection before it loses contact, builds resistance and burns up. The red looks good.
 
Is your Smoke Hollow an analog smoker?
The analog smokers have a cord that looks something like this:
View attachment 646970

If so then you don't have to rewire at all. You simply turn the cord on full blast so it lets all the power straight through to the heating element and you plug the cord into the Auber PID. As long as the Auber PID is set below the max cord temp then you will have no interference by the cord trying to control temps when the Auber is doing it :)
I will step out of this discussion, mine looks like the above. You are in good hands here, best of luck and post up some cooks when you are ready. We love pics and descriptions...lol
 
Looks like you were correct. There was a compound covering the small screws so I didn't see them initially. Nice call
Nice pics, this is clearing things up big time.

At the circuit board you will want to unscrew the red, blue, white, and black ends.

Do you have a multimeter? If so you can confirm what I am saying should be correct.

This SHOULD be the rewire for your setup.
  • Connect Black smooth end to Blue end (can likely just screw and nut them together and wrap in electrical tape to insulate them. Or cut the connector ends off and wire nut them together and wrap with electrical tape.
  • Connect White smooth end to Red end (same way as you do with other wires)
How to Test:
  • Disconnect Blue wire end at heating element
  • Disconnect Red wire end at heating element
  • Use a Multimeter on the Continuity setting and touch 1 prong of the plug with one multimeter lead and at the same time then touch blue wire end with the OTHER multimeter lead and see if the multimeter beeps.
    • If it doesn't beep then switch the lead off the Blue wire end and so you touch the Red wire end and it should beep. If it doesn't beep in either case then the wire ends do not ever connect and that means the rewire is not exactly correct and there is something in between that has to be figured out
  • Once you get a beep, switch Multimeter lead one to the other flat prong on the plug and switch the Multimeter lead too from the Blue wire end to the Red wire end and it should beep

If you get beeps while doing this then your rewire worked and your plug is feeding directly to your heating element.
Reconnect the blue and red wires to your heating element and plug in and it should straight heat up BUT DO NOT LEAVE IT PLUGGED IN!!!

It is now dumb and will heat up until it it melts down if you leaved it plugged in the wall. In the future you plug into the PID and the PID is plugged into the wall.
The PID will then cut power on/off to the plug/heating element until it hits the set temp. You should have the PID temp probe inside the smoker too or else you will burn down your smoker haha :D
 
Alright finally got to this over the weekend and everything went as planned! Thanks to everyone for all of the help and advice!
 
SmokingMeatForums.com is reader supported and as an Amazon Associate, we may earn commissions from qualifying purchases.

Latest posts

Hot Threads

Clicky