As I am pressed for time to get the cold smoker setup for the bacon that will be done curing next week... I've searched high and low for info on modifying a CCSV for cold smoking. I've found a bunch of ideas and have tried to meld most of them together with this attempt at making the CCSV a functional cold smoker as well as an excellent hot smoker...
I was excited to try the A-Maze-N last week, but it just smelled like a campfire inside the smoker and even when burning outside of the smoker it smelled the similar... Maybe I got some bad pellets, or was doing something wrong in the 3 or so attempts. It sure didn't smell like what my smoker normally smells like with that pellet adapter. Ah-ha! mailbox mod I thought to clean up the smoke and make it run cooler... and after a few questions maybe increase the smoke's flow through the smoker as well. But then as I started researching it, I came to realization that I didn't want to cut a hole in my perfectly good smoker just yet... I also was wondering if I could design a method to just continue using wood chunks and avoid buying pellets when I have such a selection of logs to cut my chunks from... So the design search, melding of research and designs, google images, and brainstorming commenced...
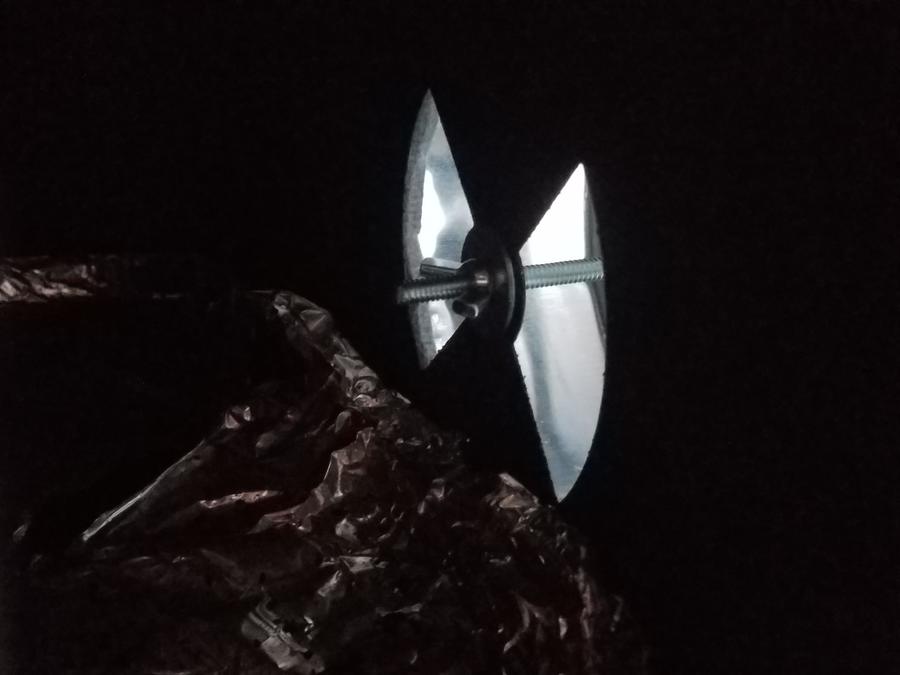
My first attempt at adding a cold smoker adapter to the CCSV that:
1) Didn't require drilling a big hole in a perfectly good smoker...
2) Was easy to remove and turn back to the factory setup for hot smoking as desired
3) A multi-purpose smoke generator that would allow me to try to the A-Maze-N pellet adapter again, and potentially allow me to burn wood from my wood pile as I slowly figure out how to tune it accordingly. As an added bonus I found out later I can turn the small bbq into a mini WSM after I add a removable top vent adjuster back on top. or use it as a camping bbq on the side.
4) It had to be a clean looking setup so it wasn't unsightly when left out and about for months on end.
Parts:
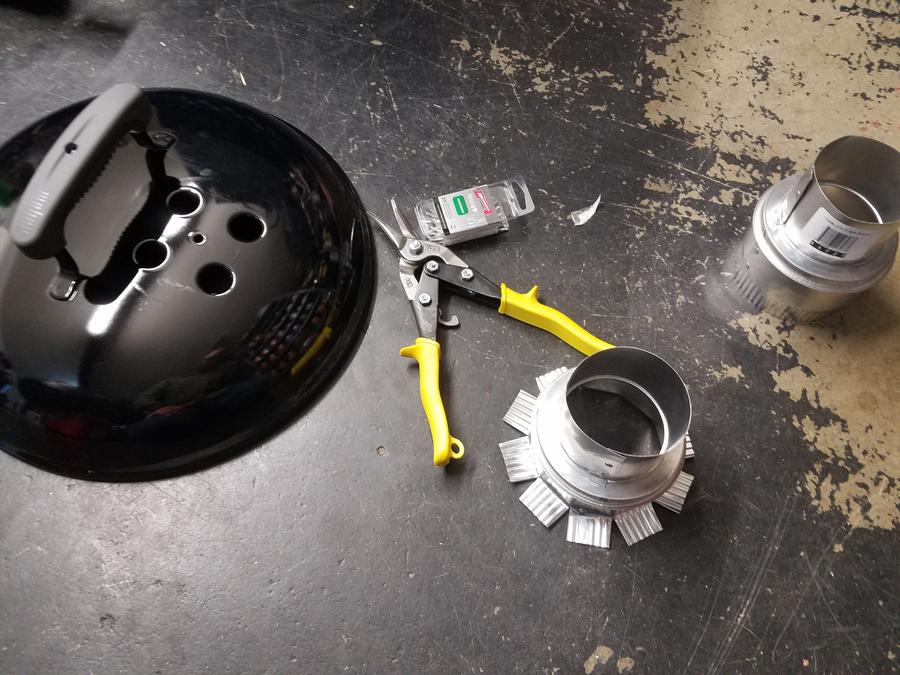
-Two 4" to 3" aluminum duct reducers with a flat transition
-Two 3" duct couplers
-One 3"x96" semi-rigid ducting
-Rivets
-Roll of smoker/stove door seal
-One ~3" SS machining screw,
-Three SS fender washers
-Three SS nuts
Tools:
-Riveter
-Tin Snips
-Drill
-Various Screwdrivers
-Various Wrenches
-Various drill bits
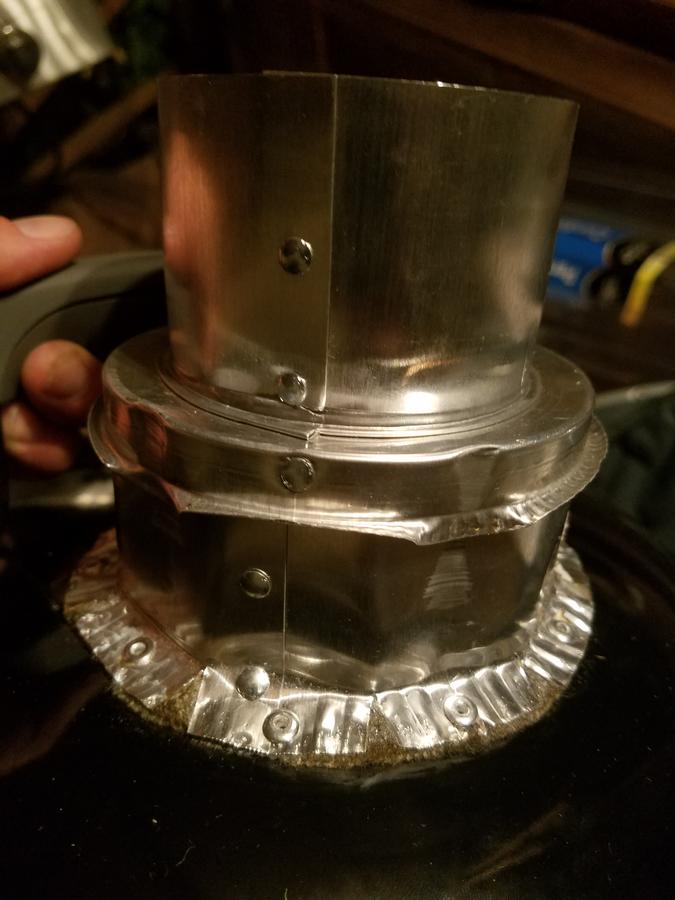
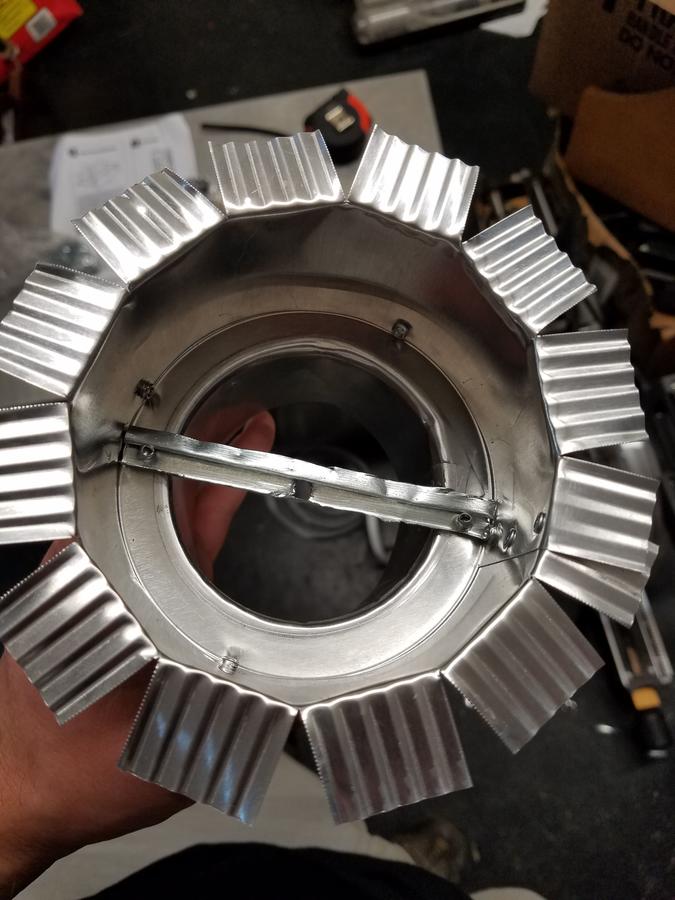
I started by drilling out the rivet on the little vent adjuster. Then notching and flaring the 4" side of the reducer out to make a surface to rivet the reducer to the lid of the bbq. I installed a smoker door seal on the reducer, trimmed the extra flaps on the reducer, and predrilled the holes before drilling into the bbq lid.
After predrilling the holes, I drilled out the lid and riveted it down.
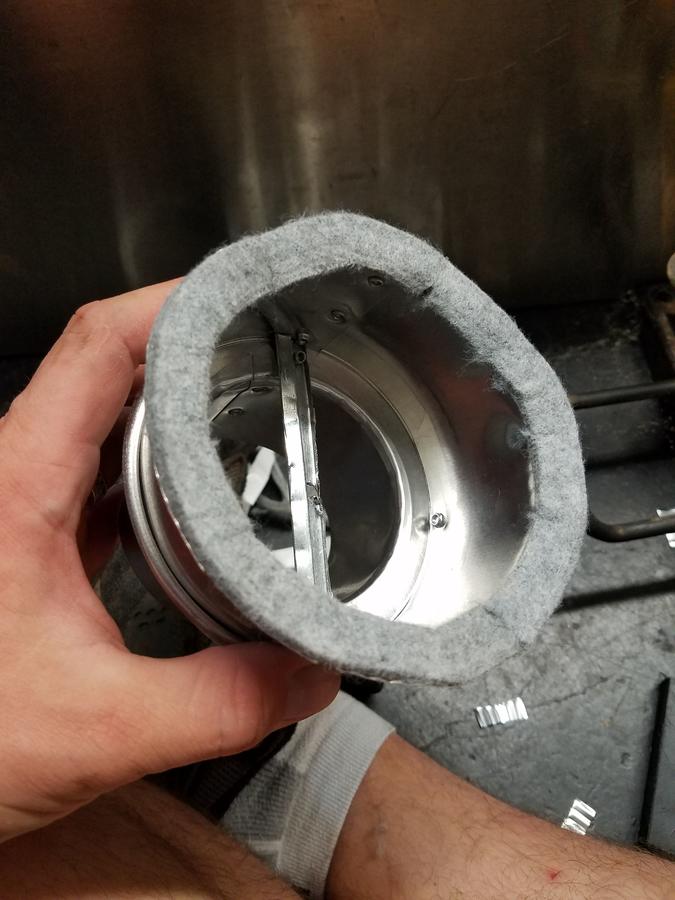
Test burn, the smoker door gasket seals like a champ!
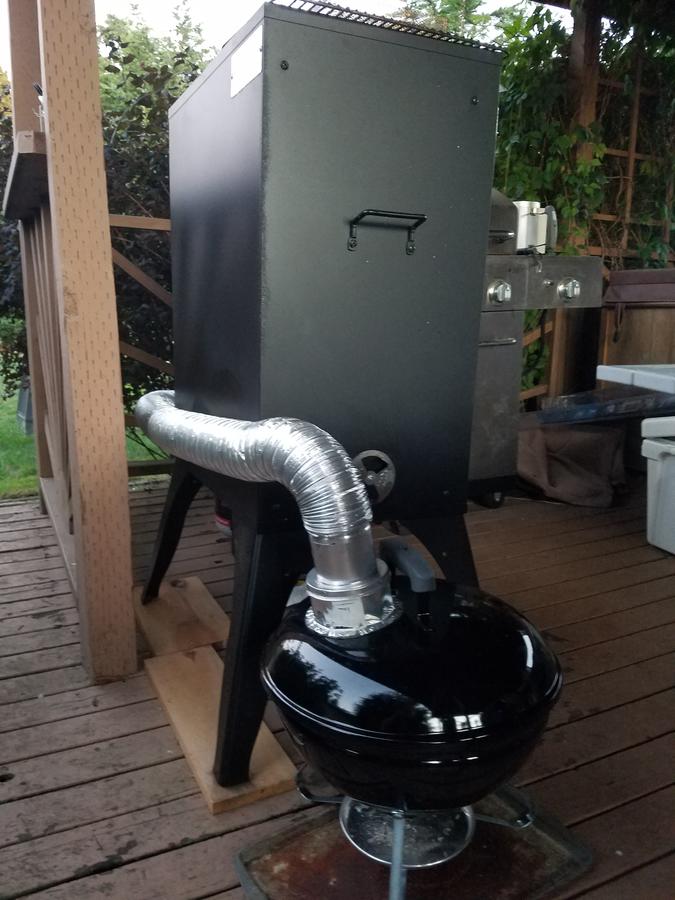
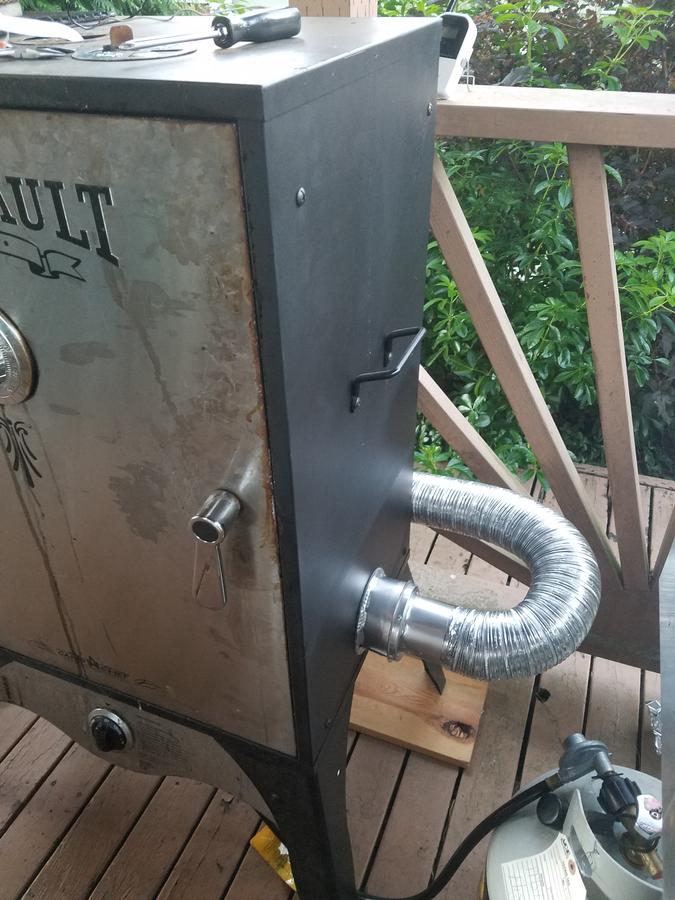
Now onto building the smoker's side vent adapter. This part had me thinking for a few days and strolling the net for setups... What I came up with was making a cross bar from a scrap piece of rigid ducting from when I installed the kitchen vent fan in the house. I cut off the rolled/reinforced lip, trimmed it to size and drilled 3 holes in it, then riveted it in place. This way I could use the CCSV factory side vent adjuster's mounting hole and I wouldn't have to drill or screw into the smoker.
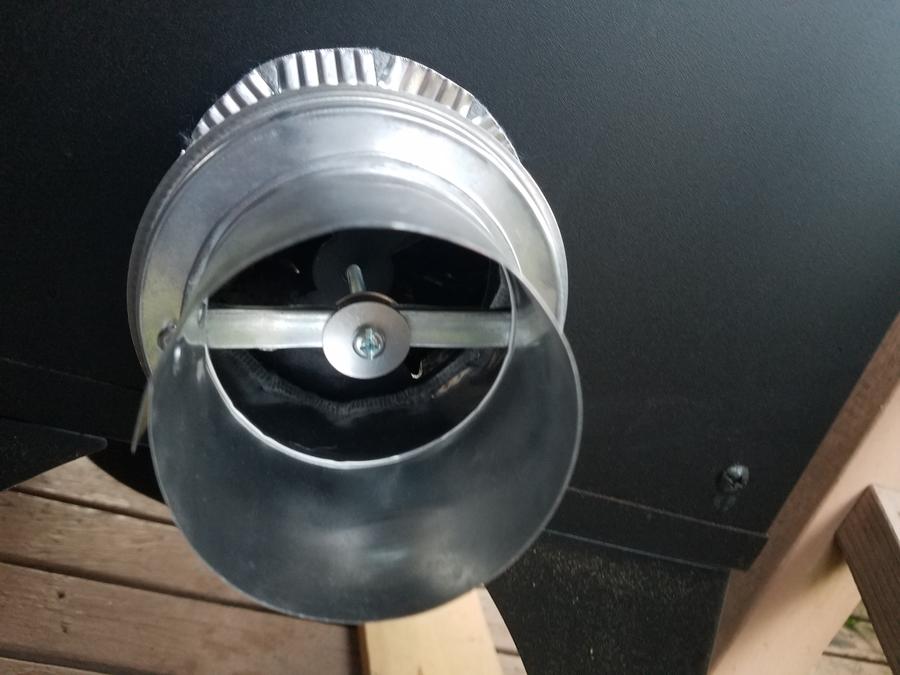
The adapter with the gasket installed and the extra flaps trimmed.
The adapter screwed into and sealed to the smoker body perfectly. The bolt was through the cross brace, sandwiched with a washer on either side of the brace, and 2 nuts jammed together to lock the bolt onto the adapter. That way it was part of the adapter, and I only needed to remove the nut inside the smoker to remove the adapter vs fighting with a screwdriver and wrench. This also allows me to keep the adapter attached to the ducting during removal, and simplifies hooking the system up.
Mounted to the 4" wide factory vent, and is totally removable with a washer and nut.
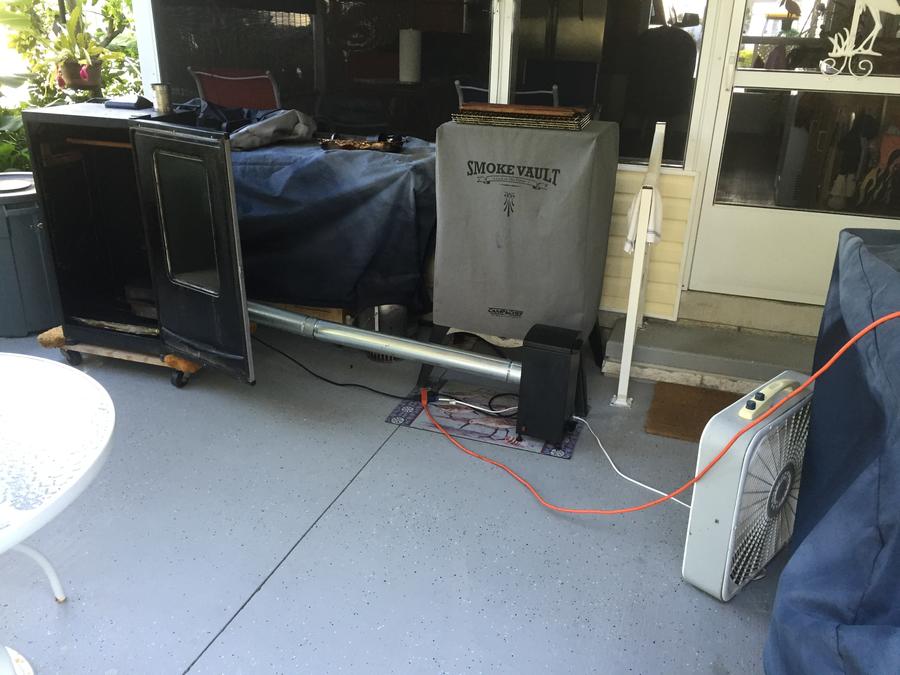
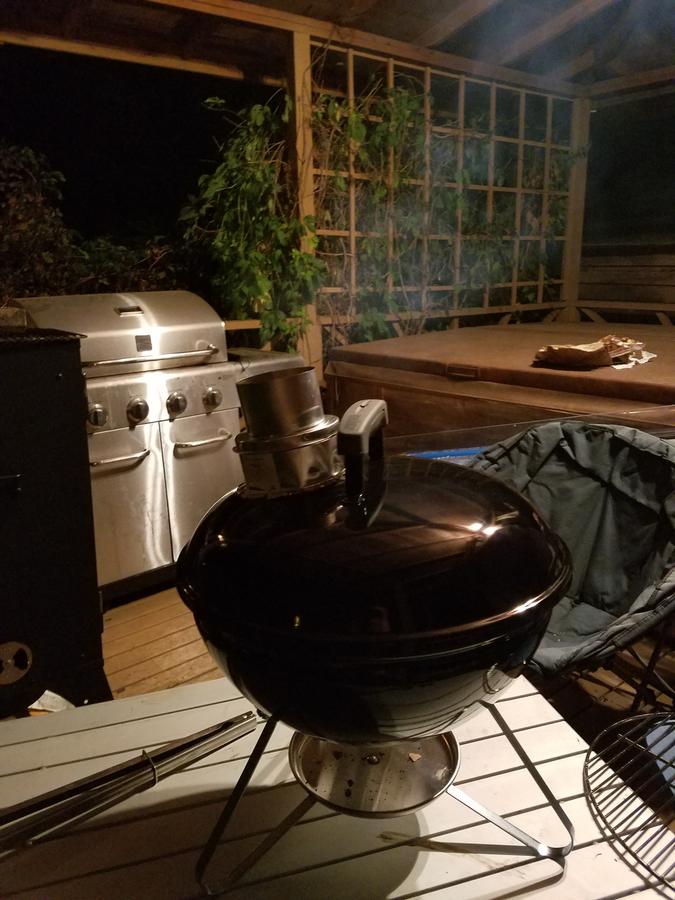
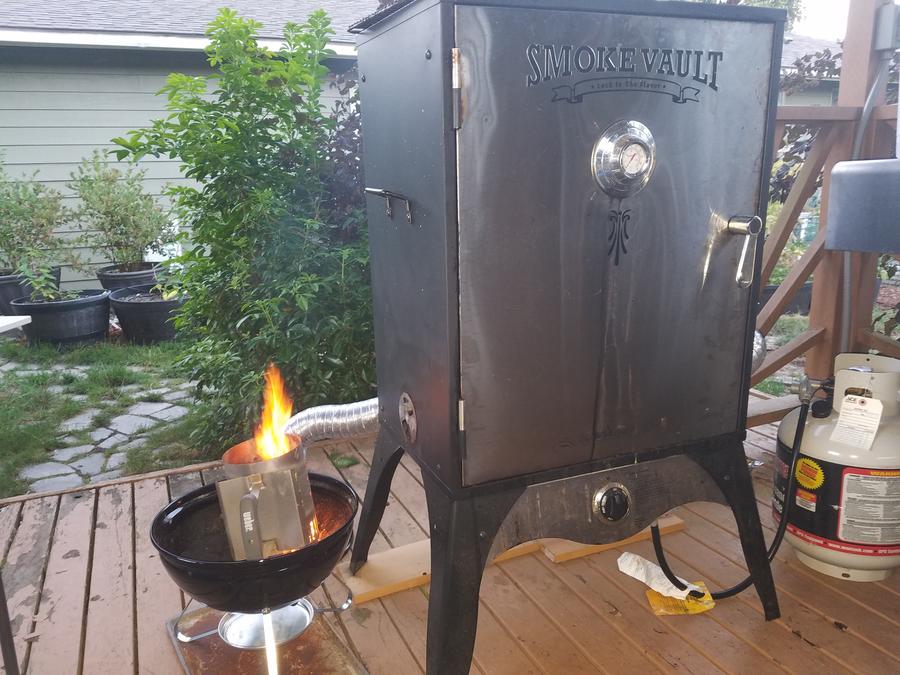
Firing her up to test her out.
A view from the back.
Side vent installation.
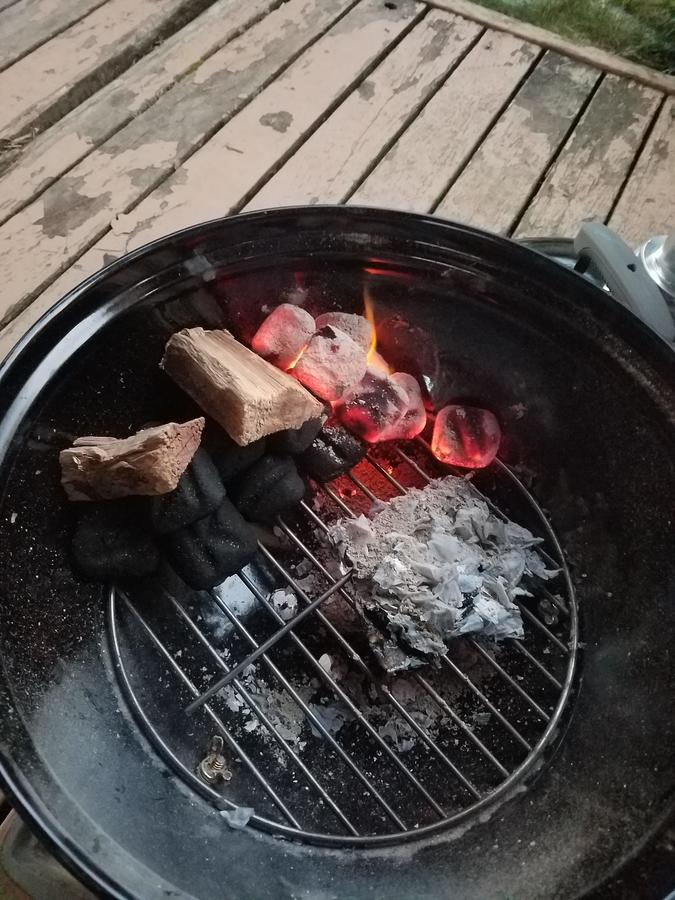
Starting a test round of charcoal. I'll try some lump coal on my next attempt. I'll also try adding the inverted can mod on the bottom of the grill that is used in some of the mini wsm builds to keep the vent holes from clogging up on long burns.
And we have a draft...
Overall the smoke at least smelled pleasing to me, except the few times I adjusted the lower vent in the wrong direction and smothered the bbq too much... I'll need to work on adjusting and tending a smoker fire for sure! By the time the smoke gets to the chimney there is definitely more draw than there was with just throwing in the A-Maze-N inside the smoker. The smoke is definitely whiter than when I hot smoke for sure, but I have a feeling this won't fully go away unless the burner plate is on to create a better draw through the smoker...
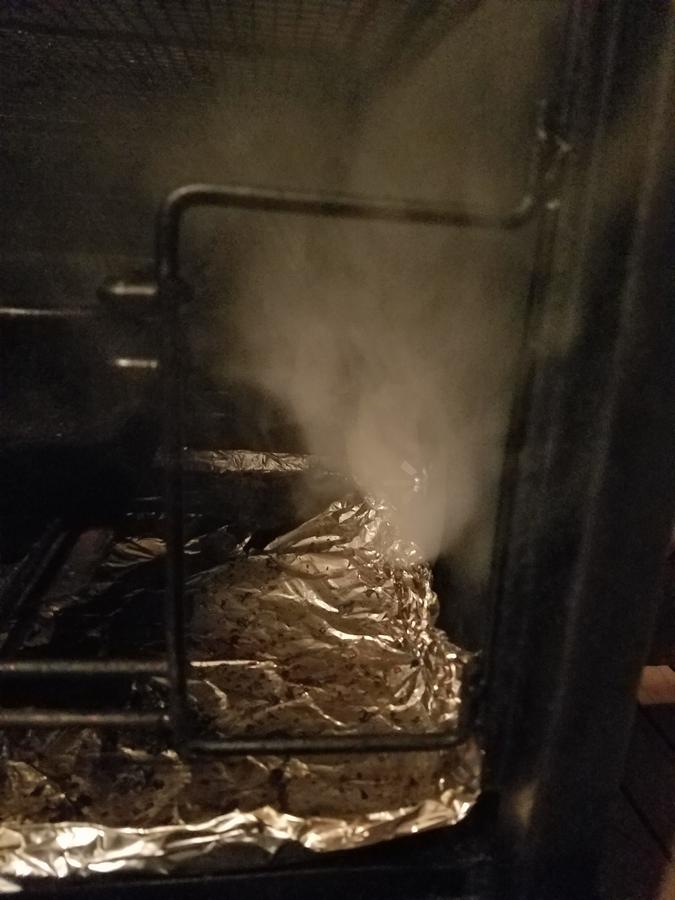
As I had this setup going for an hour I was headed into the house to go look for something to throw in for a quick dusting of cold smoke. Which is when my wife kindly reminded me to start hot smoking the Garlic Parmesan Chicken Tenders for her to bring to work tomorrow. So I ran the smoker on a hot smoke with the adapter attached. It appeared to have a better draw up and out of the top, but that could just have been my excitement of a new toy, time will tell. The addition of the charcoal and adding the smoke via the adapter did give a nice clean charcoal, cherry and apple smoke as expected while hot smoking. Albeit that was not my intent of this project, and my intent was to keep smoking on the hot plate as I normally do for hot smokes. Sadly I have to hot smoke some Hot Italian sausage tonight for lasagna and pack for a backpacking trip. Hopefully Monday I'll get a chance to try this out as a cold smoke generator and some food to see how it turns out before I have to smoke bacon next week.
Summary:
Initial results are that the exhaust has a little more pull while the propane burner is off than I had with just the A-Maze-N adapter, and the smell of the exhaust was actually closer to what I expect from a smoker, vs a campfire (except the time I screwed up the venting, but it cleaned back up)... Temps with the current amount of charcoal were about 10 to 12 degrees above ambient temps. I suspect it will be lower if I can get away with less charcoal on the next attempt or I can try lengthening the duct run.
Time will tell if this was a worth while project, and/or if I need to add an exhaust fan to speed up the smoke through the smoker during a long cold smoke. I have a feeling I will likely have to install a small exhaust fan cause this guy is a leaky un-insulated beast. Worse case scenario, I'll have a mini WSM, the smoker is still able to be returned to factory settings, and another camping bbq out of the deal. ;)
I was excited to try the A-Maze-N last week, but it just smelled like a campfire inside the smoker and even when burning outside of the smoker it smelled the similar... Maybe I got some bad pellets, or was doing something wrong in the 3 or so attempts. It sure didn't smell like what my smoker normally smells like with that pellet adapter. Ah-ha! mailbox mod I thought to clean up the smoke and make it run cooler... and after a few questions maybe increase the smoke's flow through the smoker as well. But then as I started researching it, I came to realization that I didn't want to cut a hole in my perfectly good smoker just yet... I also was wondering if I could design a method to just continue using wood chunks and avoid buying pellets when I have such a selection of logs to cut my chunks from... So the design search, melding of research and designs, google images, and brainstorming commenced...
My first attempt at adding a cold smoker adapter to the CCSV that:
1) Didn't require drilling a big hole in a perfectly good smoker...
2) Was easy to remove and turn back to the factory setup for hot smoking as desired
3) A multi-purpose smoke generator that would allow me to try to the A-Maze-N pellet adapter again, and potentially allow me to burn wood from my wood pile as I slowly figure out how to tune it accordingly. As an added bonus I found out later I can turn the small bbq into a mini WSM after I add a removable top vent adjuster back on top. or use it as a camping bbq on the side.
4) It had to be a clean looking setup so it wasn't unsightly when left out and about for months on end.
Parts:
-Two 4" to 3" aluminum duct reducers with a flat transition
-Two 3" duct couplers
-One 3"x96" semi-rigid ducting
-Rivets
-Roll of smoker/stove door seal
-One ~3" SS machining screw,
-Three SS fender washers
-Three SS nuts
Tools:
-Riveter
-Tin Snips
-Drill
-Various Screwdrivers
-Various Wrenches
-Various drill bits
I started by drilling out the rivet on the little vent adjuster. Then notching and flaring the 4" side of the reducer out to make a surface to rivet the reducer to the lid of the bbq. I installed a smoker door seal on the reducer, trimmed the extra flaps on the reducer, and predrilled the holes before drilling into the bbq lid.
After predrilling the holes, I drilled out the lid and riveted it down.
Test burn, the smoker door gasket seals like a champ!
Now onto building the smoker's side vent adapter. This part had me thinking for a few days and strolling the net for setups... What I came up with was making a cross bar from a scrap piece of rigid ducting from when I installed the kitchen vent fan in the house. I cut off the rolled/reinforced lip, trimmed it to size and drilled 3 holes in it, then riveted it in place. This way I could use the CCSV factory side vent adjuster's mounting hole and I wouldn't have to drill or screw into the smoker.
The adapter with the gasket installed and the extra flaps trimmed.
The adapter screwed into and sealed to the smoker body perfectly. The bolt was through the cross brace, sandwiched with a washer on either side of the brace, and 2 nuts jammed together to lock the bolt onto the adapter. That way it was part of the adapter, and I only needed to remove the nut inside the smoker to remove the adapter vs fighting with a screwdriver and wrench. This also allows me to keep the adapter attached to the ducting during removal, and simplifies hooking the system up.
Mounted to the 4" wide factory vent, and is totally removable with a washer and nut.
Firing her up to test her out.
A view from the back.
Side vent installation.
Starting a test round of charcoal. I'll try some lump coal on my next attempt. I'll also try adding the inverted can mod on the bottom of the grill that is used in some of the mini wsm builds to keep the vent holes from clogging up on long burns.
And we have a draft...
Overall the smoke at least smelled pleasing to me, except the few times I adjusted the lower vent in the wrong direction and smothered the bbq too much... I'll need to work on adjusting and tending a smoker fire for sure! By the time the smoke gets to the chimney there is definitely more draw than there was with just throwing in the A-Maze-N inside the smoker. The smoke is definitely whiter than when I hot smoke for sure, but I have a feeling this won't fully go away unless the burner plate is on to create a better draw through the smoker...
As I had this setup going for an hour I was headed into the house to go look for something to throw in for a quick dusting of cold smoke. Which is when my wife kindly reminded me to start hot smoking the Garlic Parmesan Chicken Tenders for her to bring to work tomorrow. So I ran the smoker on a hot smoke with the adapter attached. It appeared to have a better draw up and out of the top, but that could just have been my excitement of a new toy, time will tell. The addition of the charcoal and adding the smoke via the adapter did give a nice clean charcoal, cherry and apple smoke as expected while hot smoking. Albeit that was not my intent of this project, and my intent was to keep smoking on the hot plate as I normally do for hot smokes. Sadly I have to hot smoke some Hot Italian sausage tonight for lasagna and pack for a backpacking trip. Hopefully Monday I'll get a chance to try this out as a cold smoke generator and some food to see how it turns out before I have to smoke bacon next week.
Summary:
Initial results are that the exhaust has a little more pull while the propane burner is off than I had with just the A-Maze-N adapter, and the smell of the exhaust was actually closer to what I expect from a smoker, vs a campfire (except the time I screwed up the venting, but it cleaned back up)... Temps with the current amount of charcoal were about 10 to 12 degrees above ambient temps. I suspect it will be lower if I can get away with less charcoal on the next attempt or I can try lengthening the duct run.
Time will tell if this was a worth while project, and/or if I need to add an exhaust fan to speed up the smoke through the smoker during a long cold smoke. I have a feeling I will likely have to install a small exhaust fan cause this guy is a leaky un-insulated beast. Worse case scenario, I'll have a mini WSM, the smoker is still able to be returned to factory settings, and another camping bbq out of the deal. ;)
Last edited: