Been a while! New Electric Build!

  • Some of the links on this forum allow SMF, at no cost to you, to earn a small commission when you click through and make a purchase. Let me know if you have any questions about this.
SMF is reader-supported. When you buy through links on our site, we may earn an affiliate commission.

whitegardens

Smoke Blower
Original poster
Dec 7, 2015
79
48
Been a long time since I have posted in the forum. Thought I would share my new electric smoker build.

I currently use a MES analog that was heavily modified.

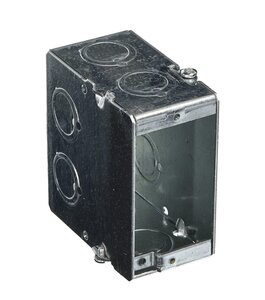
I ended up building a pid controller to get the utmost control. It was a separate box with a plug for versatility.

This thing has served me extremely well and I cannot complain. But my only drawback is tge size of the unit.

It's not wide enough for a full rack of ribs and I always have to cut them. That and I want more versatility to utilize it as an oven for roasting also.

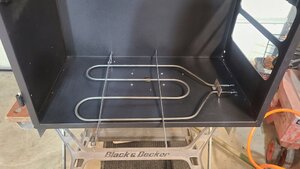
So here's the lowdown. Going to use a wide body charcoal smoker. The coal box will be utilized for the electrical components.

I am also going with 220 plug and a 240 volt broiler element that should fit perfectly. I will have to wire the plug in my house, but I'm OK with that as I need to have one anyways in the garage.


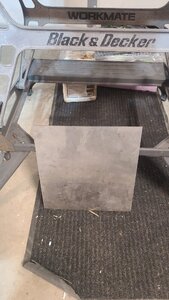
More pics to come as I build. View attachment 492913


20210416_133150.jpg
20210416_133206.jpg
20210416_133239.jpg
20210416_133330.jpg
View attachment 492913
20210416_133150.jpg
20210416_133206.jpg
20210416_133239.jpg
20210416_133330.jpg
 
Parts coming in.

Going to get a deep junction box to mount the element to. The stainless steel block off plate to delete the pass through for the charcoal off set box. The steel should provide more than enough support.

I'll need to trim the support bars on the element to fit exactly and need to figure out how I'm going to place a water pan over it.

The drip pan is horrendous. I'll end up using the one off my masterbuilt for extra capacity.

20210419_135839.jpg
 

Attachments

  • Screenshot_20210419-141831_Amazon Shopping.jpg
    Screenshot_20210419-141831_Amazon Shopping.jpg
    94.7 KB · Views: 44
  • 20210419_140327.jpg
    20210419_140327.jpg
    96.6 KB · Views: 45
  • 20210419_135910.jpg
    20210419_135910.jpg
    135.3 KB · Views: 46
Keep the pics coming. I'll be following this!
Love the large red wheels. The effect of wobble in the legs can be more than you think so if you put an "X" cross-brace, from wheel to diagonal-wheel, with the X bolted or welded in the middle to make 4 triangles, you might be surprised how much nicer they move around. I just used 1/2" EMT conduit from the electrical section, hammered the ends flat, and used a vice to squeeze the middle crossing-point together.

That is an excellent suggestion! On the Masterbuilt smoker, it seemed pretty solid for the most part. I think the holes are going to line up with the new on and I might end up recycling the feet and wheels for the new build. The feet on the new smoker don't seem quite as sturdy. That and it will cut down on fab work. Cross braces with the conduit would be a good added touch!
 
So I need input on which direction to go with generating smoke.

With the PID controller the element never cycles enough to get the smoke rolling from the original chip container in the smoker.

What I currently have a is a piece of steel pipe that I use with a soldering iron. I have found wood pellets burn the best, but can do chips also.

If I continue with this method, I would install a flange to screw the pipe to the unit to make it a cleaner fit. On my current smoker I just drilled a hole and jammed it in and that has been sufficient.

Smoke generators are expensive. I like this unit, but it looks like you would be stuck with ordering cartridges specifically, and I don't need 4 hours of smoke with each cartridge. When I do a colder smoke on jerky or fish, it doesn't take much smoke at all to generate the flavor, especially with the pellets.

So, any other suggestions on a smoke generator? Right now I'm thinking about keeping the same design. I don't think it's necessary to spend north of 120 dollars for a smoke generator.

Screenshot 2021-04-20 101441.jpg
Screenshot 2021-04-20 101832.jpg
 
In progress, coming along nicely so far.

I must of deleted the photo of the smoker itself that I'm using.

Not sure if I would buy this as a charcoal smoker or not. Not insulated, steel is of medium weight.

Block off plate is done. Element mounts up nicely on the receptacle box.

Screenshot_20210424-181424_Amazon Shopping.jpg
20210424_155803.jpg
20210424_155809.jpg
 
Parts are starting to trickle in.

Not wanting to assemble the smoker until I get the controls and wiring installed in the coal box.

Going to do a 20amp, 4 prong rv hookup plug for the drop cord. This way I can also use the 220 drop cord for my generator also.

Instead of a mechanical, 2 pole contactor, I'm going with 2 solid state relays to kill both power wires for the 220. I like the simplicity of the ssr and it eliminates any mechanics.

If it was 110, I would use one ssr.

Thermal paste is for mounting the ssr(s). Not sure if it is neccisary, but will use it anyway. Going to use the metal cabinet for the heat sink.

20210427_163257.jpg
20210427_163135.jpg
20210427_163119.jpg
20210427_163102.jpg
 
  • Like
Reactions: evilpsych
Finally having a chance to continue with the project. I have started going back to my office for work and also starting to travel again for my job.

Had a great 48 hours working on the project. I originally was going to put my receptacle plug on the side of the cabinet. But then I realized I would be better off making a service plate to mount all my components.

So what I did was to cut the welds holding the shelf brackets in the coal box. Not 100% sure what it is for, but had something to do with the coal dish, etc... I moved them up so I could utilize the bottom of the coal box for storage.

My area for the components is fairly large, but I wanted plenty of space along with the potential to add equipment. I'm already considering using a pcu fan in the box to keep things cool, and also force a bit of air through the cabinet as there is a small hole in the bottom of the gang box I used to mount my element. I did this for drainage around the connections at the element. Also built a hood over my gang box as I want to minimize any condensation around that area.

Easier to upload pics via a cpu rather than the mobile site. But, the multiple pics might be out of sequence.
20210509_140826.jpg
20210509_140813.jpg
20210509_123848.jpg
20210508_204049.jpg
20210508_140639.jpg
20210508_152514.jpg
20210508_152519.jpg
20210508_154736.jpg
20210508_204049.jpg
20210509_123659.jpg
 
On the topic of smoke generators - I've been chewing over an idea on how to utilize a small aquarium air pump to feed air in to a vertical pipe setup like you have. Do you think if you put a hose nipple on the side near the bottom of your pipe you could force air in and up to feed the burn and push smoke out to your smoker?
The upside is that those small air pumps are cheap, and adjustable.
 
I've been contemplating my smoke generator, and I think I'm going to stick with the soldering iron setup I have now. It's a good kiss method.

It's worked well and extremely simple. I'm going to purchase a flange to have a solid connection between my pipe and smoker.
 
In progress... Been drawn out due to traveling for work and summer activities.

Got sidetracked too due to building an independent, 50 gallon single nozzle sprayer for land maintenance on my family property.

Deep cycle battery as to not pull from the atv that's pulling it.
20210530_182747.jpg
 
Not 100%20 sure where I left off.

This is what's left.

1.) wire 240 plug for power. All parts have been purchased.

2.) install robbed fan from countertop convection oven. Decided I needed air movement for jerky making especially.

3.) wire everything up of course.

4.) figure out tray to put water pan just below the heating element. Or find different option.

5.) install rack over heating element. Going to use ceramic briquettes to control drips over element and temperature stability.

6.) install smoke generator.


Luckily, the legs and wheels were identical to the mes smoker. All I did was remove from the old one, fresh coat of paint, and installed on the new smoker.
20210606_113856.jpg
20210606_114754.jpg
20210606_120109.jpg
20210606_124118.jpg
20210606_124131.jpg
20210606_151343.jpg
20210606_151348.jpg
20210606_151351.jpg
20210606_151902.jpg
20210606_162329.jpg
20210606_162737.jpg
 
Fan that I will be using. I have since removed the shroud and have tested the air movement.

I went ahead and made a sharper angle on the fins, and it seems like it's just enough air movement for what I need.

10 dollar black and decker toaster oven on Facebook marketplace..lots of them on there, so replacement parts will be easy if needed.

There is a fan on the back side and that might help move air in the coal box, and should help keep the ss relays cool during cycling.

Going to mount the motor inside the box and drill just a big enough hole for the motor shaft to go through the box.

The fan will be below my burner shroud. Going to fid perfectly.

20210610_115402.jpg
20210610_115413.jpg
 
Dragging out...

Had a chance today to finally put hands on this today again, just to leave town for a week.

With some modifications, I got the fan installed.

Before installing, I did a bench test a variable speed controller for the fan. Purchased on Amazon, I got this one for the voltage adjustment and the fact I'm running a tiny motor. I was able to tweek it to where I get a 50% reduction in speed with the knob on the lowest setting.

This is going to work better than expected..
20210620_135312.jpg
20210620_135328.jpg
20210620_135945.jpg
20210620_140120.jpg
20210620_140124.jpg
20210620_135312.jpg
20210620_135328.jpg
20210620_135945.jpg
20210620_140120.jpg
20210620_140124.jpg
 
Getting a bit more done, just got back from a week out west for work.

My goal is to have it operational in the next 7 days.

Conduit and thermocouple installed, wire trimmed. Not sure if I like it 100%, but it works for now. Used JB weld at the coal box instead of trying to weld brass and steel together.

Cutouts for switches and my variable speed controller are done.

Hoping for more progress today.

20210627_075318.jpg
20210626_212746.jpg
20210626_212737.jpg
 
Looks good! Though I'm not crazy about the 2 SSRs for power to the element. Why didn't you get a DPDT SSR instead?
 
SmokingMeatForums.com is reader supported and as an Amazon Associate, we may earn commissions from qualifying purchases.

Latest posts

Hot Threads

Clicky