Grand champ XD ideas and questions (again).

  • Some of the links on this forum allow SMF, at no cost to you, to earn a small commission when you click through and make a purchase. Let me know if you have any questions about this.
SMF is reader-supported. When you buy through links on our site, we may earn an affiliate commission.

Chasdev

Master of the Pit
Original poster
Jan 18, 2020
1,030
834
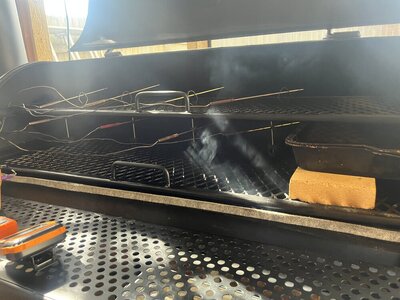
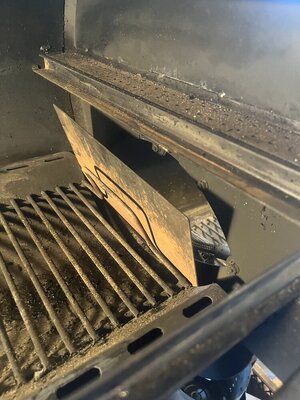
I think I'm safe in saying everyone or most everyone runs a water pan these days to lessen the hot spot at the firebox connection to the cook chamber.
(I've noticed some place a large stick in the same area where a water pan would go to lessen the hot spot effect).
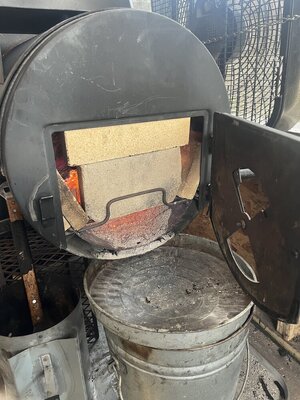
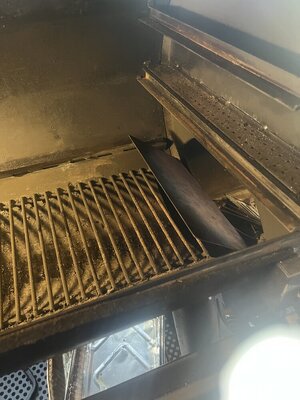
I also run a large water pan but this has me wondering what would happen if I placed a few firebricks in that spot instead of a water pan, in terms of hot end temp mitigation?
We all know the stall is caused by the cooling effect that moisture exiting the meat (equal to or exceeded the amount of heat the meat is exposed to) causes and my thought is that a water pan delays getting through the stall so perhaps just spritzing and some fire bricks in the hot end of the cook chamber is the way to go.
So now I know my next test, good thing I bought more firebrick than I can use in the firebox!
 
  • Like
Reactions: JLeonard
Stage one of latest test complete, stage two and perhaps final test to come.
First off, I cleaned up the birds nest of probe wires I was running under the door lid.
I started a large charcoal fire and then added too much wood to create an overheat as shown in the higher temp readings, then I closed down the intake and (newly added) exhaust vent to see what happened and how long it would take to cool down to a usable range (took 25 minutes and lower temps are shown in second picture).
The effect of the water pan can be seen on the left meter reading in the upper right numbers.
Probes were arranged (as I always do) with upper right over the hot spot, upper left over the cold far left end of the cook chamber.
Lower right is next to hot spot and lower left is next to cold spot and the gauge readings reflect that placement.
Right meter is lower level, left meter is upper level.
Also added fire brick to the door end of the firebox, this helped prevent the door warp issue I had last cook (I knocked the bend out of the door first).
I think I got some good info from test part one, part two is going to go off without a water pan, just firebrick near the hot end AND I am going to slide the tuning plate left and right to open and reduce the gap between it and the firebox opening to see how it re-directs heat.
 

Attachments

  • IMG_1472.jpg
    IMG_1472.jpg
    164.1 KB · Views: 19
  • IMG_1481.jpg
    IMG_1481.jpg
    153 KB · Views: 14
  • IMG_1482.jpg
    IMG_1482.jpg
    130.3 KB · Views: 14
  • IMG_1475.jpg
    IMG_1475.jpg
    124.7 KB · Views: 16
  • IMG_1474.jpg
    IMG_1474.jpg
    176.7 KB · Views: 16
  • IMG_1473.jpg
    IMG_1473.jpg
    135.7 KB · Views: 18
  • IMG_1489.jpg
    IMG_1489.jpg
    105.9 KB · Views: 13
  • Like
Reactions: DonP and 912smoker
Sounds like your headed in the right direction with your adjustments.
I'm sure your taking notes and keeping records of you adjustments to aid in the final decision.
And this knowledge can also be used for similar sized pits.

Keith
 
I'm not the note taking kind of guy but when I get it dialed, I'll report here and NEVER change the config again!
I did however think of something else to fiddle with..or two somethings that is..
One is running the lower level cook grate only (never need two level cook grids) and/or running the upper cook grate slightly above the lower (by use of spacers) to get the meat further away from the hot tuning plate.
And then of course I'm thinking about adding a rotisserie, but that's a horse of a different color.
 

Attachments

  • IMG_1454.jpg
    IMG_1454.jpg
    144.6 KB · Views: 13
  • IMG_1455.jpg
    IMG_1455.jpg
    140.2 KB · Views: 11
  • IMG_1456.jpg
    IMG_1456.jpg
    133 KB · Views: 12
  • IMG_1457.jpg
    IMG_1457.jpg
    138.1 KB · Views: 12
  • IMG_1458.jpg
    IMG_1458.jpg
    138.4 KB · Views: 14
Did a perhaps final test run yesterday for 6 hours.
This version was with the tuning plate in place instead of the charcoal grill rig.
I ran most of the test with the upper cook grate spaced around an inch above the lower/larger cook grate, both with and without a water pan.
After a few hours I removed the (very hot) tuning plate and put the charcoal grate rig back in with the deflector in standard position.
I re-tested like that with the upper cook grate in the lowered and normal position.
Tuning plate won hands down, but I also found that the tuning plate should be slid all the way to the right toward the firebox.
As the fire heated the unit I thought I had reached offset nirvana as the temps were very close across the smoker.
After two hours and multiple additions of mini sticks and lump charcoals the heat in the cooker body rose up and the temps showed more normal distribution, although the hotter end ran lower than it does with the original set up.
I then added a water pan on the right end of the lowered cook grate and that evened things out nicely.
I also ran larger and smaller wood fires and coal bases and each different type and size of the fire changed where the temps were inside the cook chamber.
Lastly the fire bricks in the firebox really made a difference.
My last tests were to let the cook grate temps drop to around 225 and then add a minimal amount of oak to see how long and how hot the fire would last between re-upping a mini stick or two.
I let it get down to 220 and when I went outside to add wood, the fire was 99% out and I had to work like a contenstant on "Naked and Afraid" to rekindle it.
Those bricks were the sole source of the heat I was seeing on my temp probes.
 

Attachments

  • IMG_1512.jpg
    IMG_1512.jpg
    164.5 KB · Views: 13
  • IMG_1514.jpg
    IMG_1514.jpg
    239.3 KB · Views: 14
  • IMG_1517.jpg
    IMG_1517.jpg
    142.7 KB · Views: 14
  • IMG_1518.jpg
    IMG_1518.jpg
    116.3 KB · Views: 11
  • IMG_1520.jpg
    IMG_1520.jpg
    129.2 KB · Views: 11
  • IMG_1521.jpg
    IMG_1521.jpg
    106.1 KB · Views: 9
  • IMG_1528.jpg
    IMG_1528.jpg
    101.8 KB · Views: 15
I think next I'm going to try to elevate the upper cook grate a little more, or I may use the probe mounts that stand two inches above the grate and see what they can tell me.
 
I haven't had time to play with the cooker lately but one idea I have is to make a deflector to direct the heat straight up out the fire box, and a make raised platform for the water pan, to mimic the airflow of the Franklin cooker. But I could probably just use bricks for all of that.

For the last big smoke I placed the water pan under the cooking grate, on the charcoal grate and against the baffle. I didn't take grate temps so I have no idea on how it affects temp variations.
 
Been there, done that..heat deflector redirect wise.
You can use the supplied deflector and just turn it upside down so that it points up.
I was not impressed as the temps across the cook grates was still much hotter on the right than on the left.
I may have posted pics of that mod in one of my earlier experiment/testing posts..I delete all my pics after I upload them as I have too much crap to look through any time I need to find something so if it exists, it's here somewhere.
I'll take a look and see if I already posted it.
Found them..this config uses the charcoal tray which as you can see allows movement left and right which allows the angle of the deflector to change to suit your needs.
I may re-visit this mod just for grins..
 

Attachments

  • IMG_1356.jpg
    IMG_1356.jpg
    158 KB · Views: 12
  • IMG_1353.jpg
    IMG_1353.jpg
    135.7 KB · Views: 12
  • IMG_1349.jpg
    IMG_1349.jpg
    116.6 KB · Views: 15
Last edited:
  • Like
Reactions: DonP
SmokingMeatForums.com is reader supported and as an Amazon Associate, we may earn commissions from qualifying purchases.

Latest posts

Hot Threads

Clicky