Digital temp and propane conversion

  • Some of the links on this forum allow SMF, at no cost to you, to earn a small commission when you click through and make a purchase. Let me know if you have any questions about this.
SMF is reader-supported. When you buy through links on our site, we may earn an affiliate commission.
Great!! Glad it works like you want! With 5 in HYS you will have about a 10 deg. swing from set point if you are ok with that,cool. If its to much then you can always change it to a lower number.
I am real interested in how this control will work at lower set points, say 100 or 120. When you get it hooked up could you try the lower set points and let me know how it works out.
 
I tested everything out in 10F weather, and its working great but with one problem: the gas regulator on the propane tank keeps shutting off.

I think the problem is the gas pressure. I've got a 20lb LP bottle attached, and I have to barely turn it on or I've got a flamethrower.

So with the setup like it is, I think that I need a way to open the LP regulator more fully and then adjust the burner and pilot light.

I've ordered two 1/4" needle valves. One for the pilot light, and the other for the burner.

Parts will be here in a couple of days, so it'll probably be Saturday that I'll be able to test it out.

On another note, the Bradley smoker doesn't look like it can handle the cold. I'm thinking the 110v line just isn't enough amps to power the heating element. I was hoping it'd work since the cabinet is much smaller, and less space to heat.

I'm going to take the legs off the smoker and squeeze it all into a small garden shack.
 
Amazing thread.

I have been reading for a few months about propane controls and such.

And Ive found no decent way of controlling it without spending 5-600.

If this works out I think you will have a lot of people  following..
 
I should have most or the receipts and such, so I'll post a build-spec when everything is finally done.

I haven't been able to focus on finishing up these past few weeks, but there isn't much left to do.

There were some gas leaks so I have to break everything down and put it together with some liquid sealer. And I'm going to swap out burners.

Otherwise, everything is working exactly as it should.
That's really cool.

Glad it worked out for ya.
 
An update to everything.

We've had some warm weather lately so I had to get out and work on the smoker some more. 

Took everything apart and took off the teflon tape since I had a number of leaks. I coated all of the threads with #2 liquid pipe sealer and put it all back together, tested with some soap/alcohol mix leak detector and not finding any leaks.

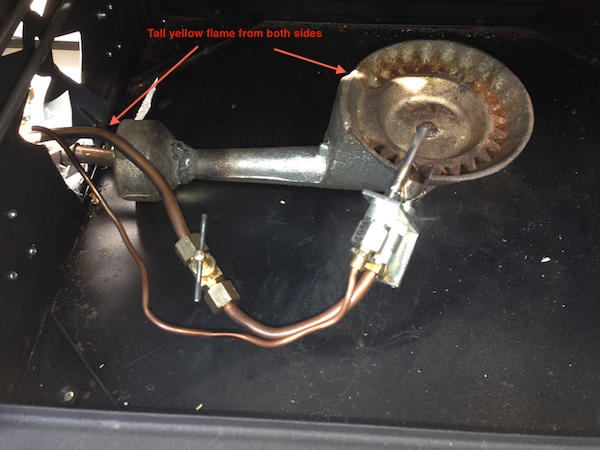
I also swapped the low-pressure burner for a high-pressure one hoping that would fix the problem I've been having with the tall, yellow flame instead of the short, blue flame that I need. 

No luck with that... and to make matters worse, I'm getting a lot of gas coming out the back of the burner. 

I'm out of ideas for how to fix it. I hope you guys have some suggestions. 

Here's a picture of what I mean:


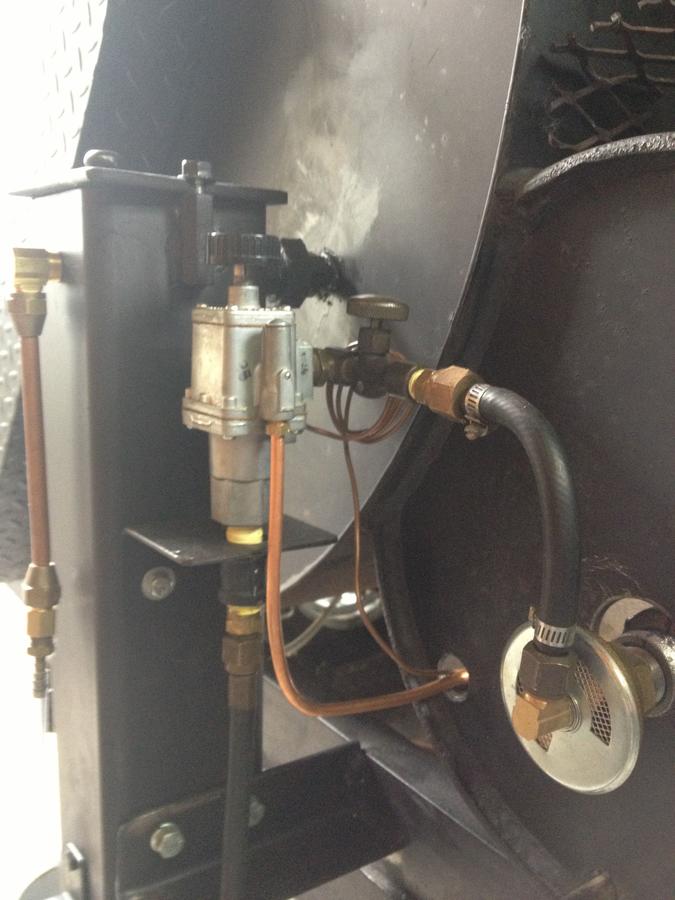
For posterity, here's what the whole setup is looking like so far:

 
Another update.

It turns out my problem is just with the burner.

I have a low pressure regulator, the low pressure controller valve, and a high pressure burner.

So now I'm just waiting for a friend to send me a burner from a hot water heater, and that should wrap it up.

Then it's just a matter of making it all look nice and neat.
 
I took an older high-pressure burner that I had and welded part of the venturi closed, then made a low-pressure orifice for it.

I need lots of little blue flames and instead of these yellow ones, but at least there isn't any soot building up on the bottom of the water bowl. 

 
Thought I'd share some hard lessons learned through this. 

- The PID has a built-in relay, so there was no need to purchase a separate relay.

- The Honeywell controller is 24V, so a 110V to 24V converter was needed.

- The Honeywell controller is low pressure, so the regulator and burner also have to be low pressure. 

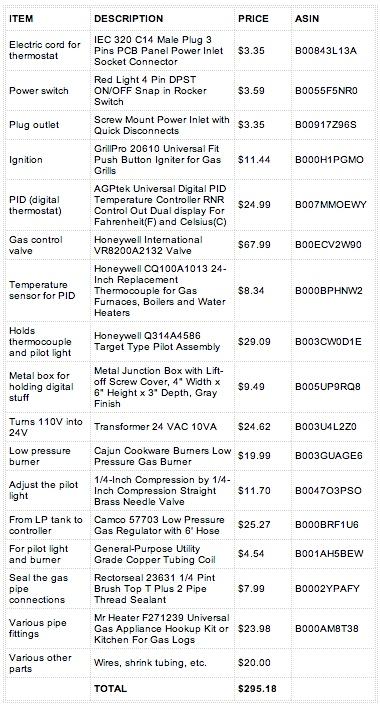
If I had this to do all over, knowing what I know now, here is the build that I would have gone with.

I could have saved some money if I found cheaper or used parts, but I just didn't know better. 

These prices were all taken from Amazon.com (ASIN is Amazon Inventory ID): 

 
Last edited:
Mw-smoke, this is a very cool thread.  I have been working with my system for a while now and would really like to come up with a way to add a electric gas valve on mine. I currently have a manual safety valve. I built my pipe burner and attached the pilot to it. and have an adjustable regulator with a gauge on my Propane tank.  I keep it around 9 pounds.  I have to keep the air intake on the Ventri almost closed to get the clean burn.  I get a nice blue flame but when it lights some times it lights in the pipe.  Also I have to open my doors very slowly or the back -draft snuffs the flame out

I have a couple of STC1000 PID.  I use them on a fridge and curing chamber. And i just so happen to have an extra STC1000 laying around. I looked at the PID you used but couldnt for the life of me figure it out. 

Congrats on your project very cool
 
Howdy Fuimus, thanks for the kudos.

Getting that air/gas mixture just right is really tough.

From what you're describing, I think the reason for that blow back is one of two things: the orifice that the gas passes through as it goes into the burner might be too large, so the gas slows down and lingers around the venturi; or the venturi needs to be outside the smoker.

Those were both things I had to deal with and were part of my problems.

I didn't move the burner, I put a steel sheet between the burner and the airway so fresh air was making its way in and the flame was not reaching for fresh air.

The other thing I did was weld up a nut and drill a very tiny hole in the welding, then screw the nut on the pipe threading feeding into the burner. This let me turn the gas flow down on the needle valve inline of the pipe going to the burner. As I understand it, the actual PSI won't be affected by the orifice size, just how quickly it moves out.

Yeah, my PID was confusing as all get out, but I finally got it working. I didn't know the relay was built-in so I was treading down the wrong path quite a bit.
 
try turning that pipe burner upside down... flames out the bottom... this will help keep from blowing the flames out... if the flame goes out in some of the holes the lit ones will help to relight them...
 
I'm working on this project, based on the final Amazon list that was posted, and I wanted to make sure I got the wiring correct.

From the pictures it looks like:

120v IN to PID terminals 1 (white -) and 2 (black +)
PID Terminal 3 (red +) 4 (black -) to INPUT of 24v transformer.  OUT from 24v transformer to Gas Valve control.

Thermocouple blue to 7 / red to 8

In another post, it was mentioned to "wire up the 24vAC to pin 3 on the PID, and wire pin 4 to the controller", but I'm not sure what that means.  

Thanks!
 
Hey cnelvis, 

I'm at work now, but when I get home, I'll take and add some pictures showing how everything is wired. 

Stay tuned!
 
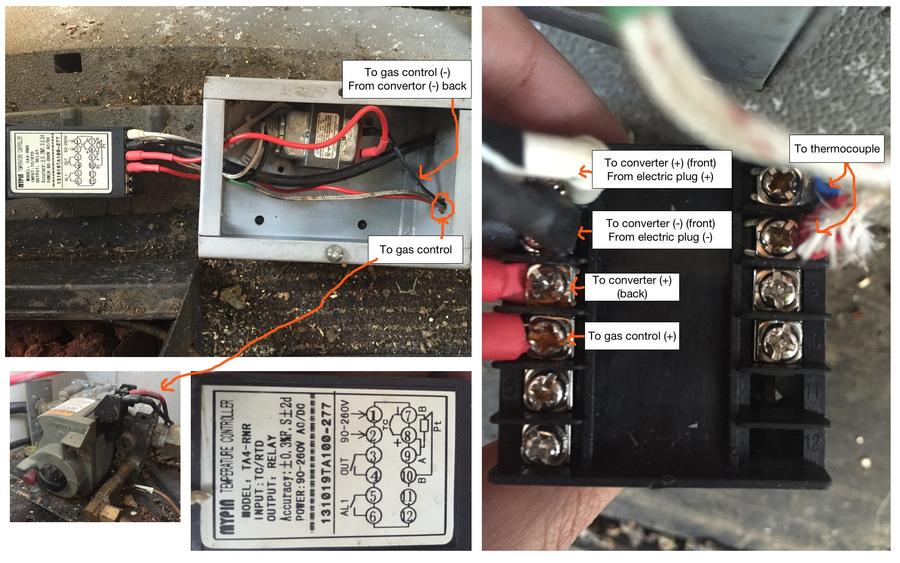
I get it!  120v positive (+) from electrical cord goes to terminal 1 on the PID controller and 120v negative (-) to terminal 2 on the PID.

Then another wire goes from terminal 1/2 to power the input of the 120v to 24v transformer.  You are powering both the PID Controller and the 24v transformer with the same terminals!  Got it! :)

Then from the 24v output of transformer (+) into terminal 3 on the PID.

Terminal 4 PID output goes to the (+) input on the gas control valve.

Then the 24v (-) from transformer bypasses the PID and gets wired directly to gas control valve.

Thanks for the clarification and the photos!  Can't wait to finish this up!
 
Finally finished this!  The short test worked great.  Looking to do a longer test soon.  Will post pictures.  Thanks mw-smoke!
 
SmokingMeatForums.com is reader supported and as an Amazon Associate, we may earn commissions from qualifying purchases.

Latest posts

Hot Threads

Clicky