New 1951 GE Fridge build looking for advice

  • Some of the links on this forum allow SMF, at no cost to you, to earn a small commission when you click through and make a purchase. Let me know if you have any questions about this.
SmokingMeatForums.com is reader supported and as an Amazon Associate, we may earn commissions from qualifying purchases.

cb24

Newbie
Original poster
Sep 4, 2012
8
10
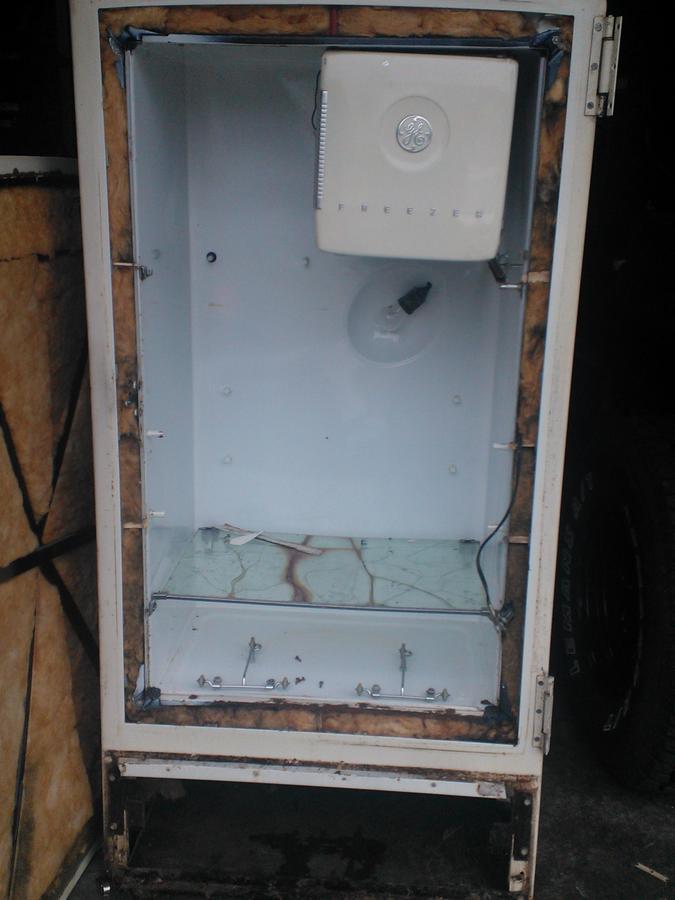
I have recently forund and begun building a 1951 GE fridge into my smoker. Overall its not in bad shape, a little rust and in need of some cleaning up but not bad. I have read a ton on the boards and have the basics of the design figured out. With that said I do need a couple of questions answered, and also some advice.

The advice I'm looking for is mainly to go propane or electric. I can find pros and cons with each. I want to be able to use it outside in all temperatures and conditions without having to worry as well as being able to go low temps for cold smoking. Gas would suffice for all conditions but maybe not so much for the low heat. I was thinking of going with something like the c-burner from gassmoker.com as a drop in as I have space below the box. I also have an Old Smokey I am decommissioning so my second thought was to maybe make a plate for the element out of that and pre-wire the box so I can just slide the old smokey in when I need it and be able to get the low temps. 

I'm looking for suggestions from those who have done it and why. Frankly some of the stories about lack of airflow and propane scare me. i don't want to blow myself up, but I figure if I do a couple of intake vents along with the holes drilled into the drop-in it should be enough intake air correct? Or should I just bite the bullet go electric and install a hood in my garage so i don't have to put the thing outside when I am smoking. I can't build a hut for it right now, and I have no where that I could run 220v outside. What do you guys think?

My questions are more about safety

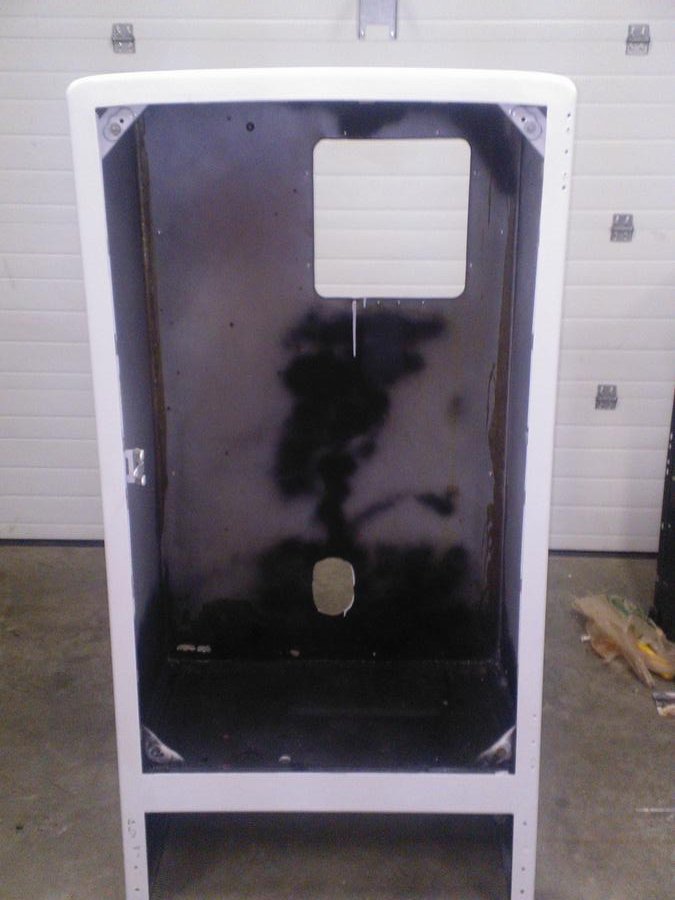
1.) these things are porcelain coated steel correct? There is no lead or anything unsafe about the paint int he box etc?

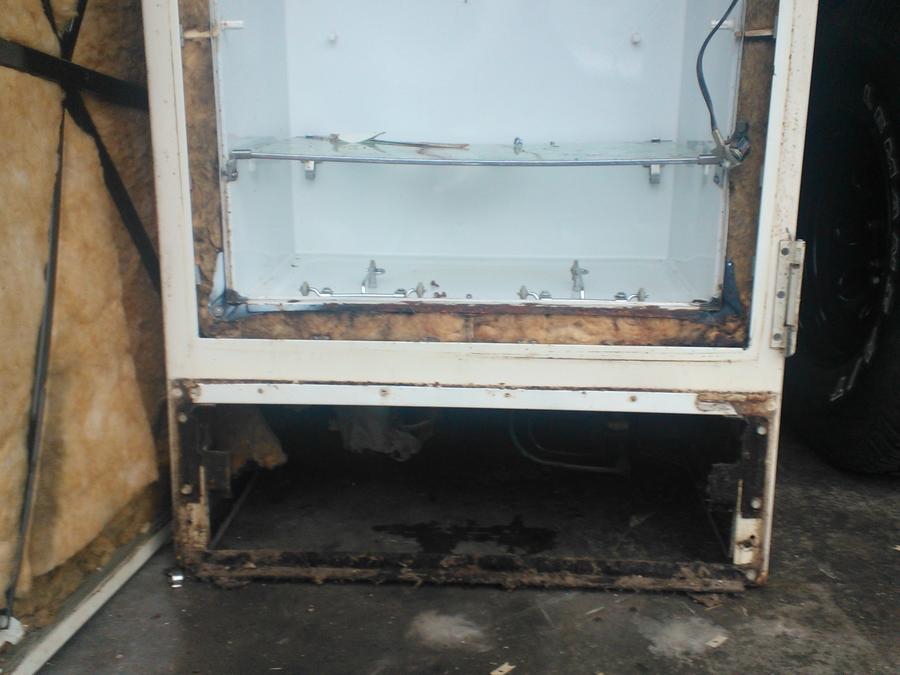
2.) Should I replace the insulation? It's a little wet and dirty in a couple of spots, but overall not too bad.

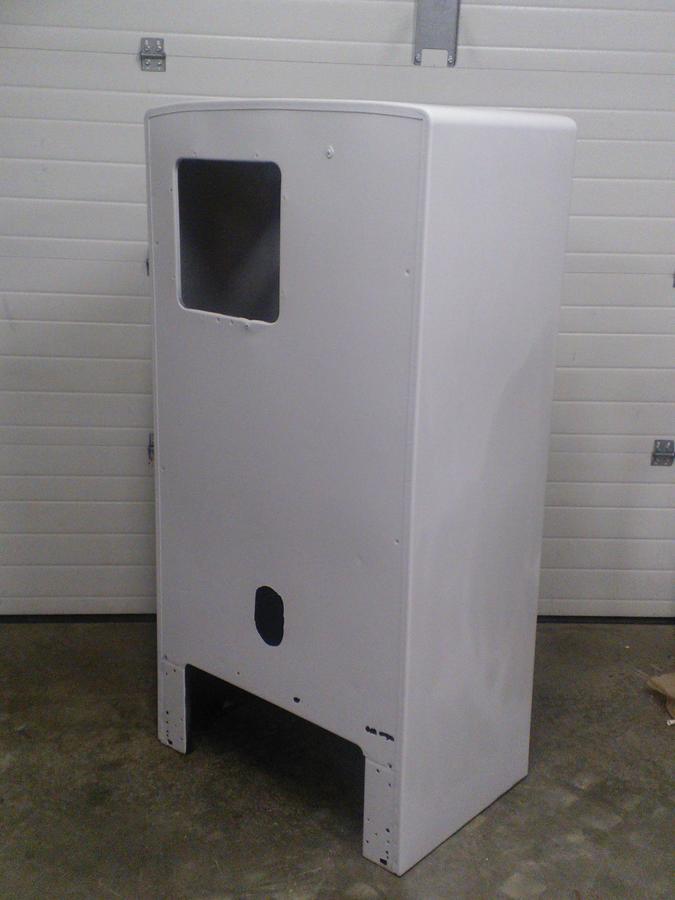
3.) Is the exterior paint lead? How safe is it to sand and paint?

I appreciate any help.

Chris

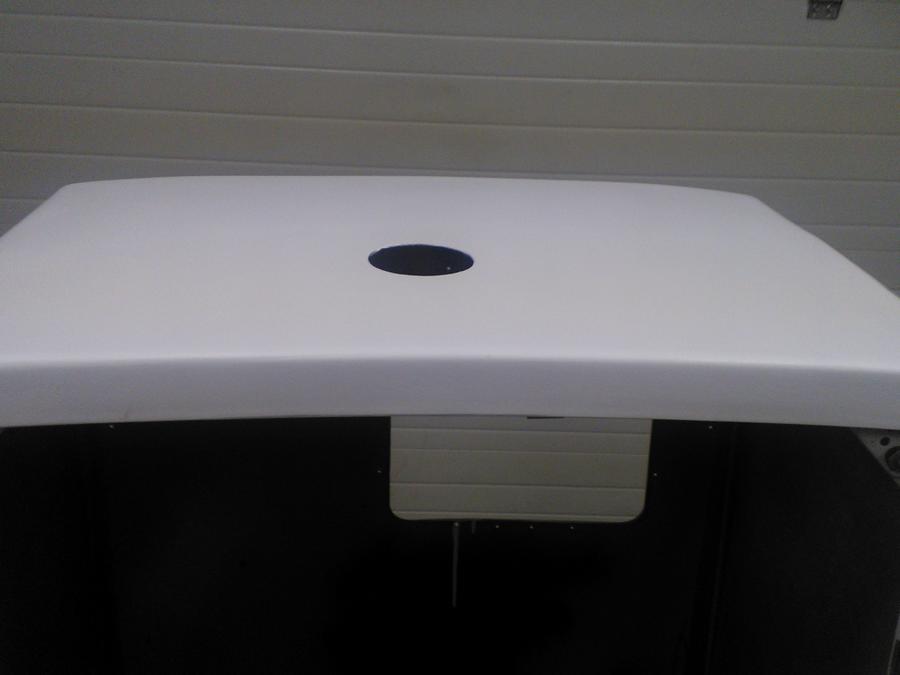
Here is the basic fridge door is removed on the left. Sorry for the crappy pics they are phone camera pics.


Chris,

you got a nice looking fridge there. Its gona be a great smoker. I just finished my fridge build about a month ago so I will help you the best I can.

.) these things are porcelain coated steel correct? There is no lead or anything unsafe about the paint int he box etc?

If you are referring to the coating on the inside on the fiberglass shell you will be fine. You will see a lot of fridges on here that have kept the shell in tact and some that have replaced it with steel. I replaced mine with steel to help with temp recovery and to have a bigger cooking chamber. note that with steel it will take a little longer to heat up.

Should I replace the insulation? It's a little wet and dirty in a couple of spots, but overall not too bad.

Personally I would replace it. There is a lot better products out now that will help you. I used regular fiberglass insulation and if I had to do all over again I would have ordered some Roxul Wool from Lowes or Home Depot. It will run you about $50 but it will be worth it in the end I promise.

Is the exterior paint lead? How safe is it to sand and paint?

I honestly dont know about this one. I sanded mine down and painted a few spots and im still doing ok. I dont think it will be an issue.

I went with electric for one reason. The ease of controlling the temps. I wanted to make something that I can plug in dial in the temp and let it sit while I go about my day. With electric it will be hard to get a good smoke ring but It really doesnt matter it will still make some awesome Q. One thing I did with mine after I made some mods is I lined the bottom with bricks with a small gap in the middle where I can put the power cord from my element thru. I just rest my element on top of the bricks instead of fastening it to the smoker. Doing this allows for great heat recovery with the brick and also allows me to easy remove the element for cleaning and I can add some charcoal in there if I wanted instead of using electric. The first time I ran mine I did not have a vent in the bottom. BIG MISTAKE ON MY PART. Stale smoke and piss poor food. I went to lowes and got an adjustable air vent for a house (4" X 4") and coated it with High Heat paint. I installed it directly in the back just above element level. With this I can keep the vent closed during warm up and I can have it open fully during smoking. I would be glad to help you with anything else. You wait long enough there will be some other help coming along. Here is the post for my fridge:

http://www.smokingmeatforums.com/t/125788/first-run-on-new-fridge-need-help-with-heat
 
Golfpro-

I had read your build earlier. Honestly the temp issues you were having definitely made me question the electric element. If I use electric I really would like to stay 110v rather than 220 for convenience, I don't want to have to run 220V on my deck or porch. I would also like the PID o be completely weatherproof. I haven't figured that part out yet. One thing I did notice about your build is you used an old smokey replacement element. I have an old smokey I was going to cannibalize to do my build, but when I checked the specs it said 1250W not 1500W.  You might be 250W less than you think. 

Gas would be a ton cheaper up-front and easier initially, but I haven't figured out how to control temps. The smoke ring thing doesn't bother me, neither does using an electric smoker. I have been using an Old Smokey for 3 years. I figured out how to get decent product out of something that really is more of a steamer than a smoker. Its amazing what some well placed vent holes can overcome! I really am getting into making sausages and doing some basic curing so I'm at a point where I need more space and temp control. I haven't been able to find a propane or electric smoker that seems worth the money or has all the features I want. With a little work I can probably have this thing built for less than a MES 30 or Bradley and have a pretty versatile unit, that frankly will look pretty nice hopefully. Just the grade of the steel and insulation alone is a plus.

Where did you get your expanded metal grates. That stuff is pricey around here, but I really want to use those for my shelves?

Thanks for the help.

Chris
 
The temp issues I had are pretty much gone. Because I have so much space and so little insulation (stupid on my part I made the biggest cooking chamber I could instead of meeting in the middle as far as space and decent amout of insulation) on the inside. If I wait till all the steel ad bricks heats up I can consistently run it at 260*. That is plenty for me. I usually only cook around 230-240. Brinkman makes a 1500 Watt converter. That is the one I used. and it is ran off of 110V. Now to get to the other things you are thinking about. Yes gas would be cheaper intially but like you said it is hard to control temps. My first smoker was a master forge propane which I converted to electric almost immediately because I kept having to adjust the burner knob. As far as a Weatherproof PID. That shouldnt be a problem. Make sure you silicone all around the edges when you bolt your box to your fridge and any other cracks you can see. Spiders will tend to find any crack and start building some webs on the inside of your box not to mention water getting in there. Use clear covers that are used for outdoor outlets on your exposed input/output and PID controller. When I was building mine I saw a guys fridge that had a clear cover that covered the front of his entire box. I dont know if he did that for weather proofing or just for the look. Ill try and find it on here and copy the link for you. My fridge stays outside all the time. Because of this I didnt go with a PID and instead an electric controller. I use this one and I highly recommend it.

http://www.auberins.com/index.php?m...id=203&zenid=d150ded17e410a62208acef4d5a1509a

The brinkman 1500 watt element is pretty cheap. There have been many guys on here that have used them with great success. that success depends on your insulation and cubic feet of cooking space. I remember a guy on here using the brinkman element with a cooking chamber size similar to yours. I dont remember what insualtion he used but he said he could reach 300* no problem. I would use the fiberglass shell that you have or replace it with steel the same size. Spend the money on Roxul Wool. You will maintain a lot more heat.

A member at my golf course happend to own a windows and doors company. He has some spare steel tubing and grate material laying around that he gave to me. Look on craigslist under the barter section. I see guys looking to trade welding for all sorts of things you might have something laying around you dont need that they do. Hope this helps
 
Your fridge looks almost identical to mine and the interior of mine was all porcelain coated steel. I've been using if for 1.5 yrs and no illnesses yet, LOL!

I went with scavenged parts from an oven, works awesome. There is way more heat there than I need but the controller does a good job at holding temperature. Initial burn out was over 400 degrees. Now I understand that you don't have 220 so you have to figure out a different heat source but I would think the Brinkman 1500W element would be a good start! But you have to be able to control it! Mine isn't weather proof and its the one thing I don't like about it. But as for cold weather, last winter I sparked her up at 5am it was -14 and had no problems with keeping temperature, actually works better in the ice cold!

I didn't get too excited about the exterior paint, light sanding (w/mask), then hit it with a couple coats of high gloss black. Don't worry about high temp paint, don't need it, as long as you get the door sealed up well and don't paint into the door opening too far.

As for insulation, the bottom insulation in mine was pretty crappy so I took it out and didn't even replace it (since its in the bottom and heat rises). All the other insulation was in good shape so I left it.

My smoker is the talk of my town (just to justify, my town is only 400ppl). See my thread for some of the things I found out the hard way.

Old thread: http://www.smokingmeatforums.com/t/105764/heres-my-fridge-build-mid-build

FlyBoy built one out of a very similar fridge too: http://www.smokingmeatforums.com/t/...ion-electric-heat-and-pid-temperature-control

It's been a while since I've been on the old SMF but I'll try to check back more often so I can help you along.

I don't know about a fiberglass shell that GolfPro mentioned, I wouldn't use anything fiberglass. The internal door is some fiber wood or plastic crap, gotta get rid of that! Also I found out the hard way that the screws on the bottom have plastic washers on them, be sure to remove those.

More pics of your fridge would be beneficial but I'm pretty confident its the same, or close.
 
I am about midway through the build now. Box is all sanded and primes holes for exhaust and vent are cutout. PID is on order from Auberins along with all the other parts. I am going to paint and then insulate with Roxul this weekend. My cell phone is taking crappy pics in the low light of my garage o I will post some when it is sunny. I have decided to go 220V with it and put it on wheels soI can store it in my garage whereI have a 220 plugs and use a length of 10/4 wire I have from an old generator hookup which will allow me t roll it out until I figure out some venting. DOes anyone have any part #'s for 220V elements or pics of how they wired them ie:direct wire or some form of terminal block etc. I have been searching for closeups or part #'s but have come up empty.
 
Chris... let me ask you this.. Is your breaker panel for the house in the garage ?.. on an outside wall ?.. If this is the case you could run a wire from the panel (in conduit of coarse and with it's own breaker)) down the wall and drill a hole to the outside and mount a 220v receptacle that has a weather cover on it... then you just put a plug on your smoker and when you wheel it out just plug it in... as far as a hood in the garage that would not be for me as it will not get all the smoke out...
 
Mine is on wheels and goes in and out the garage just like you speak of. Its a hassle but I make it work. Unless you garage is not attached and you don't care about it smelling like smoke I would avoid the hood/venting idea. The amount of suction the hood would need would be pretty significant.

Sorry don't have part numbers for my element, check oven broiler elements (main bake element is way to big) that's what mine is and its a perfect fit! I think you might find those to be fairly reasonable, or if you can find someone wanting to junk an oven that could work too. I used the control board from the oven to control my temps so I can't help you with the wiring of it either. Not that I have any expertise that I would offer anyway!

I'm eager to see some pics, I want to see how its coming along!!
 
Here are some pics of the progress. All rust is sanded down. I treated rusty areas with rust converter and sprayed with Rustoleum stops rust wherever there was rust. That's why the inside looks like it has graffiti - I was running out of paint. Vent and chimney holes are cut, and it's primed up and ready for paint. I did make a mathematical error when cutting the rear vent hole and the hole was  2" low. It was late apparently my brain wasn't functioning. I needed a piece of sheet metal back there for a rust patch anyhow so I guess that piece will just be a bit taller 
biggrin.gif


I decided to go ahead and use the 240V in my garage and just roll it outside when needed. I ended up just getting a Rangetop element that is 2600w @ 240. Overkill but cheap and available. Apparently its an element made for a whirlpool that was used in just about every model so it was 11 bucks on Amazon. I cut an 8 1/4" hole in the bottom for the drip bowl, it fits like a glove and will be cheap and easy to replace when needed. Hell for 11 buck I may just keep a few spares on hand.

I bought 2 lengths of 1-1/2" 1/8 angle iron for the shelving brackets. Should I paint them or should I just oil them and season like a cast iron pan? Not sure if the high temp paint would be safe when it heats up- fumes and such -I know it won't melt. Tomorrows project is to insulate with new Roxul and finish the inside with shelving brackets and hit it with some paintl. I still have no idea what I am going to use for the shelves. Expanded metal is a little too rich for this budget right now, but I have a feeling I may go that route. I can't find anything better. Its like $100 a sheet uncut though, plus the cost to get it cut.

I have all the parts for the PID which I am going to mount where the compressor went facing out to the rear so it will be sheltered from the rain at least a little. It is going to be on wheels so I will have access to the back of it anyhow. 

Josh what did you do to make yours roll? Did you bolt wheels directly to the feet  or did you build a platform?

That's my update for now. Hope to have more with pics after this weekend.

Chris

Link to the element


Pics:


It's really starting to come along!!

For my wheels I used some casters I had laying around. And took 2 2x4s, cut them so they would just slip up under the fridge compartment but they actually sit on top of where the old legs used to sit. I'm not sure if that makes sense or not. I cut out the old legs (to rusty to remove) then used those holes to bolt my 2x4s on top. This help lower the center of gravity a bit. I will say with the door open she's a little wobbly with out that old heavy compressor. Some day I'll get around to mounting the front wheels I little higher than the back so it's actually off level. That will push enough of the weight to  the back and make it so the door doesn't want to tip it over.

One thing I might add, I've got the interior of my fridge sealed up pretty good and I still had some condensation issues with moisture from the chamber getting between the walls. For this reason you might consider putting the PID controls in its own box. I would hate to see them get shorted out by condensation.

You should be able to throw plenty of heat with that element. When you don't want to use the oven in the house (like during the summer months) now you can use the smoker!

Finally one thing on the wiring (keep in mind I don't know how savvy you are with electrical) you will need to run a neutral to run the PID. I would imagine those components run on 120v.

If you want pics of my wheels setup let me know I can take a few, heck might motivate me to fix them while I'm at it.
 
As far as the wheels go my bottom and legs are in real good shape so I think I am going to get some threaded casters and just screw them into the plate on the bottom. It appears those have a 3/8-16 thread which makes threaded casters relatively easy.

How heavy was the moisture between the panels? Heavy enough to require drainage in the drip pan? The PID is going in a case anyhow and it is splashproof ish. I am going to mount it up undereath the rear side of the unit under the drip pan so I assume it should be protected from the moisture.

I got the case from Auber's. I figured I was already spending $100+ what's another $28. It has the hole cutout, vents etc. I just have to drill a couple of fuse holes.

http://www.auberins.com/index.php?main_page=product_info&cPath=7_34&products_id=143

When it comes to electrical stuff I am OK. I am no genius, but I was an electrician's apprentice many moons ago before I became an IT geek. The PID seems to handle 240V or so it seems from the manual/ Wiring diagram so I shouldn't need a neutral. I am also switching and fusing it for some level of safety as well as grounding the case and the fridge itself.


 I stopped by a steel shop and had them cut 5 shelves of 3/4" #9 flatted expanded steel for $26 + $5 per cut so $50 total. I can live with that. I am going to season them the same way I did the angle iron. I wire brushed them then put them in my grill to urn the crap off. Then coated with grease and baked  repeated a few times until I had a nice carbon layer. That should slow the rust down. A friend hada sheet of stainless I'm using for the inside of the door and the compressor hole. Free on that one which is always good. Pant is all done and I am hoping to give it a test burn by Tuesday or so, but I have to work all weekend.

Oh and just in case anyone is wondering I did a lead paint test. Tested once before I sanded and once when I scuffed it a little in case someone top coated over it.  It passed both so I guess they didn't use lead on these - mine at least.

I'll take some pics from my good camera this weekend. The cell phone makes the paint look horrible.
 
Hi -

I know you posted this in September but, I have a question for you. I am restoring a 1951 GE slightly different model than yours. I don't suppose you saved the class crisper cover? Also was there a thermometer attached to the freezer door. On the off chance you did save those pieces, I might be interested in taking them off your hands. Can you please email me and let me know?

Tara Irmo, SC.
 
SmokingMeatForums.com is reader supported and as an Amazon Associate, we may earn commissions from qualifying purchases.
Clicky