
Hello all. New to smokingmeatforums. Glad to find your site and to become a member. Looks like lots of great information and meat smoking intel!
I've been modifying my too-small Oklahoma Joe offset in stages for the last few months to allow gas burner assist to the firebox.
My reason for making the modifications was primarily due to the difficulty in fire management that results from it's small size. I learned fire management and was able to maintain a good clean fire but, as with most undersized offsets, temperature stability problems and labor needed to keep the fire clean was more than I was willing to commit to.
My goal was to mimic results found with Southern Pride and Ole Hickory gassers which I've found to be able to produce very good results when sampling meats from BBQ establishments who operate them correctly.
First off, I'll give a short explanation of how the commercial gassers operate. A gas fired power burner shoots a flame into a split or multiple splits within an insulated firebox and the heat and smoke travels up through openings and eventually into the cooking area. The burner is cycled on and off via a cooking chamber oven type thermostat maintaining around a 10 degree swing around setpoint. Typical on and off times assuming normal conditions and how much meat is being cooked is somewhere around 45 seconds on and 5 minutes off. When the burner is on, the unwanted smoke volatiles are burnt up, during the 5 mintues off, there's typically some small flames from the split which continue to burn off volatiles. With proper wood moisture content, smoke quality is very good with no smoldering gray smoke. The problem in trying to utilize this concept in an uninsulated small offset is many fold. Once the cooking chamber would hit the temperature setpoint and the burner cycled off, the chamber temperature would fall quickly and require the burner to cycle every 30 seconds or so to keep the cooking chamber anywhere near setpoint and would only be on for a few seconds. With this many cycles per hour, the burner components would be failing prematurely. This short of a burner run time would also never allow getting the split up to proper burn temperatures.
The solution was to eliminate using a thermostat for controlling the burner and instead, cycle the burner using an asymmetrical cycling electronic timer that cycles endlessly with settable on and off times to be able to mimic the 45 seconds on and 5 minutes off of the commercial gassers. The obvious problem this presents is the cooking chamber temperature will now swing too high during the 45 seconds on and drop too low during the 5 minutes off. To prevent this, I had to come up with a way to thermostatically control a damper in between the firebox and cooking chamber. For this task, I utilized a bimetal coil type heat control which is used in controlling the firing rate in wood burning stoves https://www.tractorsupply.com/tsc/product/us-stove-67743-thermostat-assembly-1115479 by actuating a damper at the air entry point of the stove. I attached this via a wire rod linkage to a home made damper. These bimetal thermostats luckily are sensing around the same temperatures we want our cooking chamber to run at (200-250F). After playing around with where to attach the linkage on the bimetal stat to allow enough damper travel to fully open/shut, the bimetal stat works flawlessly and can hold cooking chamber temps to within 10 degrees + or -.
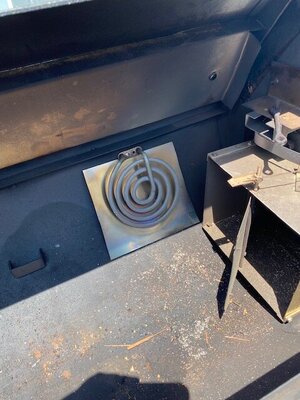
The next problem to solve was keeping the cooking chamber from falling too low in temperature during the 5 minutes off, assuming there isn't enough heat from the embers and flame still coming off of the split/splits to keep the chamber temp up to setpoint. To solve this, I took a 1000 watt hotplate heating element and installed near where the heat enters the cooking chamber and control it with a cheap bimetal oven thermostat that's capable of controlling in the 200-250 F range. I simply set this at 200 degrees and it assures the cooking chamber never drops below an acceptable temperature.
The next modification needed was to give burner combustion gasses an additional path out of the firebox instead of only traveling through the cooking chamber which also reduces the level of temperature swing in the cooking chamber. I added one 3 1/2" diameter smoke stack on the side of the firebox to accomplish this. I've now tested the smoker on two occasions and the only issue so far is the tendency for the cooking chamber to climb up to around 250-275 during the 45 seconds on cycle if a large portion of the split is burning but fairly quickly drops back into the 200-210 range when the burner shuts off. If I reduce the gaps around the damper, this will probably not be an issue. During a brisket session this week, with these temperatures, I hit 170 meat temperature at 8 1/2 hours which was a little fast.
Note: Before I added the gas burner and electric heating element , I had added the additional stack to the firebox and installed the bimetal coil controlled damper which allowed me to utilize much larger size pieces of wood and was able to add wood sooner without the fear of the cooking chamber temp rising to an unacceptable level. As you'll see in the photos, I added a convection recirc fan into a sheetmetal plenum that recirculates the cooking chamber air and passes it over the bimetal damper control to ensure it senses real cooking temperatures and not the high heat temp coming
through the damper.

.
.jpg")
.
Videos of burner on bench and installed
Burner test on firebox
burner bench test
I've been modifying my too-small Oklahoma Joe offset in stages for the last few months to allow gas burner assist to the firebox.
My reason for making the modifications was primarily due to the difficulty in fire management that results from it's small size. I learned fire management and was able to maintain a good clean fire but, as with most undersized offsets, temperature stability problems and labor needed to keep the fire clean was more than I was willing to commit to.
My goal was to mimic results found with Southern Pride and Ole Hickory gassers which I've found to be able to produce very good results when sampling meats from BBQ establishments who operate them correctly.
First off, I'll give a short explanation of how the commercial gassers operate. A gas fired power burner shoots a flame into a split or multiple splits within an insulated firebox and the heat and smoke travels up through openings and eventually into the cooking area. The burner is cycled on and off via a cooking chamber oven type thermostat maintaining around a 10 degree swing around setpoint. Typical on and off times assuming normal conditions and how much meat is being cooked is somewhere around 45 seconds on and 5 minutes off. When the burner is on, the unwanted smoke volatiles are burnt up, during the 5 mintues off, there's typically some small flames from the split which continue to burn off volatiles. With proper wood moisture content, smoke quality is very good with no smoldering gray smoke. The problem in trying to utilize this concept in an uninsulated small offset is many fold. Once the cooking chamber would hit the temperature setpoint and the burner cycled off, the chamber temperature would fall quickly and require the burner to cycle every 30 seconds or so to keep the cooking chamber anywhere near setpoint and would only be on for a few seconds. With this many cycles per hour, the burner components would be failing prematurely. This short of a burner run time would also never allow getting the split up to proper burn temperatures.
The solution was to eliminate using a thermostat for controlling the burner and instead, cycle the burner using an asymmetrical cycling electronic timer that cycles endlessly with settable on and off times to be able to mimic the 45 seconds on and 5 minutes off of the commercial gassers. The obvious problem this presents is the cooking chamber temperature will now swing too high during the 45 seconds on and drop too low during the 5 minutes off. To prevent this, I had to come up with a way to thermostatically control a damper in between the firebox and cooking chamber. For this task, I utilized a bimetal coil type heat control which is used in controlling the firing rate in wood burning stoves https://www.tractorsupply.com/tsc/product/us-stove-67743-thermostat-assembly-1115479 by actuating a damper at the air entry point of the stove. I attached this via a wire rod linkage to a home made damper. These bimetal thermostats luckily are sensing around the same temperatures we want our cooking chamber to run at (200-250F). After playing around with where to attach the linkage on the bimetal stat to allow enough damper travel to fully open/shut, the bimetal stat works flawlessly and can hold cooking chamber temps to within 10 degrees + or -.
The next problem to solve was keeping the cooking chamber from falling too low in temperature during the 5 minutes off, assuming there isn't enough heat from the embers and flame still coming off of the split/splits to keep the chamber temp up to setpoint. To solve this, I took a 1000 watt hotplate heating element and installed near where the heat enters the cooking chamber and control it with a cheap bimetal oven thermostat that's capable of controlling in the 200-250 F range. I simply set this at 200 degrees and it assures the cooking chamber never drops below an acceptable temperature.
The next modification needed was to give burner combustion gasses an additional path out of the firebox instead of only traveling through the cooking chamber which also reduces the level of temperature swing in the cooking chamber. I added one 3 1/2" diameter smoke stack on the side of the firebox to accomplish this. I've now tested the smoker on two occasions and the only issue so far is the tendency for the cooking chamber to climb up to around 250-275 during the 45 seconds on cycle if a large portion of the split is burning but fairly quickly drops back into the 200-210 range when the burner shuts off. If I reduce the gaps around the damper, this will probably not be an issue. During a brisket session this week, with these temperatures, I hit 170 meat temperature at 8 1/2 hours which was a little fast.
Note: Before I added the gas burner and electric heating element , I had added the additional stack to the firebox and installed the bimetal coil controlled damper which allowed me to utilize much larger size pieces of wood and was able to add wood sooner without the fear of the cooking chamber temp rising to an unacceptable level. As you'll see in the photos, I added a convection recirc fan into a sheetmetal plenum that recirculates the cooking chamber air and passes it over the bimetal damper control to ensure it senses real cooking temperatures and not the high heat temp coming
through the damper.
.
.
Videos of burner on bench and installed
Burner test on firebox
burner bench test
Attachments
Last edited:

