
- Jan 6, 2011
- 26,255
- 4,705
So far all the material with the exception of some flat bar and round rod
was in my son's scrap pile'
We started with a 18" dia. x 42" long piece of pipe
Cut out fire box, welded angle to sides for wood rack, squared it up, tacked it together
and welded it out
Everything leveled and squared up, Tacking it together
Should have done this before welding Fire Box together, Rotated everything 180º to
weld on bolts for FB deflector plate. Using 1/2 " bolts
Deflector Plate, Using a uni-bit to drill 1" holes "Plenty of room for contraction, and
expansion.
Another picture of bolts welded out
Framing up for the Fire Box Door
These are not bad blades, we were cutting thicker than recommended.
Fire box door finished (well almost), checking the fit
Cutting out the bottom damper. Drilled the top one
Here they are, door done, Used the same bullet hinges for the fire box and the CC
door.
We marked out the door, and ready to be cut
Making the top cut and half way down each side
Then we measure and cut a piece of flat bar, tack it on and position and weld on
the hinges. ( we installed 2 to make sure everything was like it was supposed to be)
then we installed the third one.
We tacked a piece of scrap inside at the bottom of the door cut to catch door
on the final cut.
Door cut out, a really a good fit. Won't be much tweaking
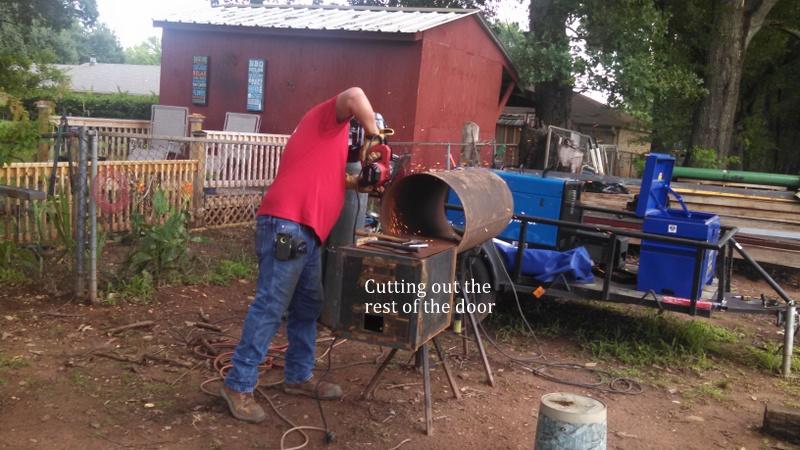
Trimming out the rest of the door
We never weld in our RF plate, We weld in flat bar ant a 1/2 " drop from FB end to the
opposite end. The first 5" of plate is welded in solid, The RF plate sits on the flat bar
Here is the deflector plate installed Ran the bolts up but left a little play
Starting on the stack, Went with square tubing because he had about 3 - 20' sticks
in the scrap pile.
OK here you can see what the RF plate looks like. We welded a piece of flat bar to the
welded in piece of RF plate so the main plat slips right under and buts up it.
Take a little time and grind a little bevel down the edges of the RF plate and
you will have a perfect fit.
Door stops tacked on
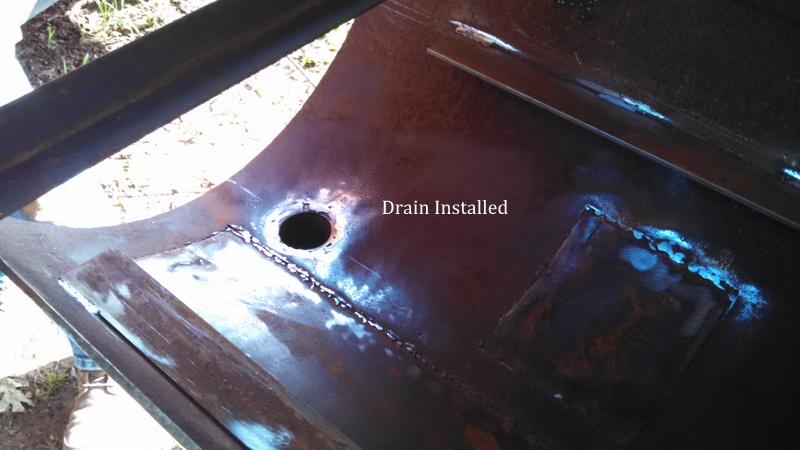
Drain installed in bottom of Cook Chamber, ground smooth.
Installing the guides for the pull out racks
One end all closed up. a little grinding later on
Like I said everything out of the scrap pile, closing up the other end.
Needs to be cleaned up, welded out and ground smooth
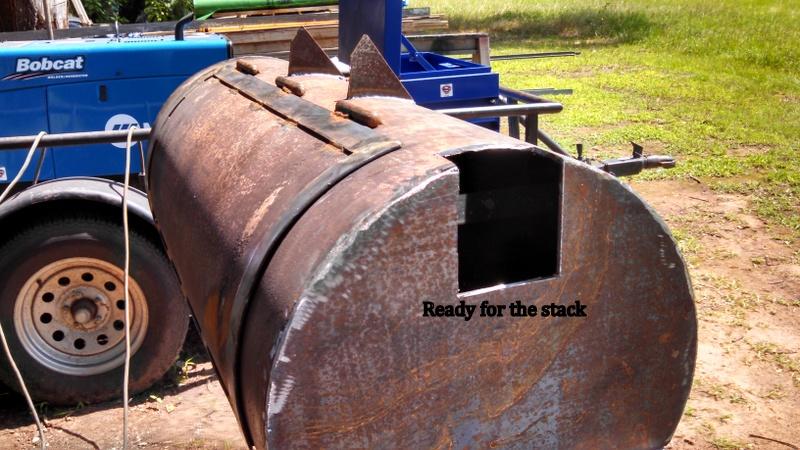
Got the hole cut for the stack
Squared, leveled and tacking it on
Needed a handle for the door and the fire box too
Damper done
Frames for the racks
Drilled hole for gauge, and installed hood over gauge
Wood/Charcoal rack for the Fire Box
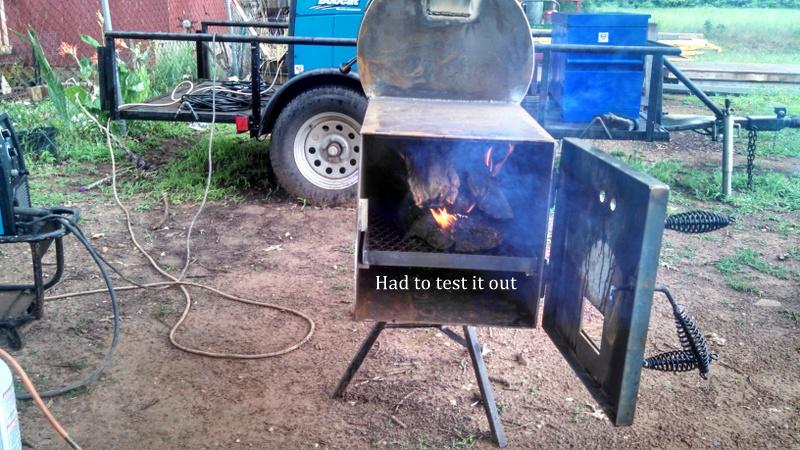
Decided to do a test run yesterday, to see what tweaking it needs.
A little Cook Chamber Door and Fire Box Latch Adjustment, That was it
Took her up to a little over 400º and let her go for a while, started backing her down to
about 250º sprayed the entire inside of the CC with cooking oil, added more wood got
it back to almost 400 º then started playing with the dampers to see how they were
controlling heat, Working Great ! Kept spraying cooking oil and bringing the temp up
and down. about 3 - 3.5 hours, Then My son decided to cook some of my
Buck Board Bacon (After I left)
Here is a shot of the Fire Box and Pecan
He needs to look in his buddies scrap pile to find some material for the legs
Still have to build work table, wood rack and install the ball valve for the drain.
Some sanding ,grinding, clean up and paint. That's about all.
was in my son's scrap pile'
We started with a 18" dia. x 42" long piece of pipe

Cut out fire box, welded angle to sides for wood rack, squared it up, tacked it together
and welded it out

Everything leveled and squared up, Tacking it together

Should have done this before welding Fire Box together, Rotated everything 180º to
weld on bolts for FB deflector plate. Using 1/2 " bolts

Deflector Plate, Using a uni-bit to drill 1" holes "Plenty of room for contraction, and
expansion.

Another picture of bolts welded out

Framing up for the Fire Box Door

These are not bad blades, we were cutting thicker than recommended.

Fire box door finished (well almost), checking the fit

Cutting out the bottom damper. Drilled the top one

Here they are, door done, Used the same bullet hinges for the fire box and the CC
door.

We marked out the door, and ready to be cut

Making the top cut and half way down each side

Then we measure and cut a piece of flat bar, tack it on and position and weld on
the hinges. ( we installed 2 to make sure everything was like it was supposed to be)
then we installed the third one.

We tacked a piece of scrap inside at the bottom of the door cut to catch door
on the final cut.
Door cut out, a really a good fit. Won't be much tweaking

Trimming out the rest of the door

We never weld in our RF plate, We weld in flat bar ant a 1/2 " drop from FB end to the
opposite end. The first 5" of plate is welded in solid, The RF plate sits on the flat bar

Here is the deflector plate installed Ran the bolts up but left a little play

Starting on the stack, Went with square tubing because he had about 3 - 20' sticks
in the scrap pile.


OK here you can see what the RF plate looks like. We welded a piece of flat bar to the
welded in piece of RF plate so the main plat slips right under and buts up it.
Take a little time and grind a little bevel down the edges of the RF plate and
you will have a perfect fit.

Door stops tacked on

Drain installed in bottom of Cook Chamber, ground smooth.
Installing the guides for the pull out racks

One end all closed up. a little grinding later on

Like I said everything out of the scrap pile, closing up the other end.

Needs to be cleaned up, welded out and ground smooth

Got the hole cut for the stack
Squared, leveled and tacking it on

Needed a handle for the door and the fire box too

Damper done

Frames for the racks

Drilled hole for gauge, and installed hood over gauge

Wood/Charcoal rack for the Fire Box

Decided to do a test run yesterday, to see what tweaking it needs.
A little Cook Chamber Door and Fire Box Latch Adjustment, That was it
Took her up to a little over 400º and let her go for a while, started backing her down to
about 250º sprayed the entire inside of the CC with cooking oil, added more wood got
it back to almost 400 º then started playing with the dampers to see how they were
controlling heat, Working Great ! Kept spraying cooking oil and bringing the temp up
and down. about 3 - 3.5 hours, Then My son decided to cook some of my
Buck Board Bacon (After I left)

Here is a shot of the Fire Box and Pecan

He needs to look in his buddies scrap pile to find some material for the legs
Still have to build work table, wood rack and install the ball valve for the drain.
Some sanding ,grinding, clean up and paint. That's about all.
Last edited:


